Learning HubSpot webhooks - from simple action step to sending via code
Webhooks and API calls sure do feel like a mystery. Developer speak. Code. Let’s demystify it and learn some stuff.
This article is aimed at my fellow people who are non-developers and want to orient themsevles in these terms for HubSpot and quickly grasp what needs doing when webhooks come up for discussion.
To follow along, you’ll need Operations Hub Pro or Enterprise. Alternatively, a HubSpot Developer account + a testing account.
In my own perceived order of difficulty, we’ll go through:
- Use integrated apps in a HubSpot workflow
- Send an authorised webhook using API Keys (POST)
- Send an authorised webhook with request signatures in the header (POST)
- Send an authorised webhook - GET
- Trigger a HubSpot workflow on an external incoming webhook
- Authenticating incoming webhooks
- Send webhook via a custom coded action (CCA)
API calls and webhooks
APIs are connections between computer programs. HubSpot talks to Slack and sends data (first name last name submitted a ticket!) to show in a channel as a message. That’s done via an API.
Depending on the direction of how data requested, you can call it an API call or a webhook.
To make an API call means that you make a request to another system to either send or receive data. The other system decides if it will accept or deny the request. Salesforce checks with HubSpot - has any information changed since last time we synced? Can you send that across please? HubSpot confirms and sends updates. It runs on a schedule and checks every 15 minutes.
A webhook initiates sending or asking for data without a prior request. A contact becomes an MQL? HubSpot sends a ping to Slack to post a message. This can be managed via workflows.
Use integrated apps in a HubSpot workflow
The simplest format is to use a pre-built app. These are accessible from workflows, and are already defined webhooks where someone (HubSpot or creator of said app) have managed all the develop-y bits for you.
Let’s give it a go.
- Set up a new workflow.
- Let’s start with contacts and pick some enrollment triggers to test with.
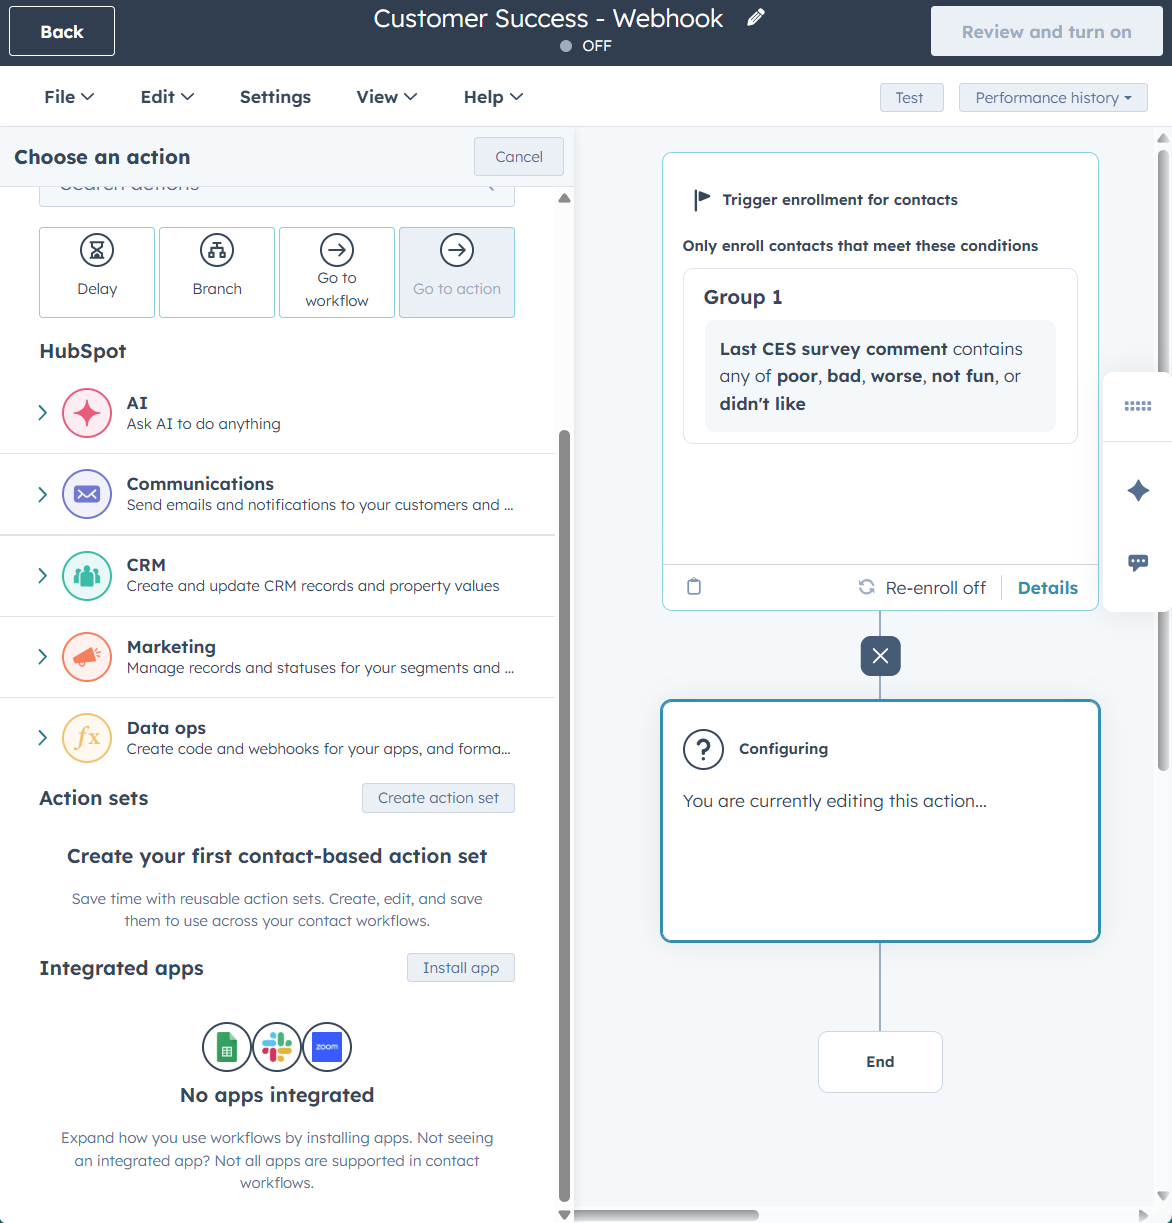
- Choose an action, and scroll to the bottom to see if there are any integrated apps.
- If not, pick install app.
- Slack, Teams or Google Sheets are usually easy to trial.
- Click on your app of choice and pick an action.
- You’ll need to sign in to connect the apps. If you need to be a super admin to connect and aren’t, you can test via a personal Google account to Google Sheets. Just remember to unhook the connection once you’re done!
- Pick your action and follow the walkthrough steps. This may entail choosing a Slack channel to post in, adding a message, adding a contact to a Zoom webinar etc.
- Voilá - done. Send through a test contact to see the magic happen.
Insights: This is built on the same logic we’ll be exploring in later steps. API calls and webhooks. When the workflow triggers and sends something through the set of actions, they’ll be pushed through the action you just set up.
Send a webhook as a workflow action
- Set up a new workflow.
- Let’s start with contacts, set some enrollment criteria.
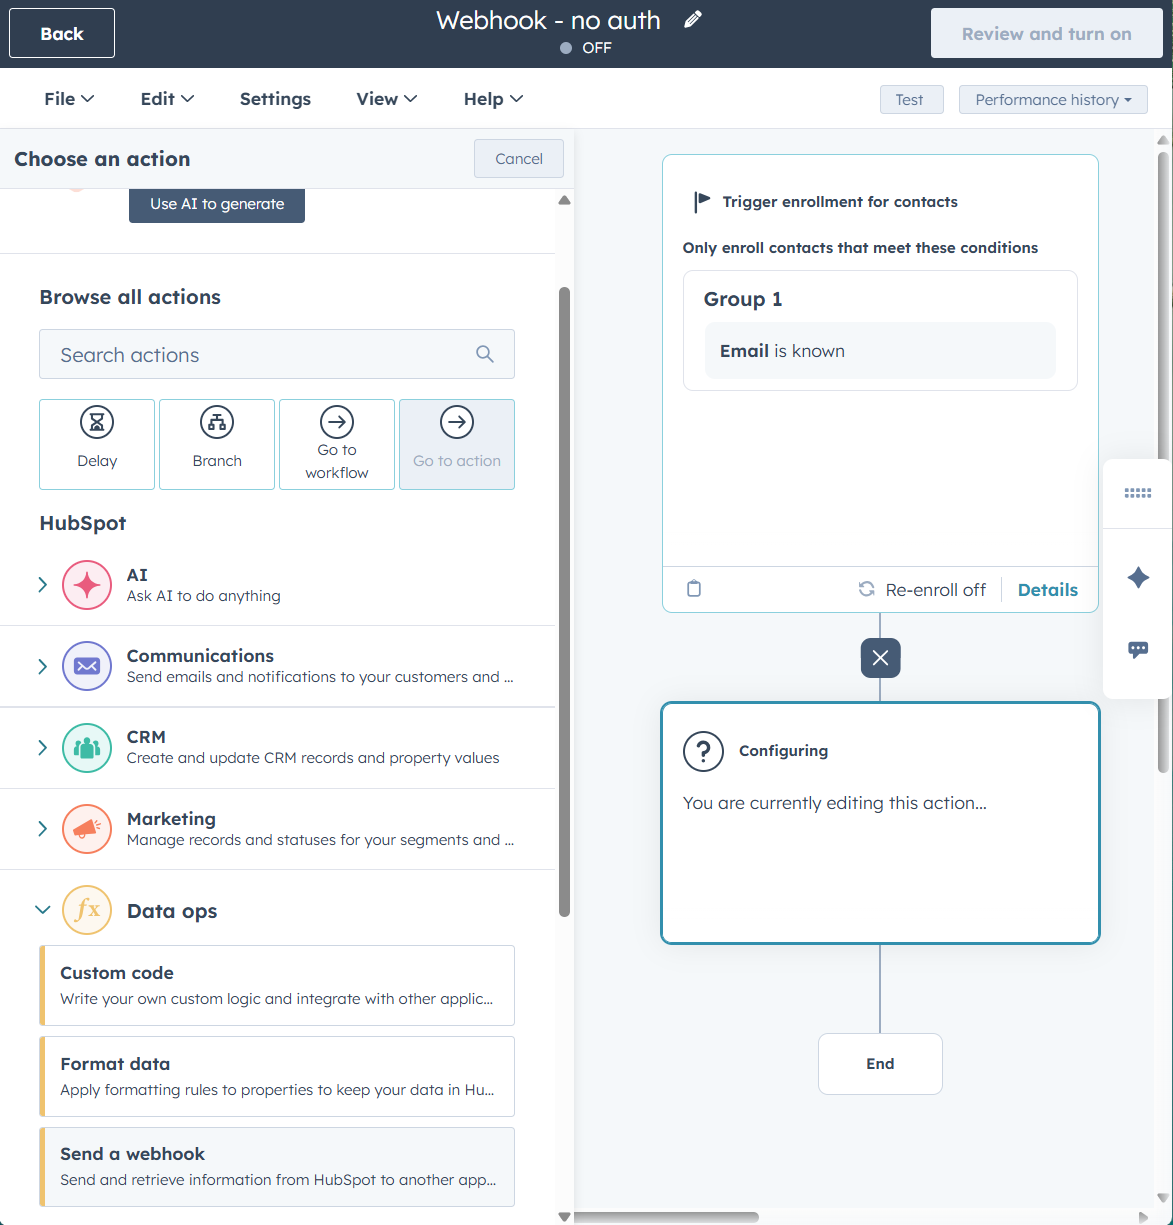
- Add a new action and under data ops pick send a webhook.
- Choose POST as the method to send data in our test.
- Surf over to webhook.site and you’ll get a temporary, free, URL to test sending that webhook to.
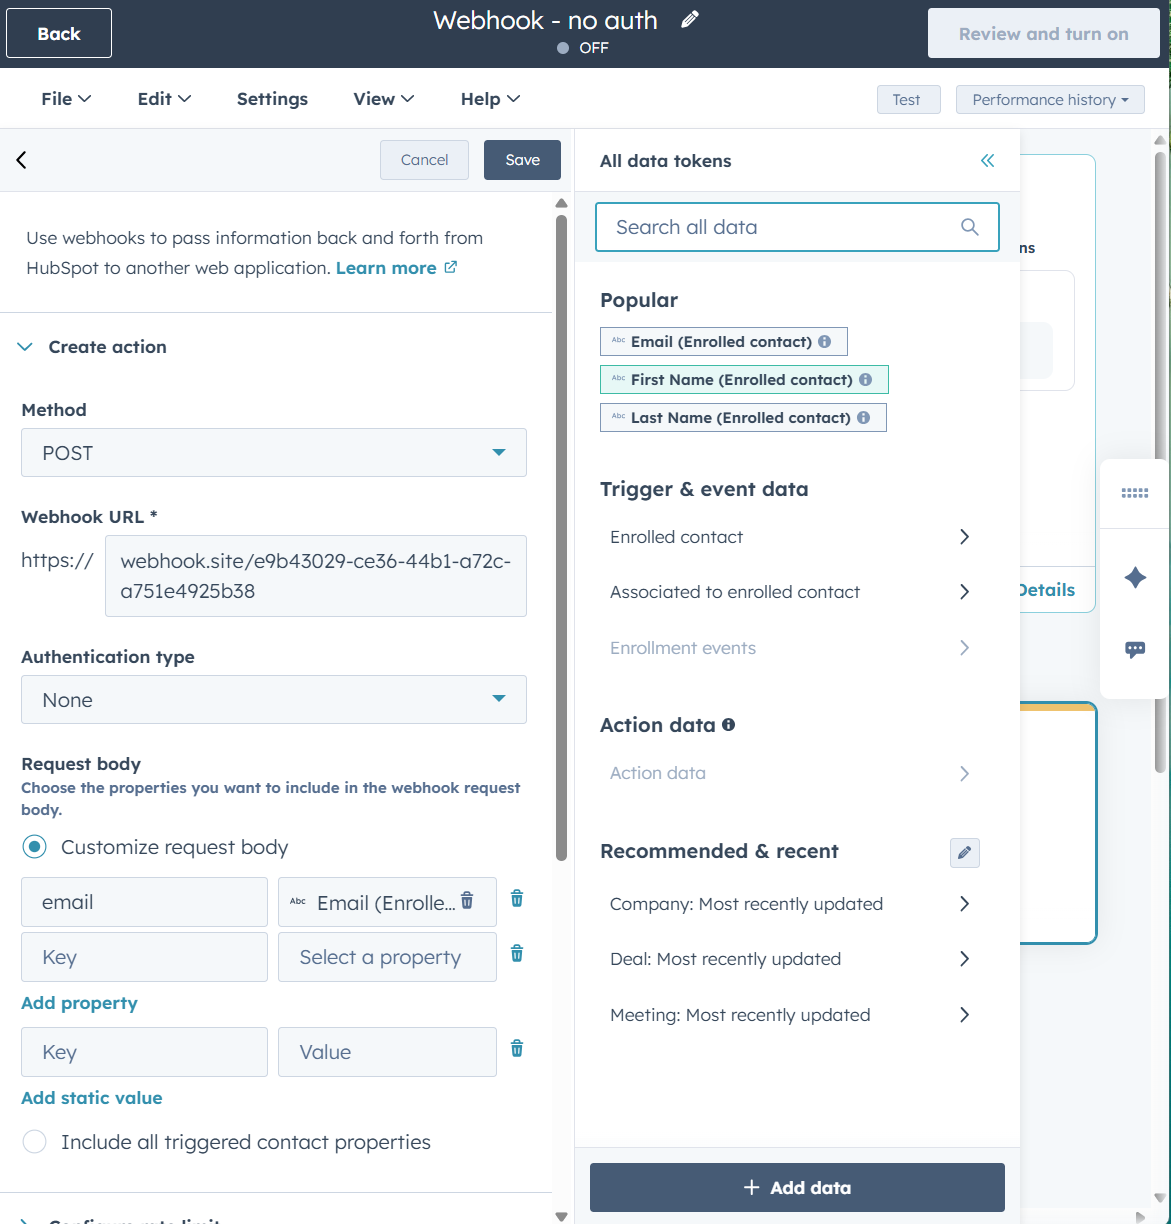
- Copy the URL and add to the box webhook URL. Leave the window open!
- Leave the authentication type as None.
- The settings for request body allows you to add what information will be sent across. Click select a property to pick from the CRM. It will automatically pull in the known value for that property. Note: Choosing static value menas you pick a value that will always be added rather than changed per contact, and the key is just a way for the code (not shown to us, but exists hidden behind the settings we’re making) is a placeholder for what you put into the box for value.
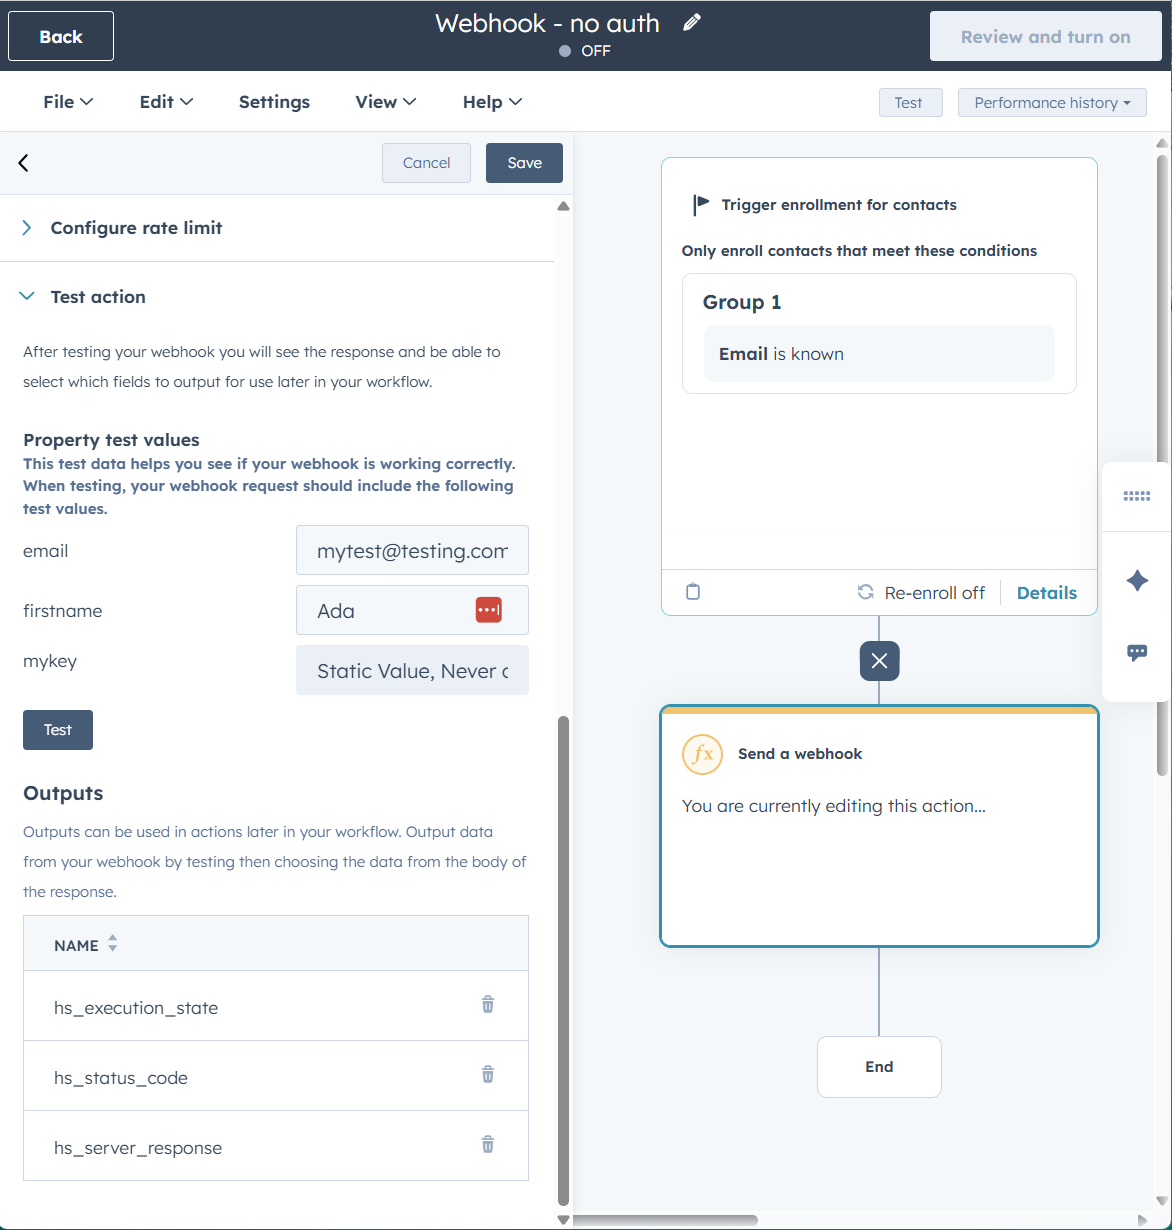
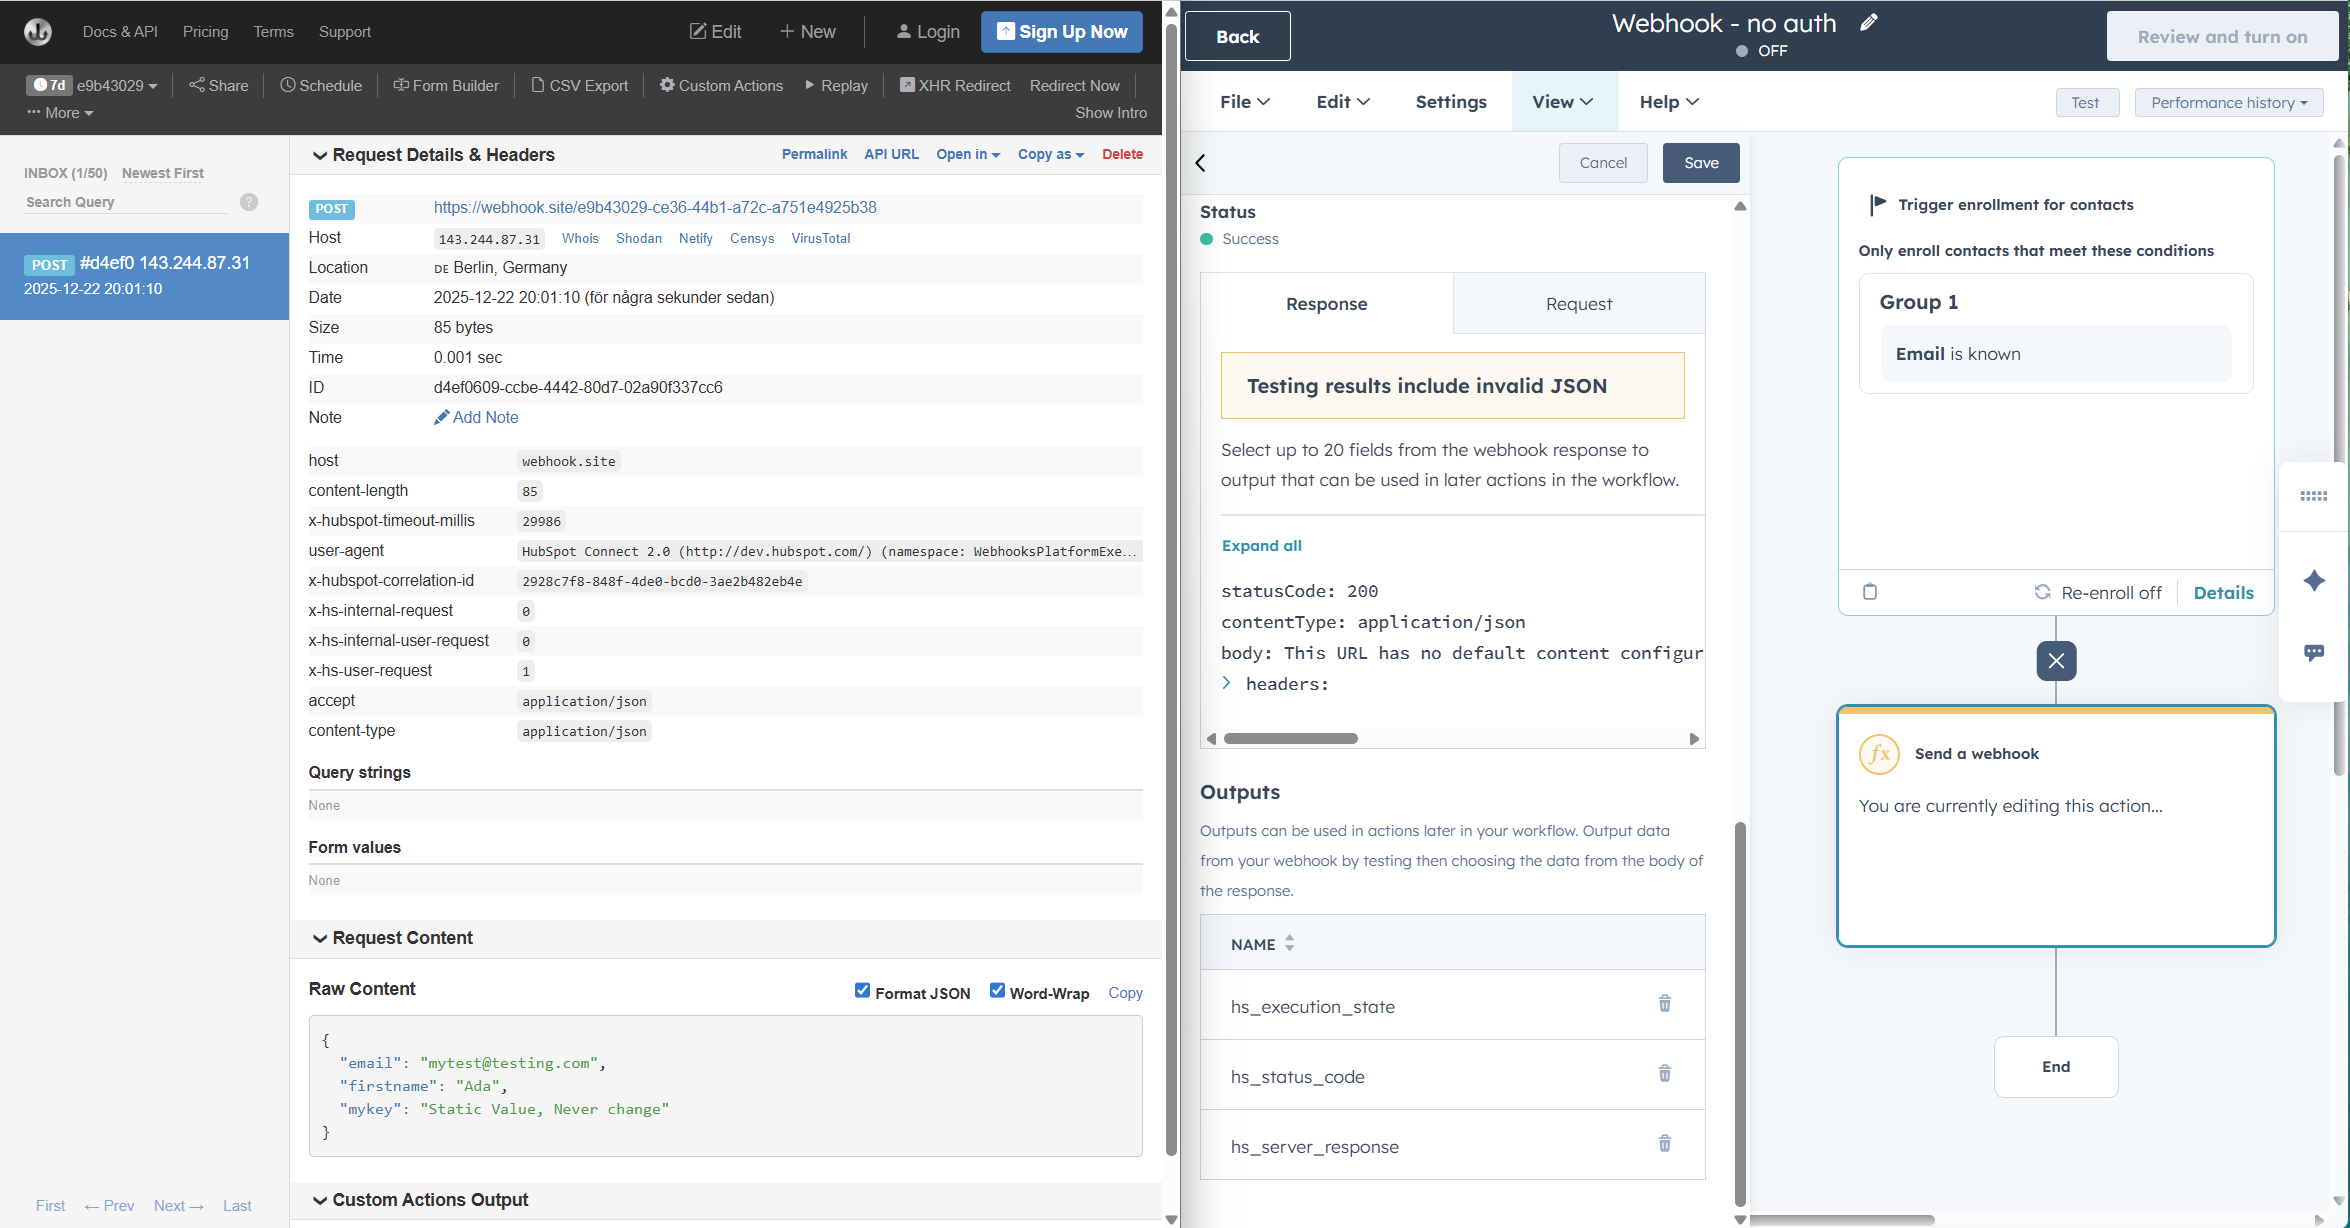
- Scroll down and expand Test action. Fill in some mock information and click the button Test.
- Success message in HubSpot!
- Go back to the webhook.site page. There should now be some information on display to let you know what you got from HubSpot. Scroll way down to Request Content and Raw Content to see the received information.
Insights: See, not that complex, eh? You pick the type of data to send and the place it should go to (in the format of a web URL). The receiving end then deals with the incoming information. Pat yourself on the back, you just send a webhook!
Send an authorised webhook using API Keys
If we can send webhooks here and there, what’s stopping people from messing up your data?
This is where authorisation comes into play. By adding a need to authorise any request before we actually accept the data (or send any through as a response) we make sure no information falls into the wrong hands.
This is where things get a bit… code-y.
You do the very same steps as for sending a webhook without any authorisation at all, but now instead you pick Authentication type and set it to API Key.
This type is for those special moments when you’re told to create a webhook and get given a username and a password (or key, or token). You need to send this information across with the request, and on the other side some piece of code checks to make sure you have the right authorisation before letting the request come throguh.
We are sending information through what is essentially a HTTPS-request, like surfing into a website. So the information needs to be encoded into a suitable format (no blank spaces among other things). This is Base64 encoded to ASCII-standards by combining username and password To username:password.
I don’t know the specifics of the whys.
For demo purpose, use username and password as, well, the username and password.
As before, the basics of setting up our webhook are the same as earlier, but what we’ll need to do now is:
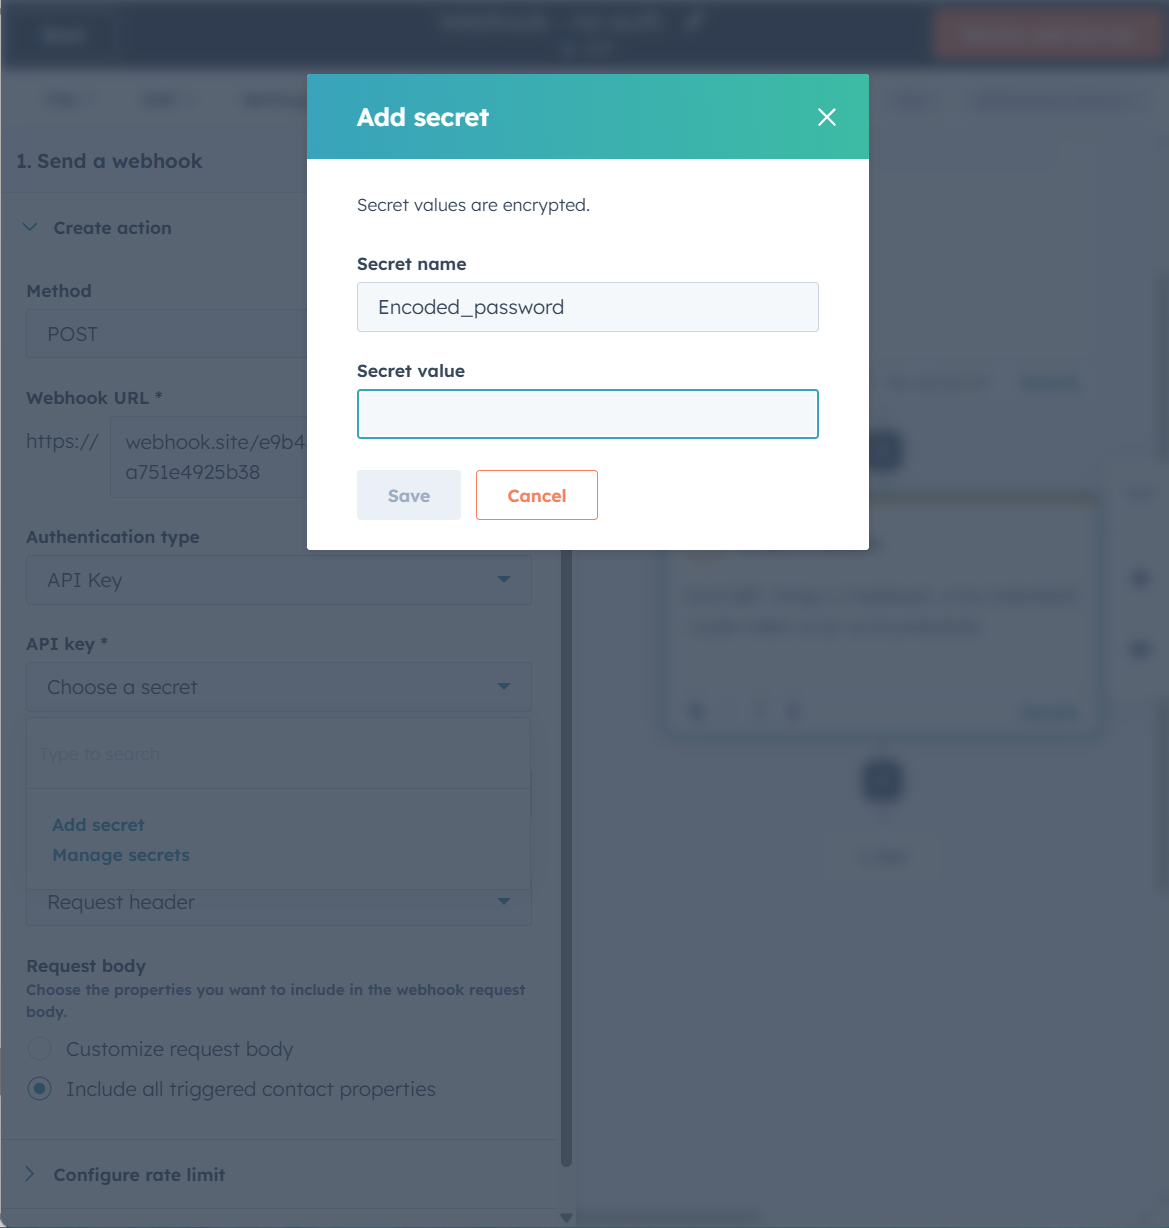
- Set the authentication type to API Key.
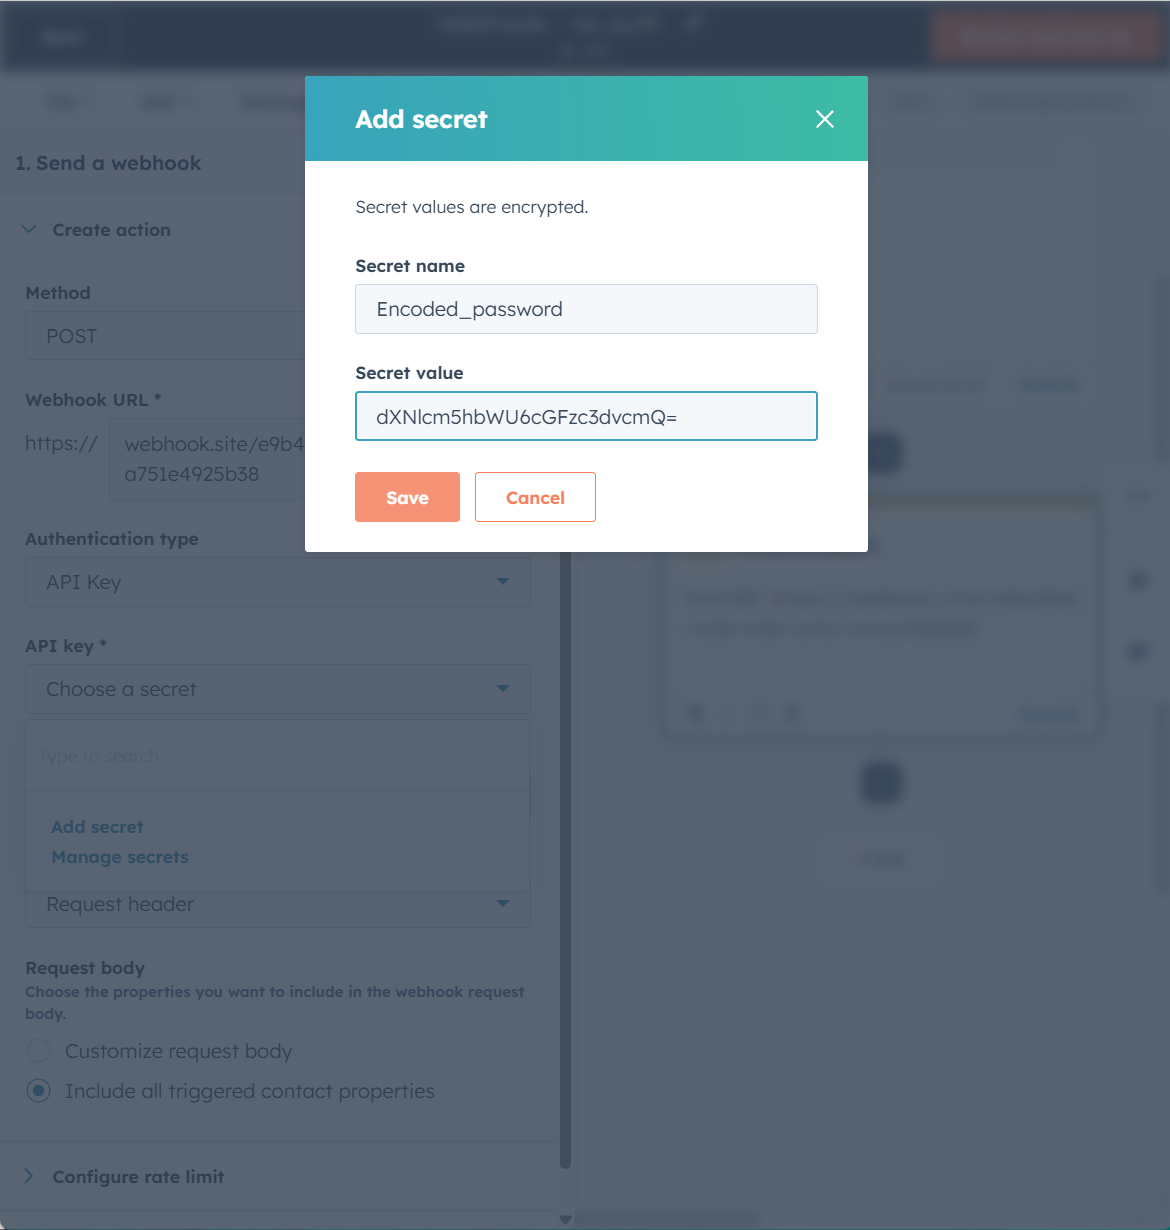
- Click the dropdown API Key and Add secret.
- Pick a secret name so you remember where this goes (this is just for us humans).
- Combine the username and password through a
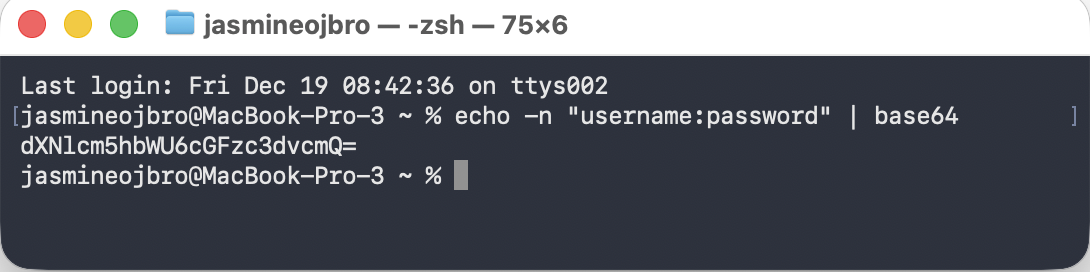
:sign and encode theusername:passwordusing either the terminal or a website such as base64encode.org (Important! Do not use the website method for actual API key data!). Copy the encoded text.- To use the terminal, if you’re on a Mac, search your programs for terminal and open. Copy-paste the text:
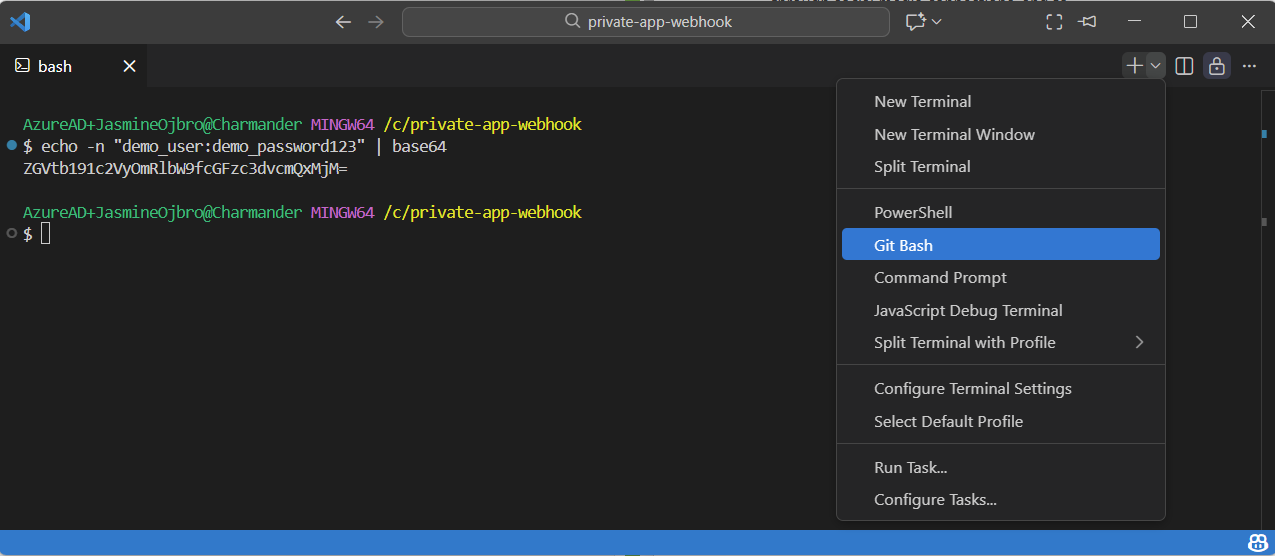
echo -n "demo_user:demo_password123" | base64and copy the output, should look like:dXNlcm5hbWU6cGFzc3dvcmQ=. - If you’re on a PC you’ll need to first install a programming software like VS Code, open the program and from the main menu pick Terminal > New terminal window. In the top, click the plus sign and choose Git bash in the dropdown (a programming language for interacting with the terminal). Same as for Mac: copy-paste the text:
echo -n "demo_user:demo_password123" | base64and copy the output, should look like:dXNlcm5hbWU6cGFzc3dvcmQ=.
- To use the terminal, if you’re on a Mac, search your programs for terminal and open. Copy-paste the text:
- Add the encoded password to the setting in HubSpot for the secret.
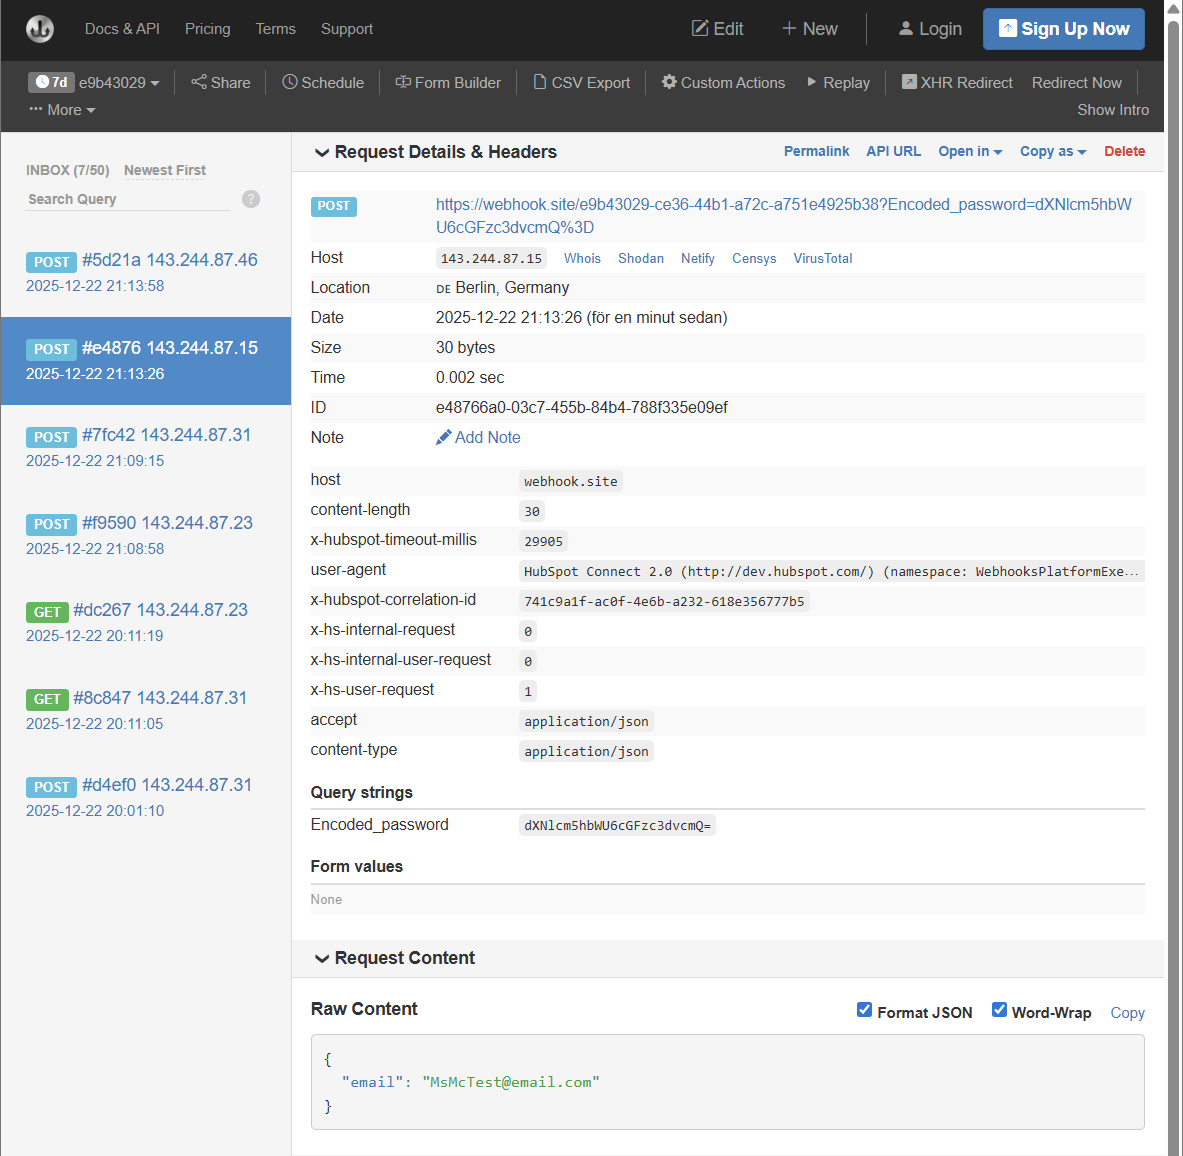
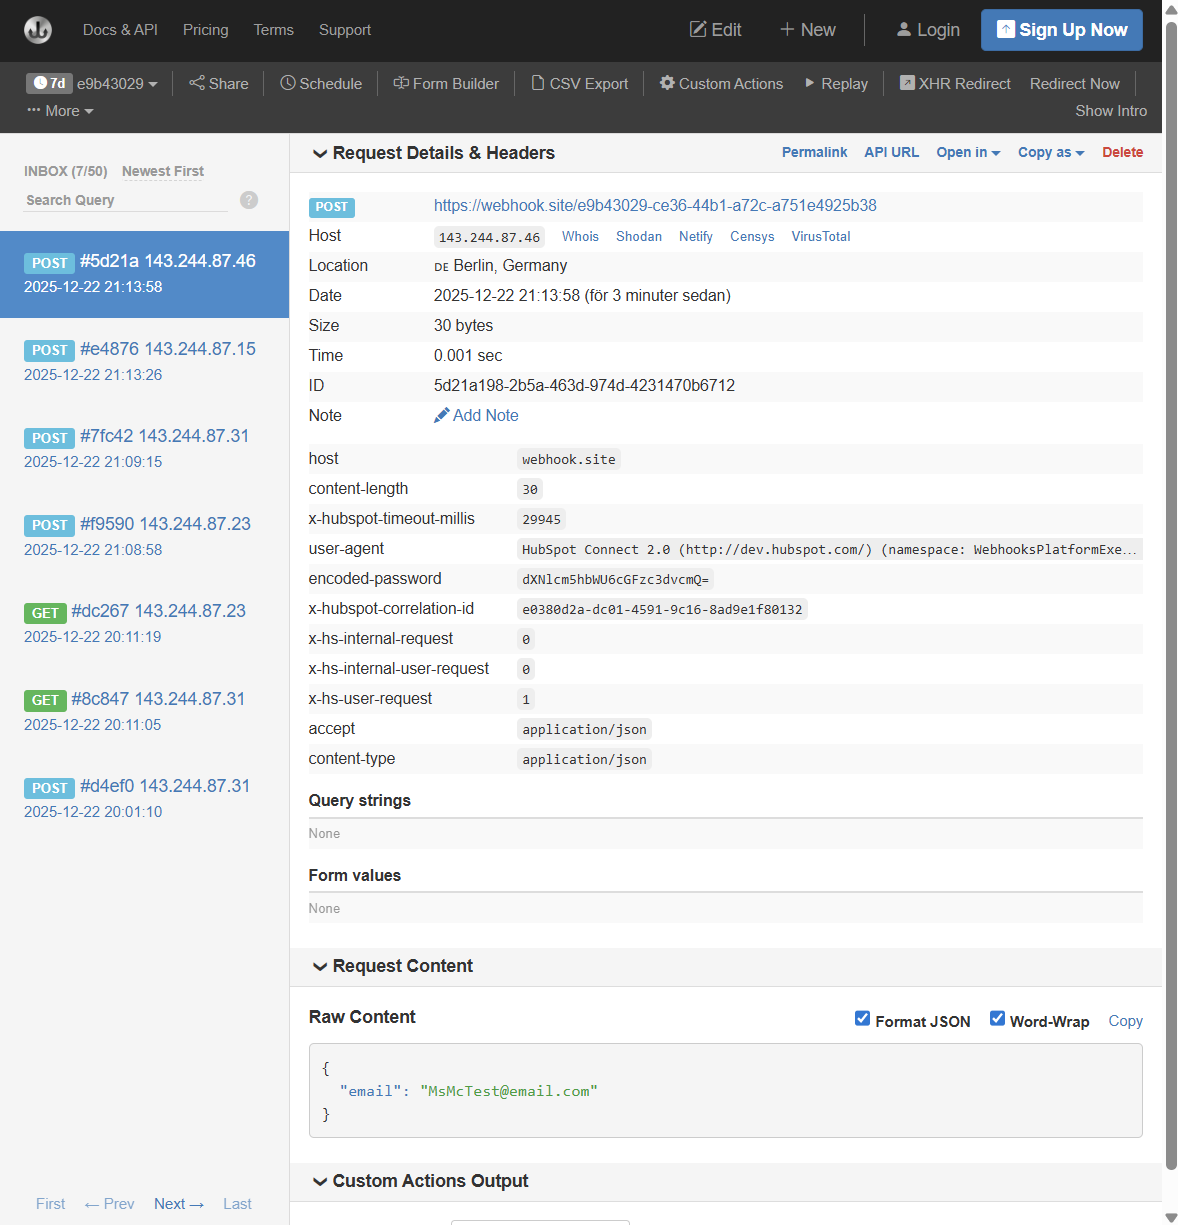
- Pick your setup for API Key location. You can choose Query parameters or Request header. Go ahead and run tests with both to see the difference.
- Request headers are to identify or authorise who is making the request. It’s added to the metadata of the request.
- Query parameters are used to describe the requet itself. This is added to the URL of the request, so is a less secure way to send the information as it can be intercepted. Some older legacy systems have no other way to accept the information.
Insights: You can now send an authorised webhook! This type of authentication is referred to as Basic Auth, and is a simple shared secret to do a quick check that you’re allowed to ask for and receive/give data. This kind of solution is best for low risk integrations with simple flows. The API key can be shared across many 3rd party systems, so HubSpot may not be the only system using it.
Send an authorised webhook with request signatures in the header
We’re about to go a level deeper into feeling like developers as we amp up the security of our webhook request.
To use the Authentication type that is set to include request signature in header we need to create something called a private app. Don’t freak out. Apps are names for programs designed to do specific tasks. We’re not building the next Facebook.
By creating a private app, we’ll be giving “it” premissons of what it can do with data, and create a secret for authorisation and verification.
With our request we are now sending our signature, and forcing the receiving party (of the information we’re trying to send or ask for) to validate that signature and that that we (HubSpot in this specific portal using this specific secret) really are the ones reaching out. The system receiving the webhook request will need to check that the request came from HubSpot (authenticity) and that the information (referred to as payload) hasn’t been changed (integrity).
As earlier, the steps of setting up the the workflow and adding the webhook actions are the same, with the tweak being the authentication type. We’ll start by creating a private app for the authentication. I’ll do a walkthrough of two methods. One is a legacy way (meaning: on its way out, will be removed at some point) which you can do via your HubSpot portal, and the other is by typing your instructions into the terminal which we used to encode out API Key in the earlier step.
Using the HubSpot Command Line Interface
Time to step into developer territory.
- We’ll need to install Node.js (programming language) and make sure you have npm (a package manager for installing dependencies).
- Go to nodejs.org and download the version for your computer.
- Open the terminal (Mac: search for the program of the same name, on PC open a terminal via VS Code as outlined above). Type and enter
node -vto verify the version of node that has been installed. - Run
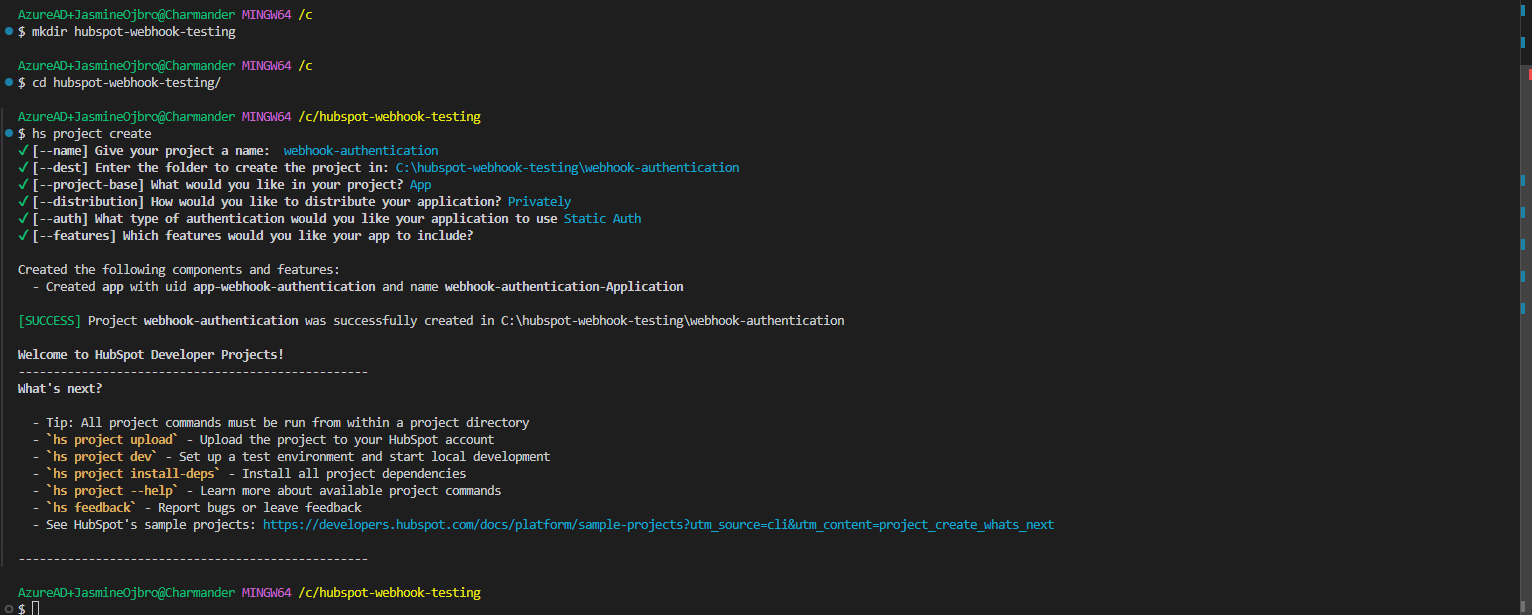
npm -vto verify that this is also installed. - We’ll now create a folder to house our project. Type
mkdir hubspot-webhook-testingand hit enter.mdkirmeans make directory, which means folder. I’d recommend not having any blank spaces and using a dash instead. - Enter the new directory (folder) by using the prefic
cdand the name of the folder:cd hubspot-webhook-testing. If you go to the wrong one, you can “go back up” one level by typingcd ..and trying again. - Time to install the HubSpot Command Line Interface that will allow us to create our private app. Run
npm install -g @hubspot/cli. To explain each word here in order:npmis the package managerinstallis what we’re telling the npm to do-gmeans to do it globally (not in a specfic folder, but rather on the whole computer)@hubspot/cliis the package we’re installing
- We need to log into the portal you’re creating the app in, so run
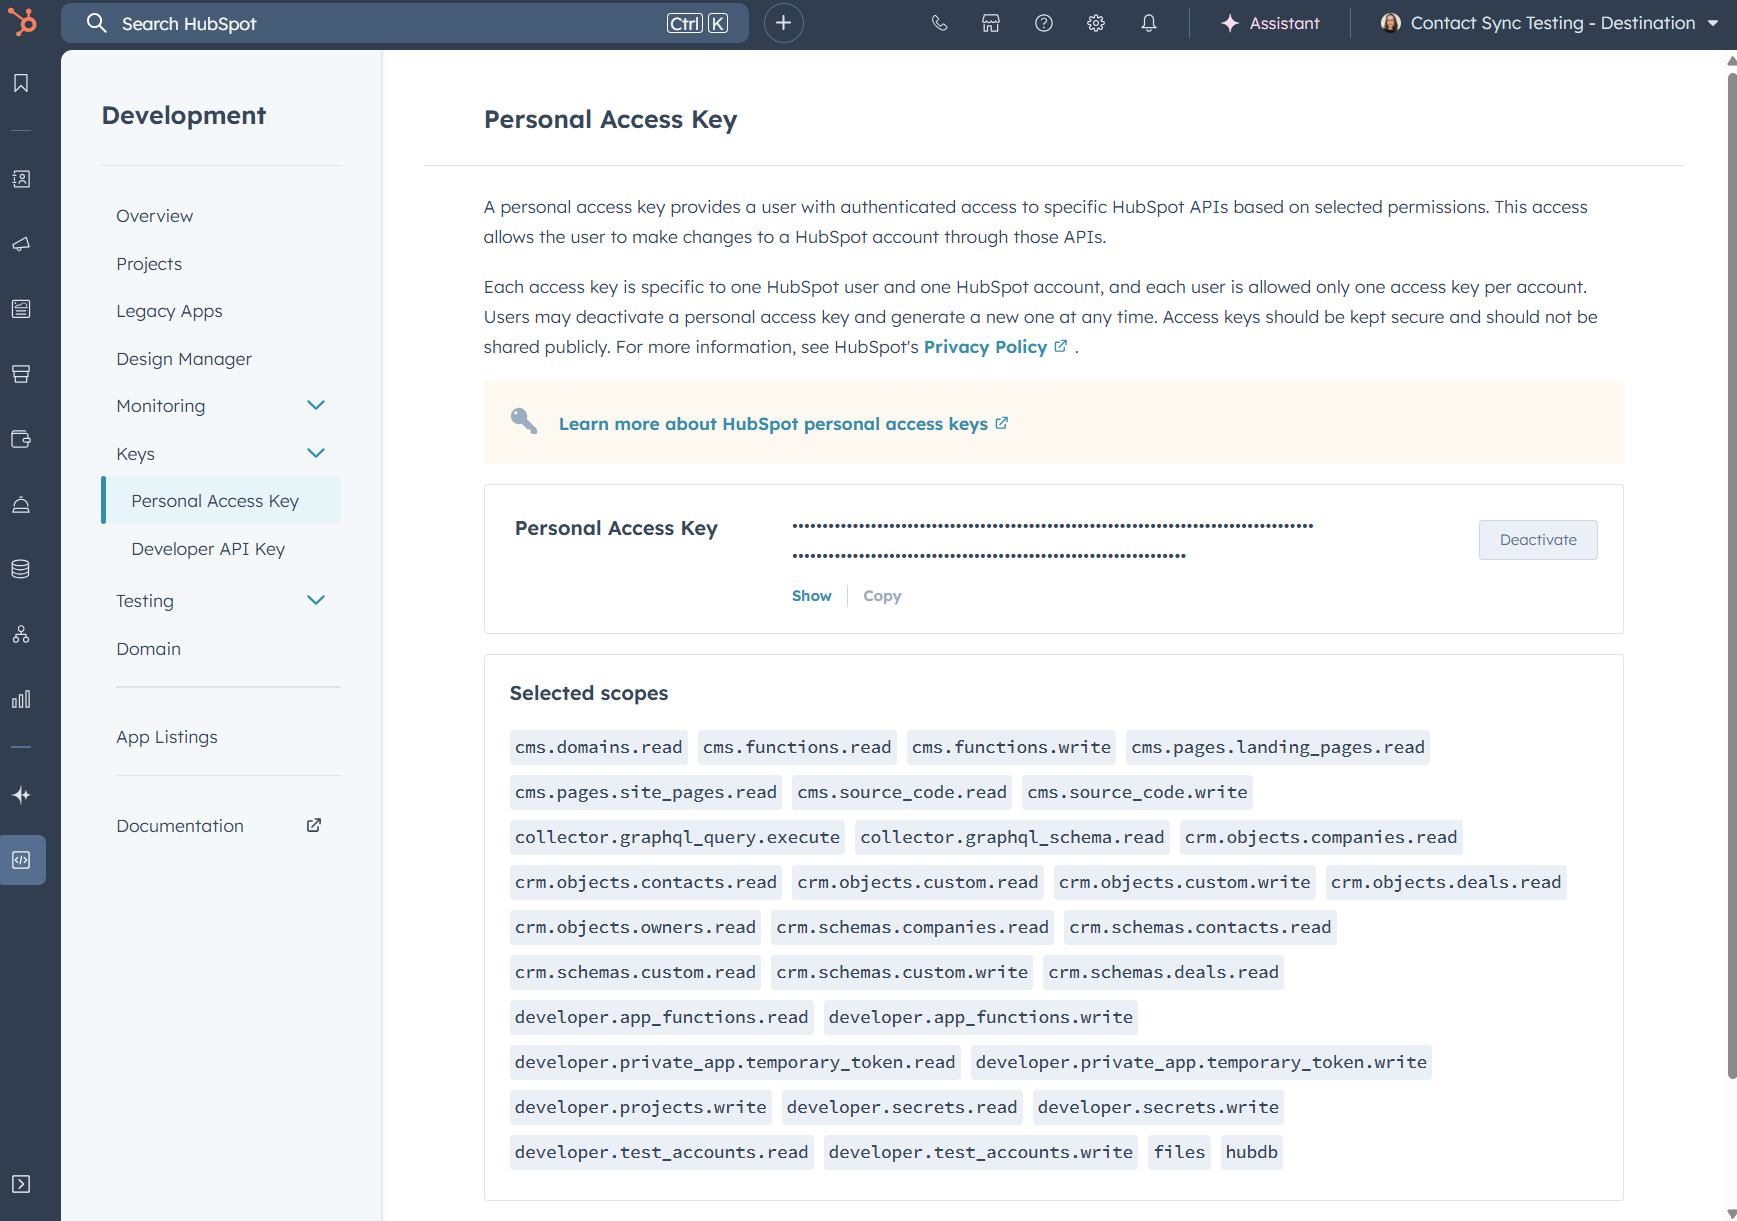
hs init. - You’ll be asked to authenticate yourself. Pick Enter existing personal access key and log in to your HubSpot portal. Go to the Development area, and navigate to Keys > Personal Access Keys. Scroll to the bottom to generate a new, and Show and Copy the full code. Add this to the terminal prompt to authenticate and move to the next step.
- You’ll be prompted to name the account in case you connect others later.
- Time to create a project, set some details and upload it as a private app. Run
hs project create. - You’ll be prompted to add a few settings. In order:
- Name - Give your app a name, like
webhook-authentication - Destination - Where the project will be saved - hit enter.
- Project base - What type of project it will be. Navigate with arrow keys and hit enter on App.
- Distribution - Who will use this? Pick Privately
- Authenticaion - This is asking how your app will authenticate to HubSpot not how users will authenticate with the app. We’ll pick Static auth as this is used for private apps and webhooks. OAuth is mainly used for marketplace apps that are downloadable and and can be isntalled on different portals that requrie different logins.
- Features - What features this app will have. We don’t require any of these, so hit enter.
- Name - Give your app a name, like
- The app is “complete” for our test purposes of sending webhook requests for contact data. If we want to change the data type, to add the ability to read/write company data for example, we must edit a text file. Even if you skip the steps below (don’t change the settings) it’s helpful to get familiar with the files themselves:
- I find this easiest to do if you open your file manager (in the visual interface of your computer), navigate to your directory (folder), and click all the way through the folders into the app > to open the file
app-hsmeta.json. - In a text editor (Notepad, Sublime, VS Code) look for
"requiredScopes". This outlines what this app is allowed to do. Basic settings havecrm.objects.contacts.readandcrm.objects.contacts.writein place. You can add further access permissions in the list. Hit save.
- I find this easiest to do if you open your file manager (in the visual interface of your computer), navigate to your directory (folder), and click all the way through the folders into the app > to open the file
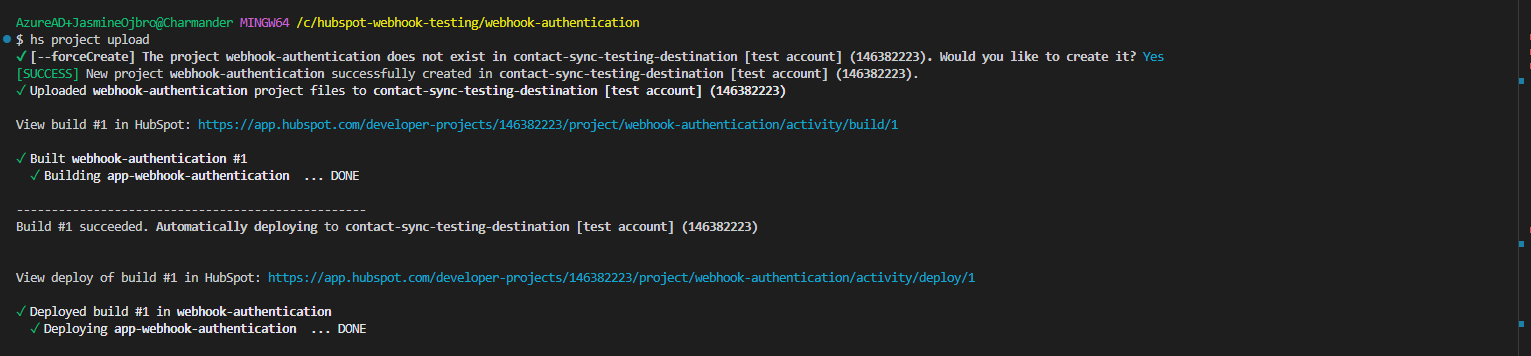
- Time to add the app to our HubSpot portal. Our last set of actions created a project directory inside the directory hubspot-webhook-testing and we need to enter this directory first before we can upload our project. Type
cd webhook-authenticationand enter. - In the terminal, type
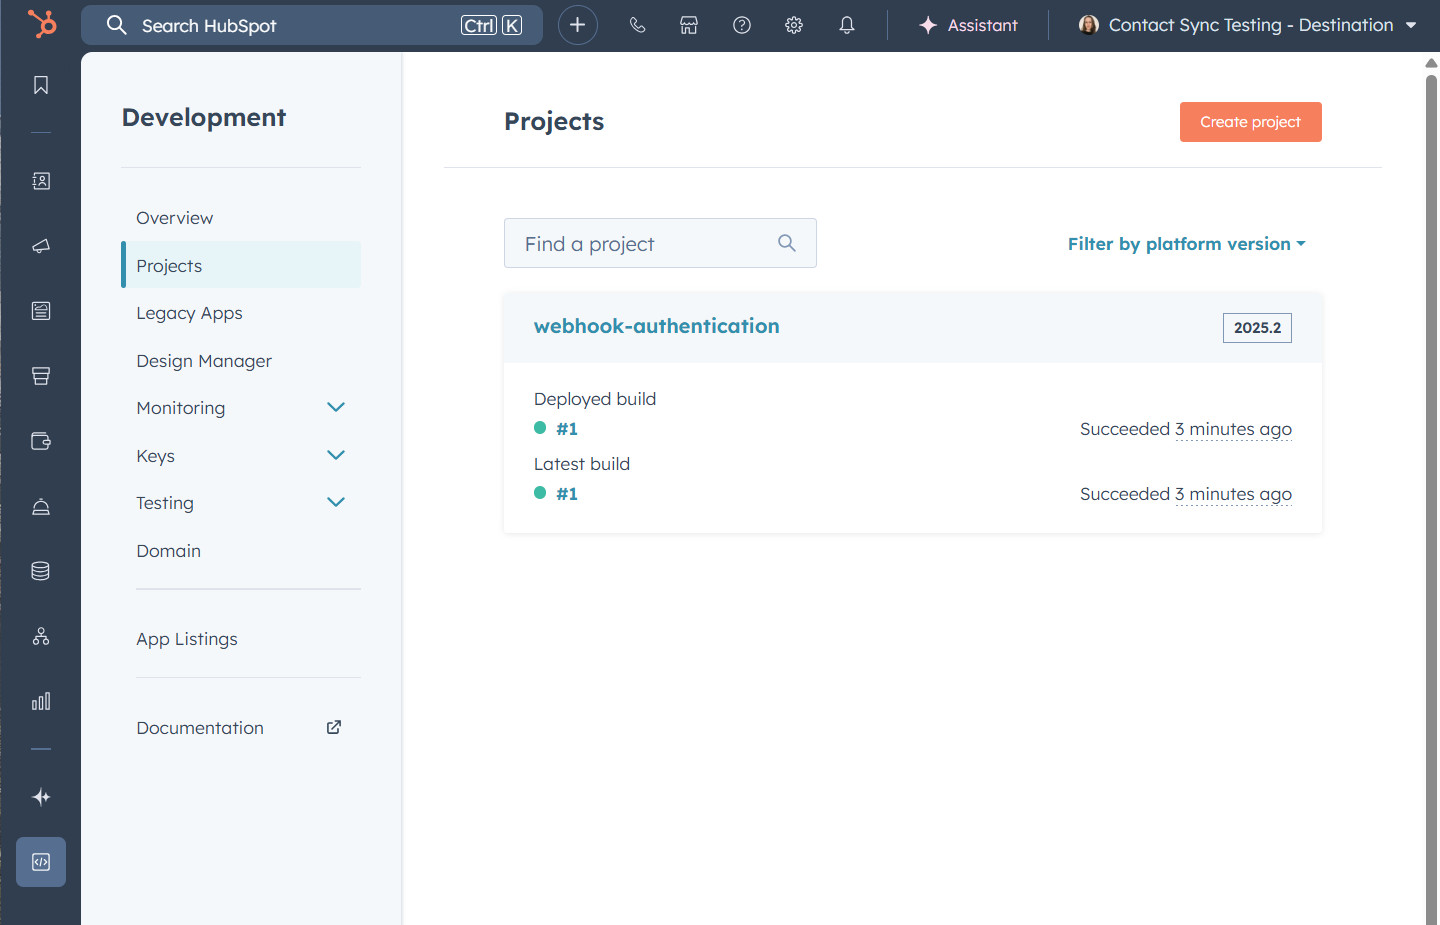
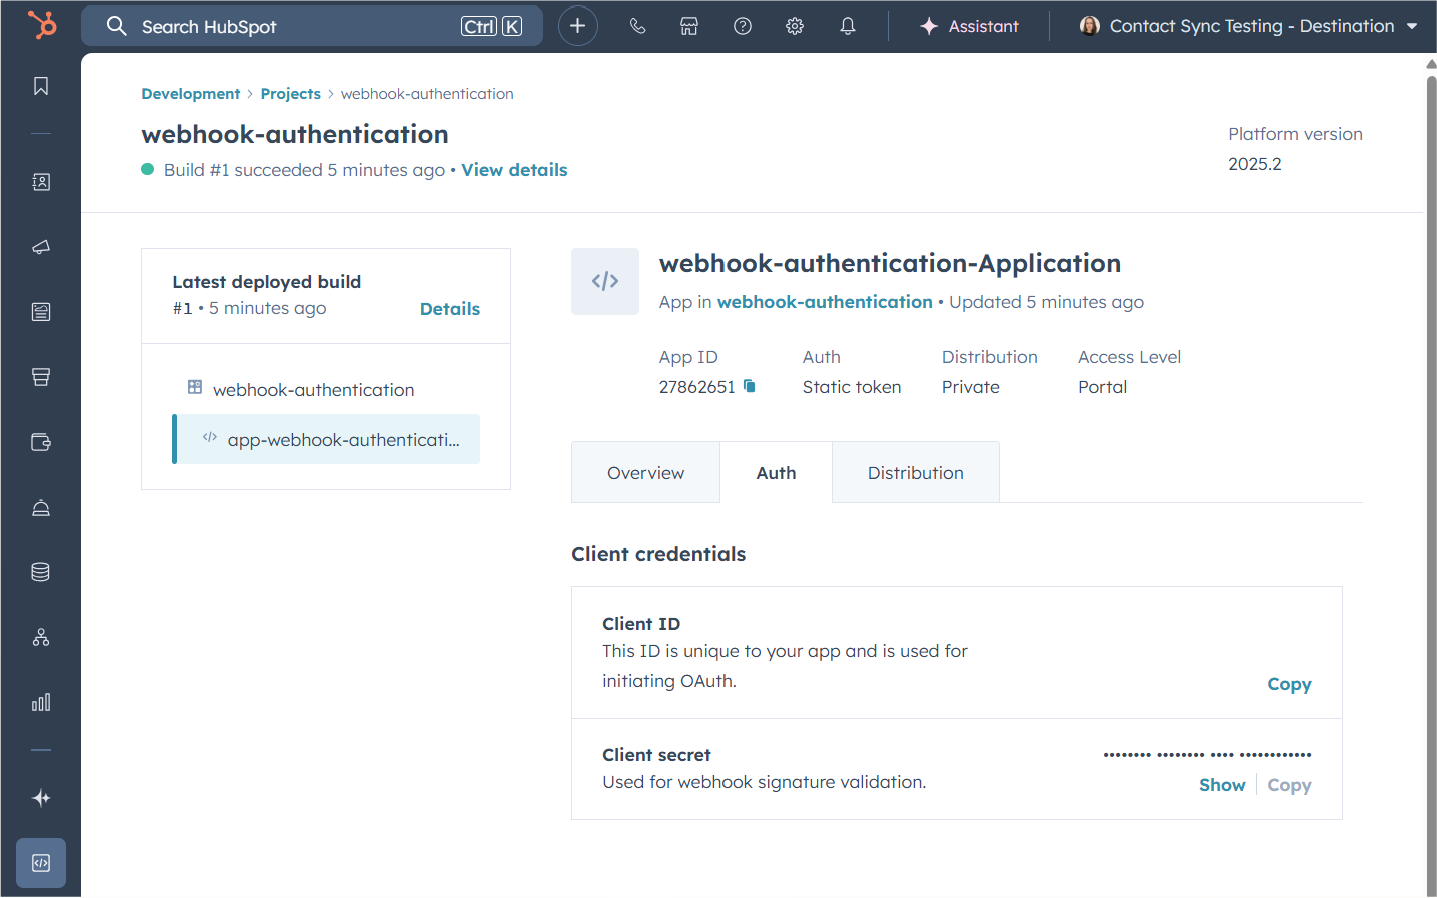
hs project upload. The CLI will ask you to confirm that you want to create the project in the portal, clickyand enter. - All uploaded! Check it out in your HubSpot portal. Log into your portal > Development > Projects > Click the app name. At the very top there is an info box, copy the numbers seen under App ID (you’ll need this in a few minutes).
- Go back to HubSpot and the workflow with the webhook actions. Pick POST, add the test URL from webhook.site into the webhook URL field, and pick Include request signature in header.
- There is a new field for HubSpot App ID. Paste in the numbers you copied earlier from the app settings.
- Ready to test.
- Next steps? Webhook bit is all done in HubSpot. For the recieving end, the other app will need to know the Client secret from your app settings (where you picked up the app ID) so share this with the developers on the other side.
- Context explainer: The earlier method we looked at sent the “password” unprotected in plain text, just dressed up with other letters and numbers. This method doesn’t send the password at all. The secret allows HubSpot to add a fingerprint to the message. The recieving app can generate the same fingerprint, match it against what they got, and by seeing that they match trust the content of the message.
I can’t run any hs CLI commands!
Are you running into issues with installation of the HubSpot CLI? If you’re on a managed computer owned by your work, you may be barred from installing softwares globally. I’ve found success on Windows PCs and Mac alike to install the CLI in a specific folder. Remove the prefix -g and you should be good to go. For Mac I’ve also noticed that you need to run the prefix npx when working with the CLI, so hs init become npx hs intit etc.
Send an authorised webhook to GET data
So far we’ve tried sending information from HubSpot. The webhook can also be toggled to GET data from an external source.
Good news. We’ve done the hard work of understanding the various authentication settings. The same setup for authentication types holds true here as well.
The difference is what the GET webhook is used for. In simple terms, GET will fetch data. Our other examples will take information about what ran through our workflow and send propety values to another endpoint (the receiving end of the webhook) of that contact/company/deal/record. For example their email, name, status, or owner.
Similarly, for a GET request you will want the request to trigger for a specific piece of data, for example a contact. The GET request sends a ping to another system with a piece of data about that contact, which will give you a reply.
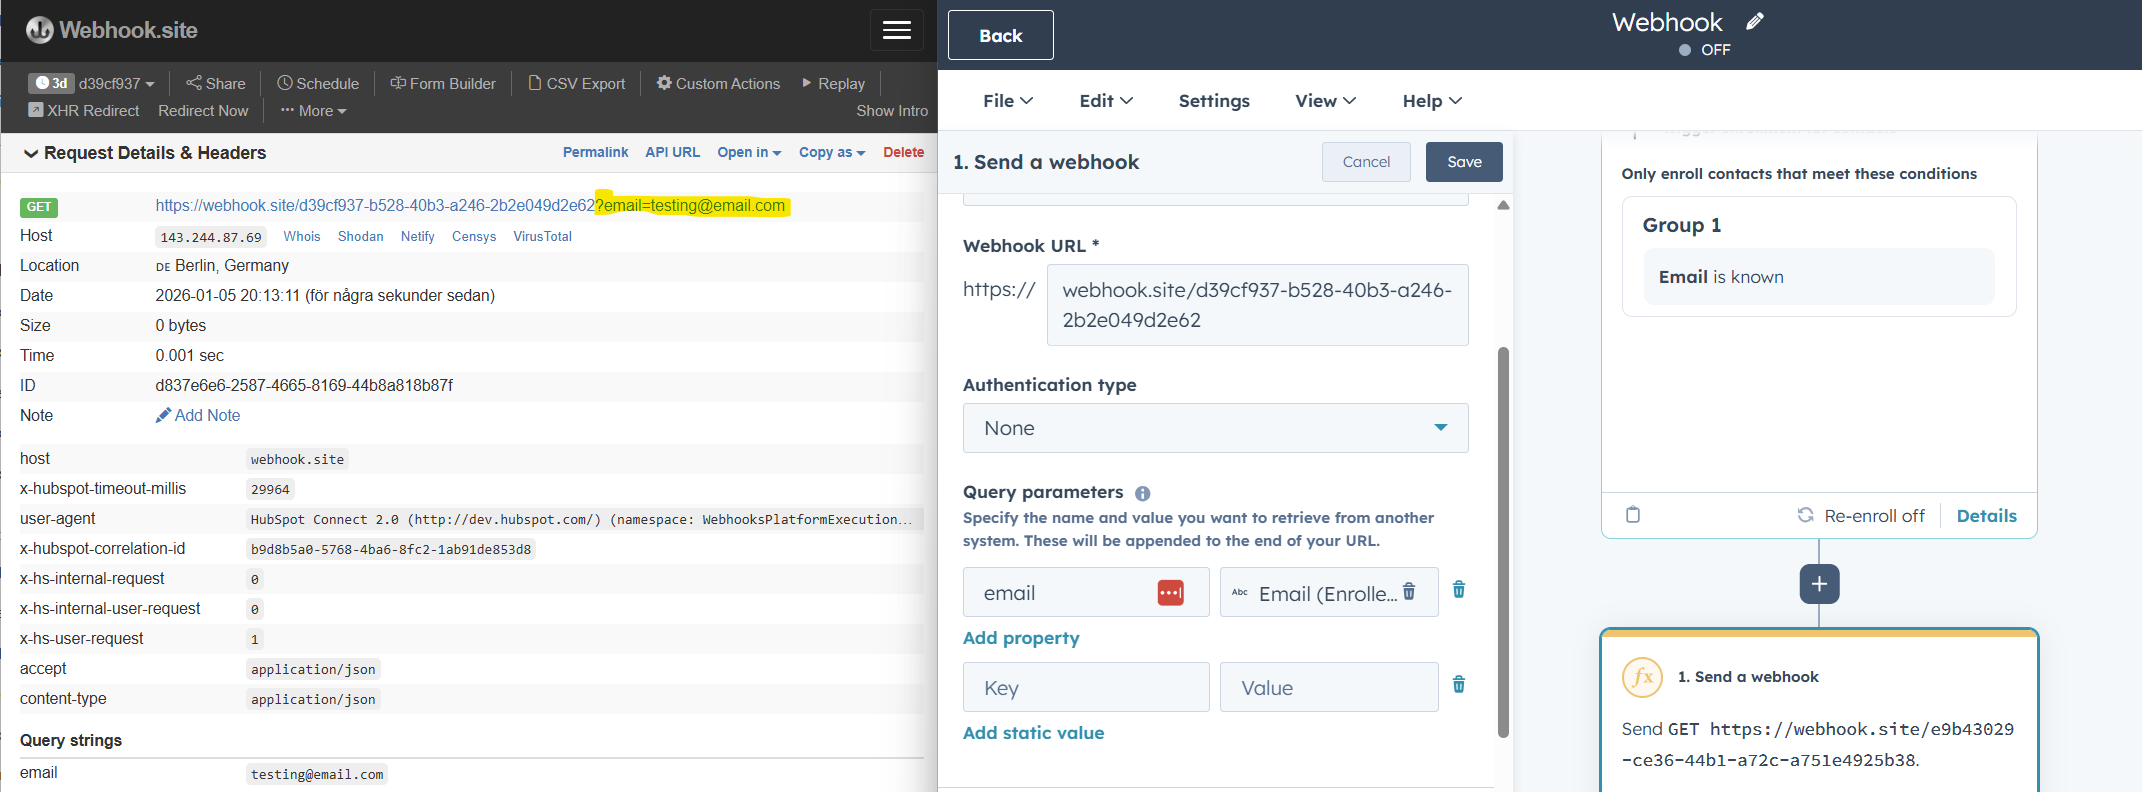
Our settings are a bit different:
- Under Method pick GET.
- Add your test URL for the webhook.
- Pick an authentication type from earlier, or set to None for simplicity.
- Our earlier area to configure the Request body, the contents of what we send, has now bee switched out to configure Query parameters. These are pieces of data that attach to the end of the webhook URL rather than as the body text of a message.
- For test, add in the property for
email. It’s common for systems to use email as a unique ID to differentiate between records, but this could be replace by any number of data points such as phone number or customer ID. - Send a test request.
- You’ll get a status code 200 (success) with no additional info. Had this webohook been connected to a live system, you’d be able to use the output (responses) to add actions like branches. Error or success, add a branch for each and create some action steps. Had the reply been a message body (with data, properties) this could also be used to branch logic and do things like update the record in HubSpot.
- It’s important to note that HubSpot does not control what data is sent back, this is all set by the external service triggering this webhook.
Trigger a HubSpot workflow on an external incoming webhook
The webhooks so far have been started inside HubSpot, and then an action step triggers a webhook to POST/GET data from another service or system.
You can also have HubSpot be the recipient of a webhook initiated by another service. This is what we’ll look at next. Since we’ll keep this high-level we’ll go through the steps of setting this up in HubSpot and testing it, but not how the webhook would be triggered from another system. We’ll use a tool to help us simulate that bit of the experience.
Note that these enrollments only work for POST requests, not GET.
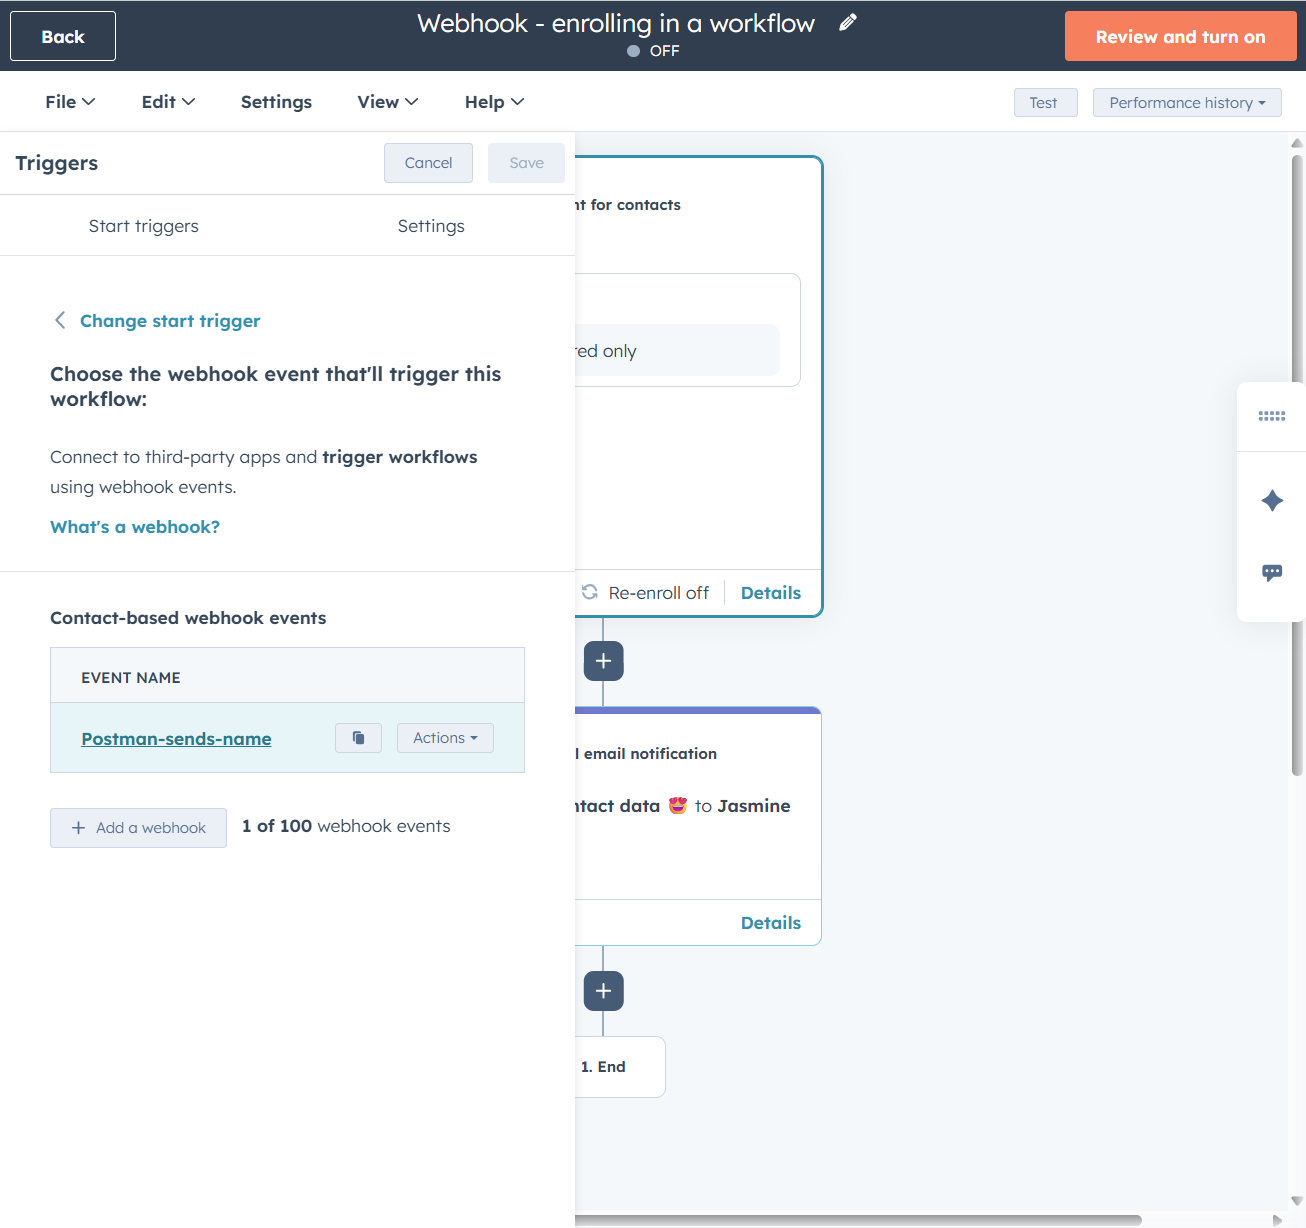
- In HubSpot, create a new workflow and for the enrollment trigger scroll down under Advanced options and pick When a webhook is received.
- You’ll get a URL to test sending a webhook POST request to, copy it and save for later. Keep this tab open.
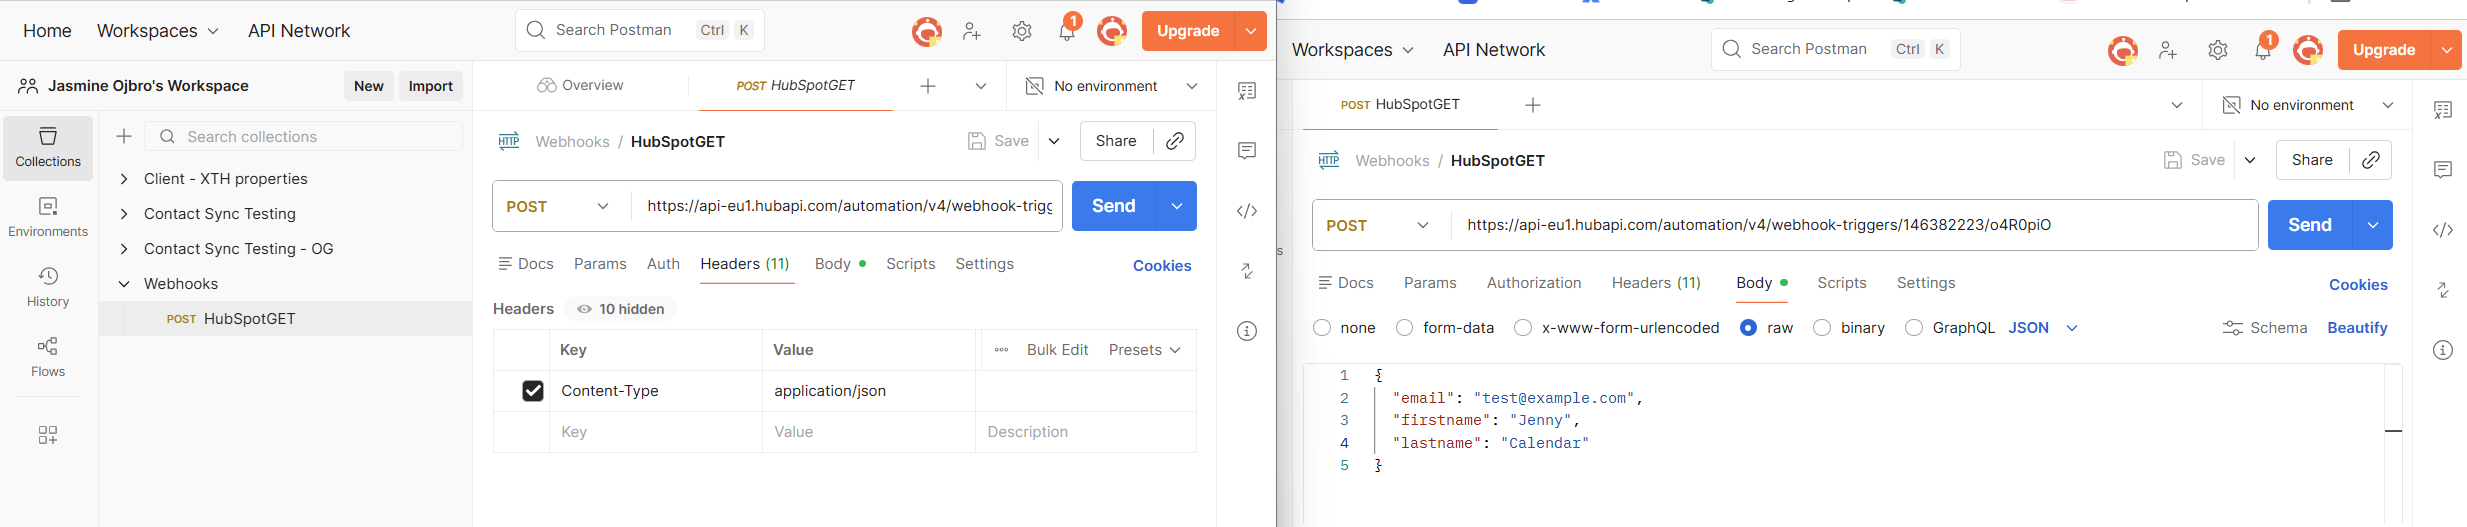
- We’ll use a service for testing APIs called Postman. Sign up a free account, and create a workspace.
- In the left menu, choose Collections and click the plus sign to create a new collection and name it Webhooks.
- Hover over your newly created collection, hit the plus sign again and a API request will be created. We’ll need to configure it to send test data to HubSpot.
- In the top, change type from GET to POST.
- Add the URL from the HubSpot workflow step into the bar.
- Right below, navigate to the tab Headers and add in Key set to
Content-Typeand Value set toapplication/json. - Go to the tab for Body - we’ll configure test data to send. Choose Raw in the menu that appears, and make sure it’s set to JSON.
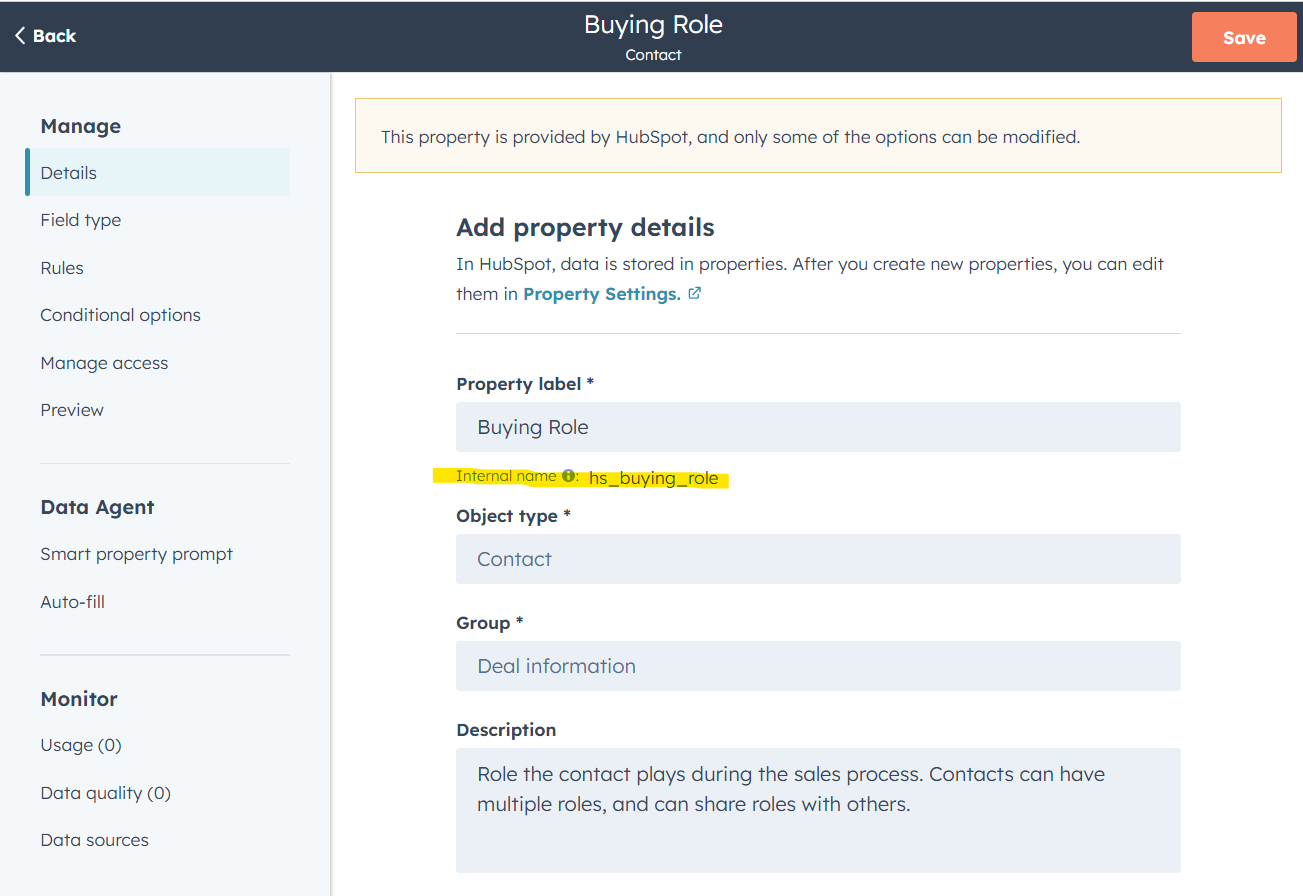
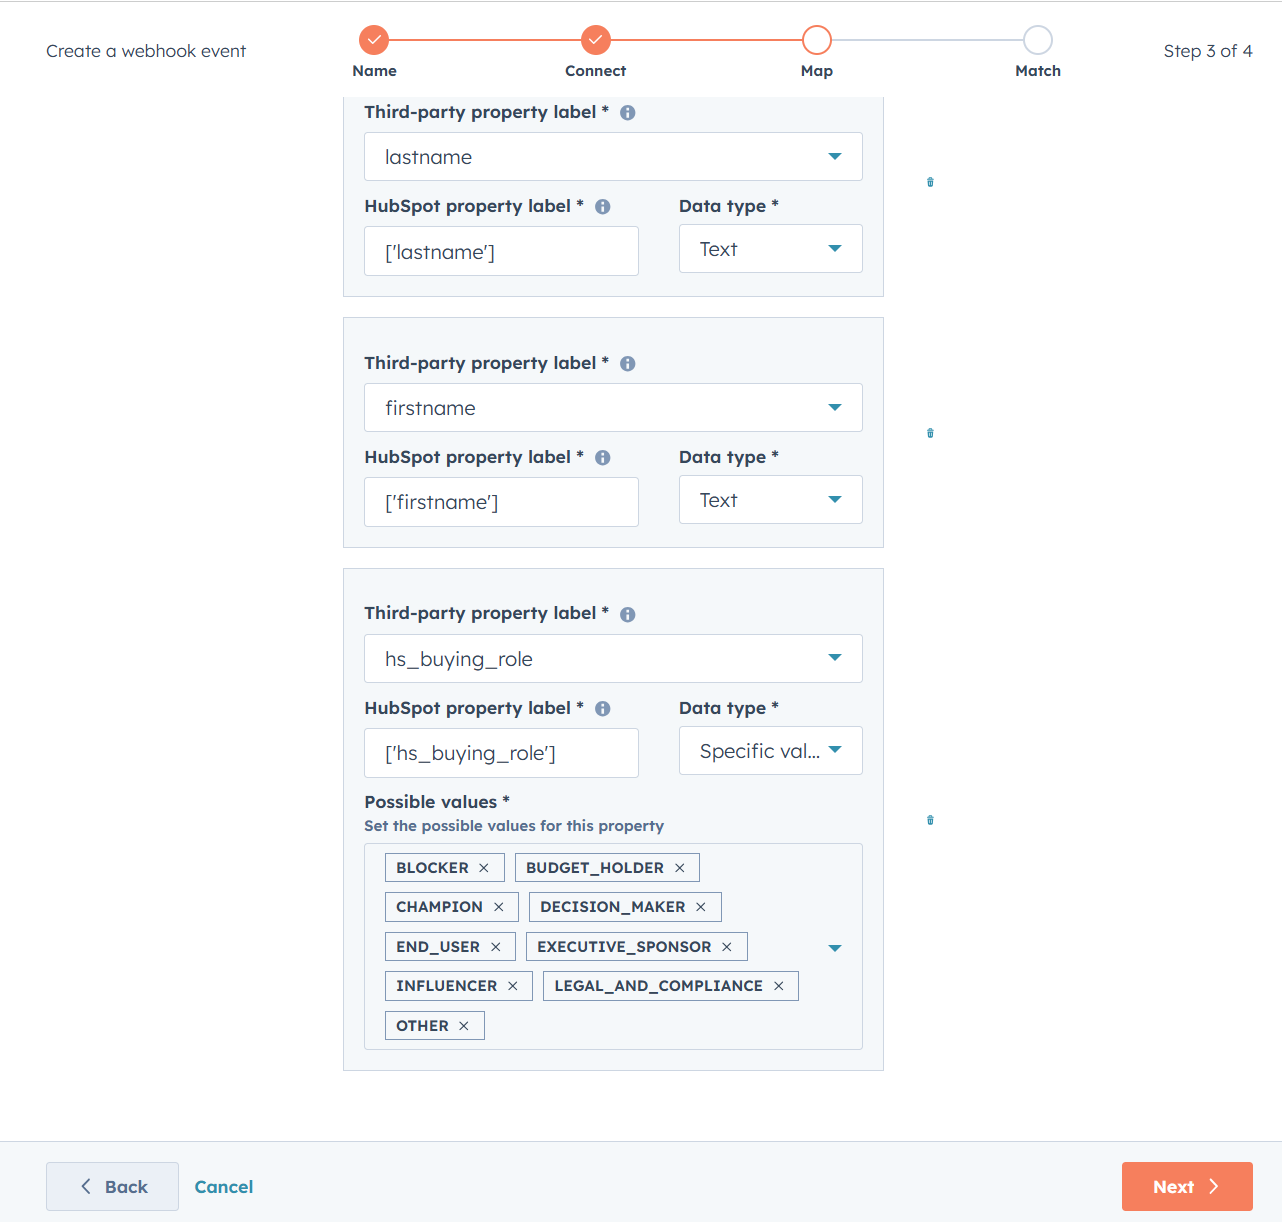
- We’ll add in data that is sent to HubSpot as part of the message to the webhook. You can copy-paste the info below. Try adding properties and values. Important! Do your self the favour and use existing properties. Use the internal name. While the label for the property can be changes, the internal name cannot.
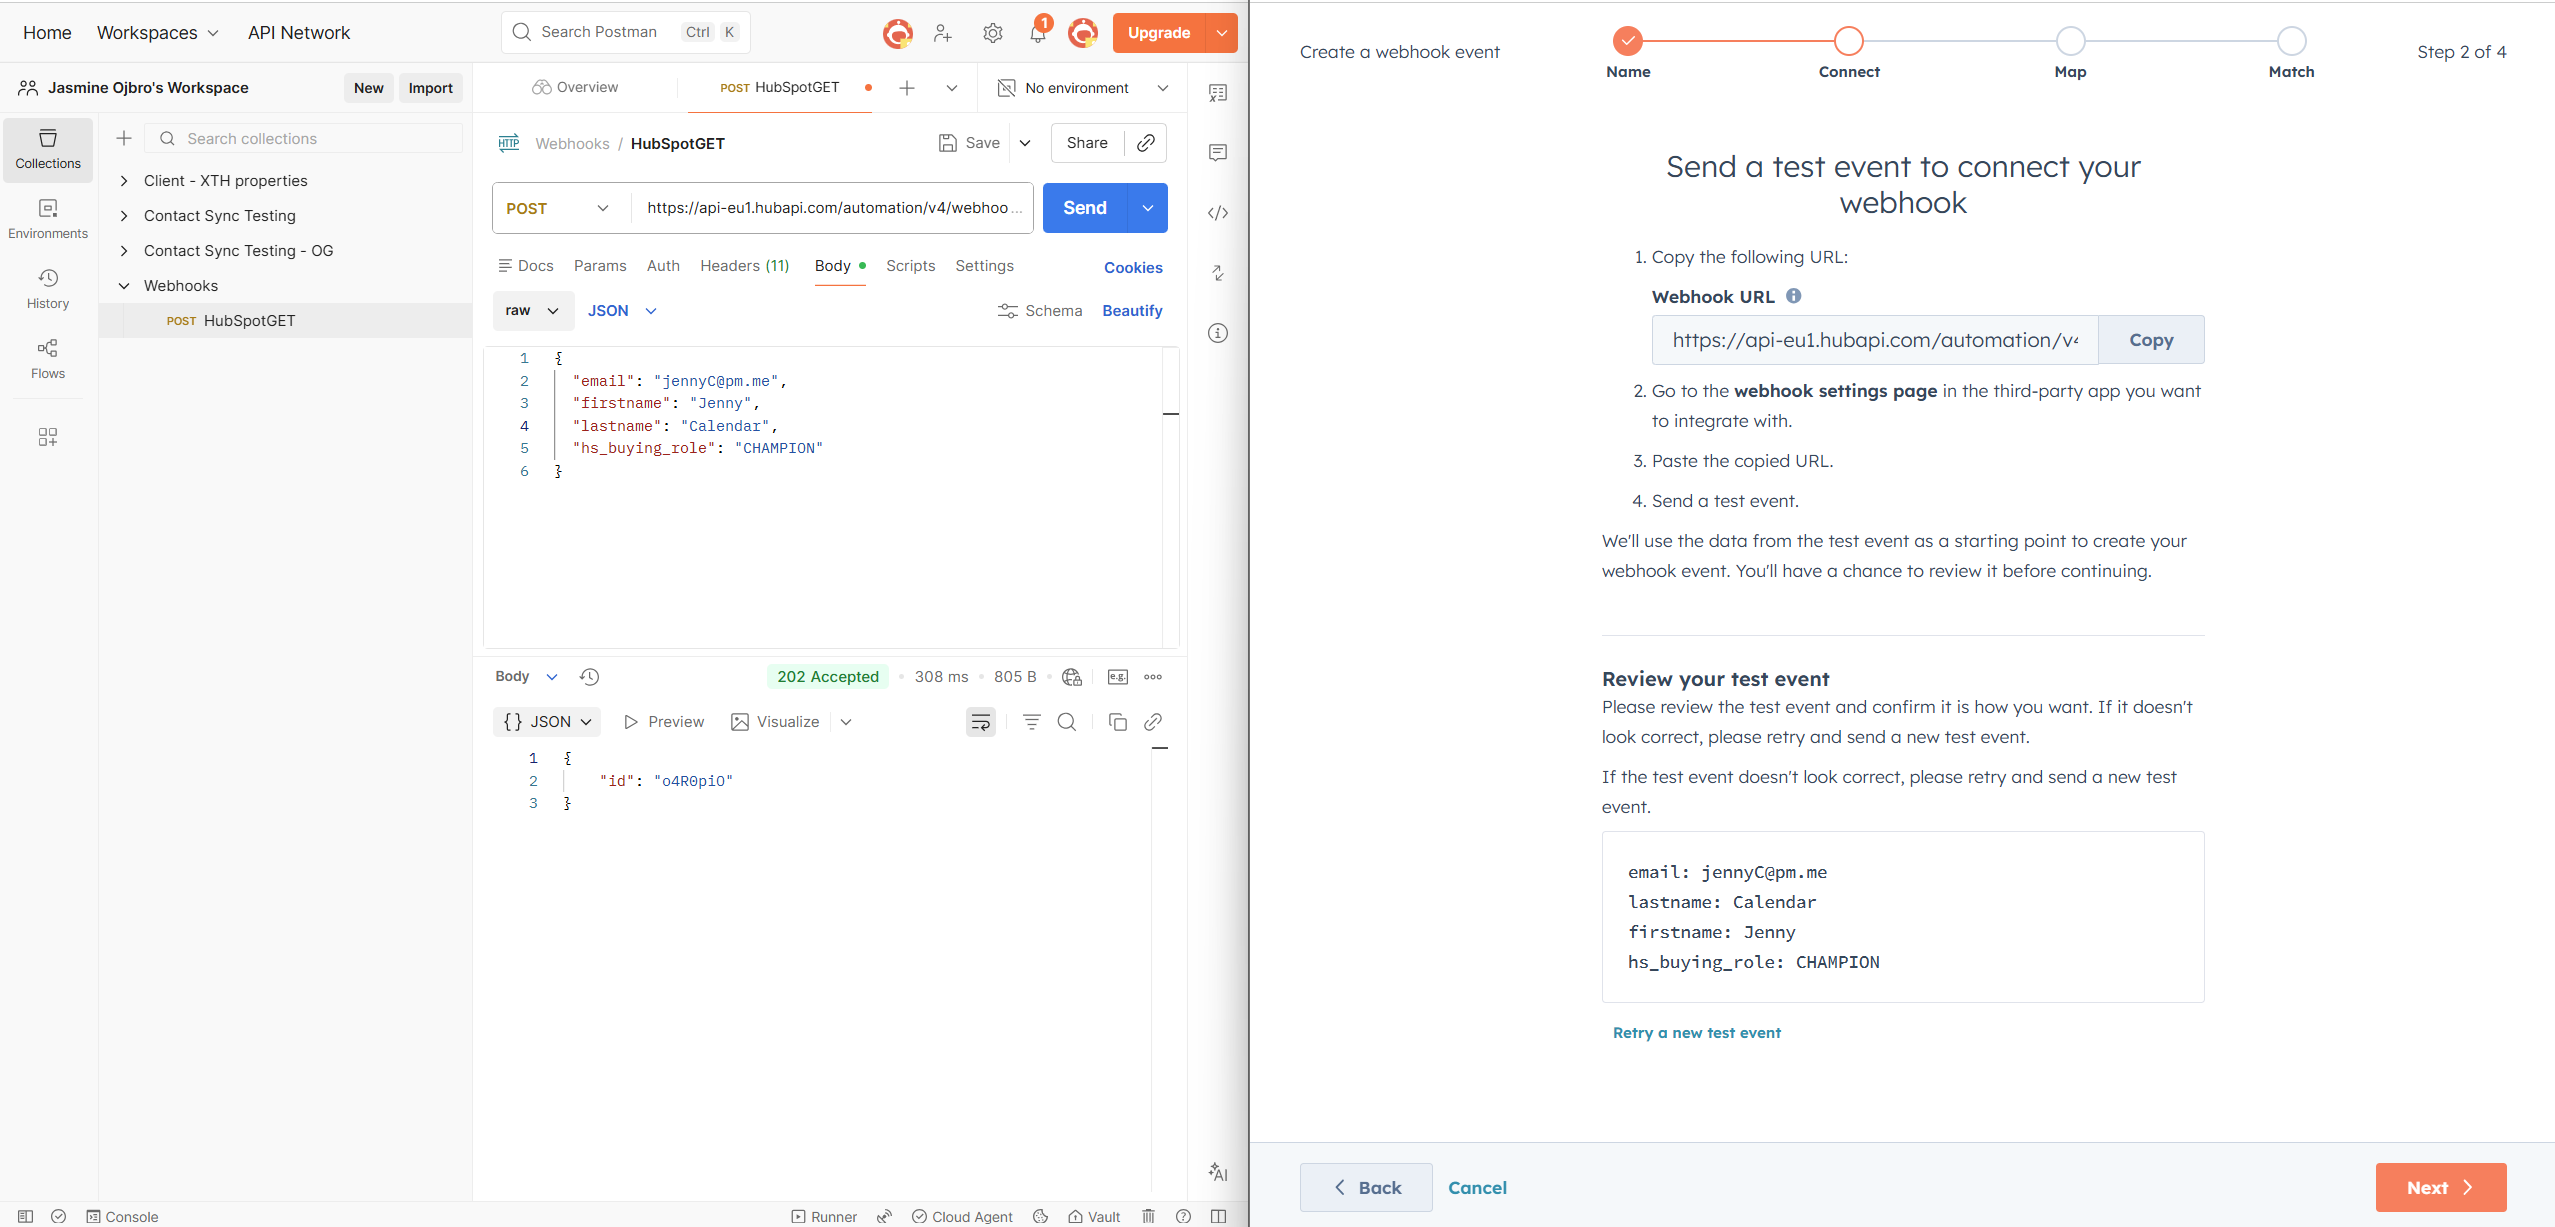
- Go back to the HubSpot tab. Click Retry a new test event and hit Send in Postman.
- Data all recieved! Go back to Hubspot, hit next and verify that the fields are there (if you, like me redid the test and fields aren’t included, redo the first step and generate a fresh URL to send the test to). Pick the type of data this property is. If you include a field with options, these need to be copied into the a
- As the data will identify a record in the database and enroll in the automation, you next need to choose which property is the identifying data for that. For contacts, emails is the most common one. Some organisations have their own unique ID set up, such as organisation number for the business. For this test, we’ll pick email.
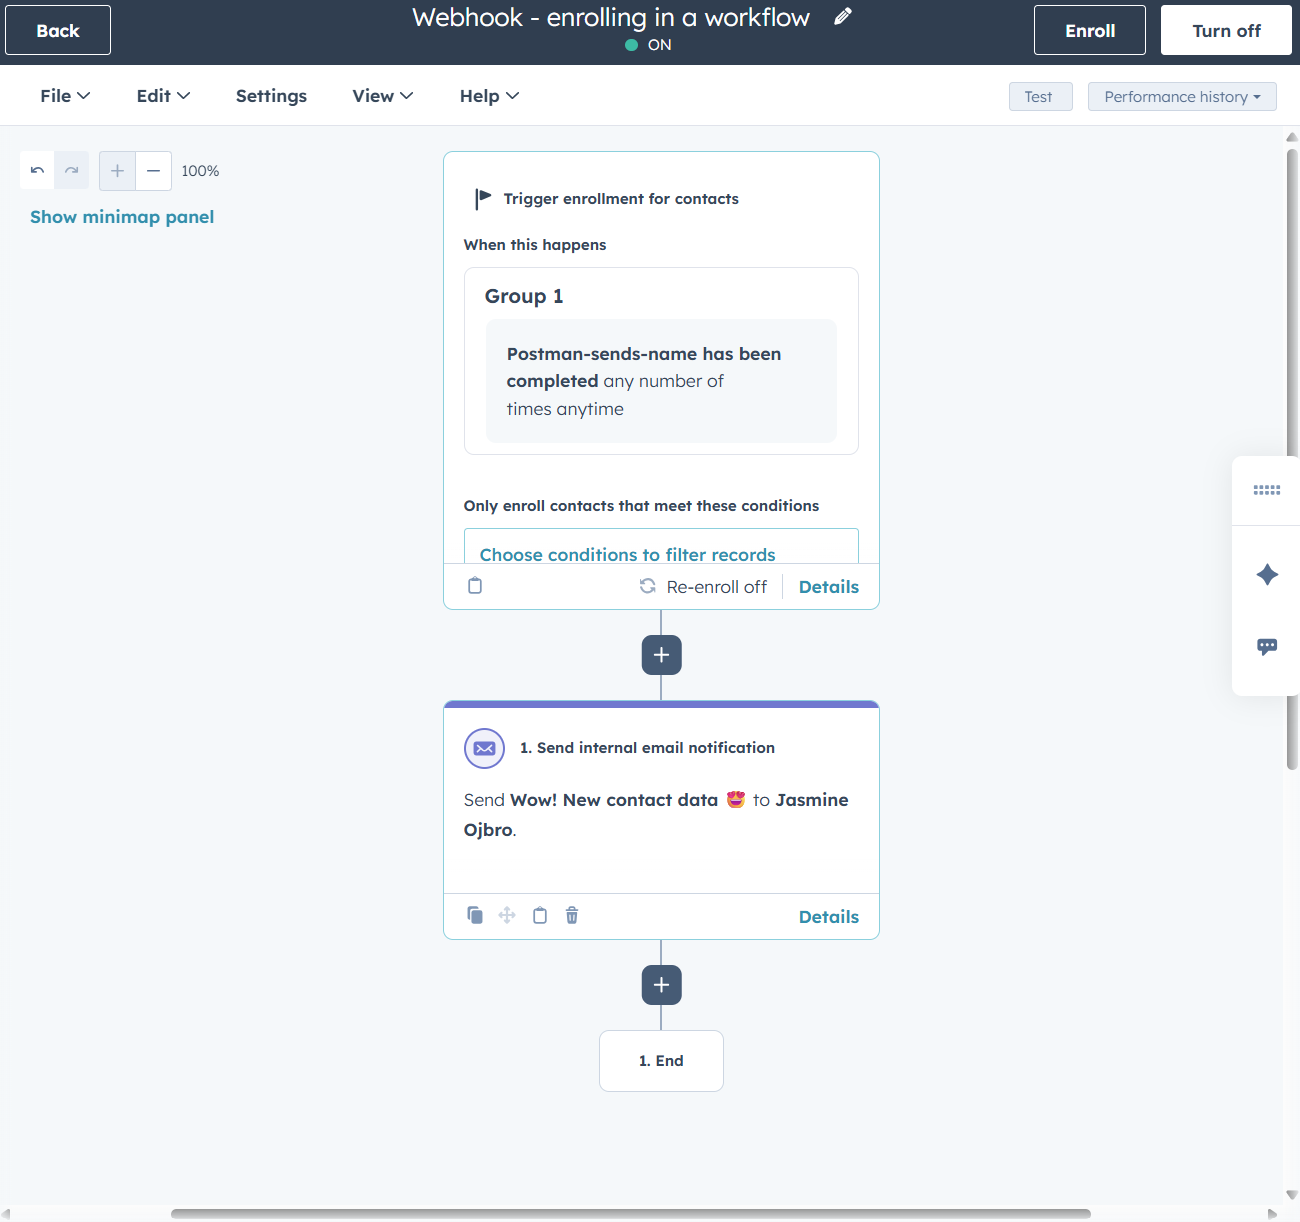
- The steps so far has created the option to use this webhook as a trigger. We now choose it as the enrollment criteria, and get building our workflow like we’d normally do.
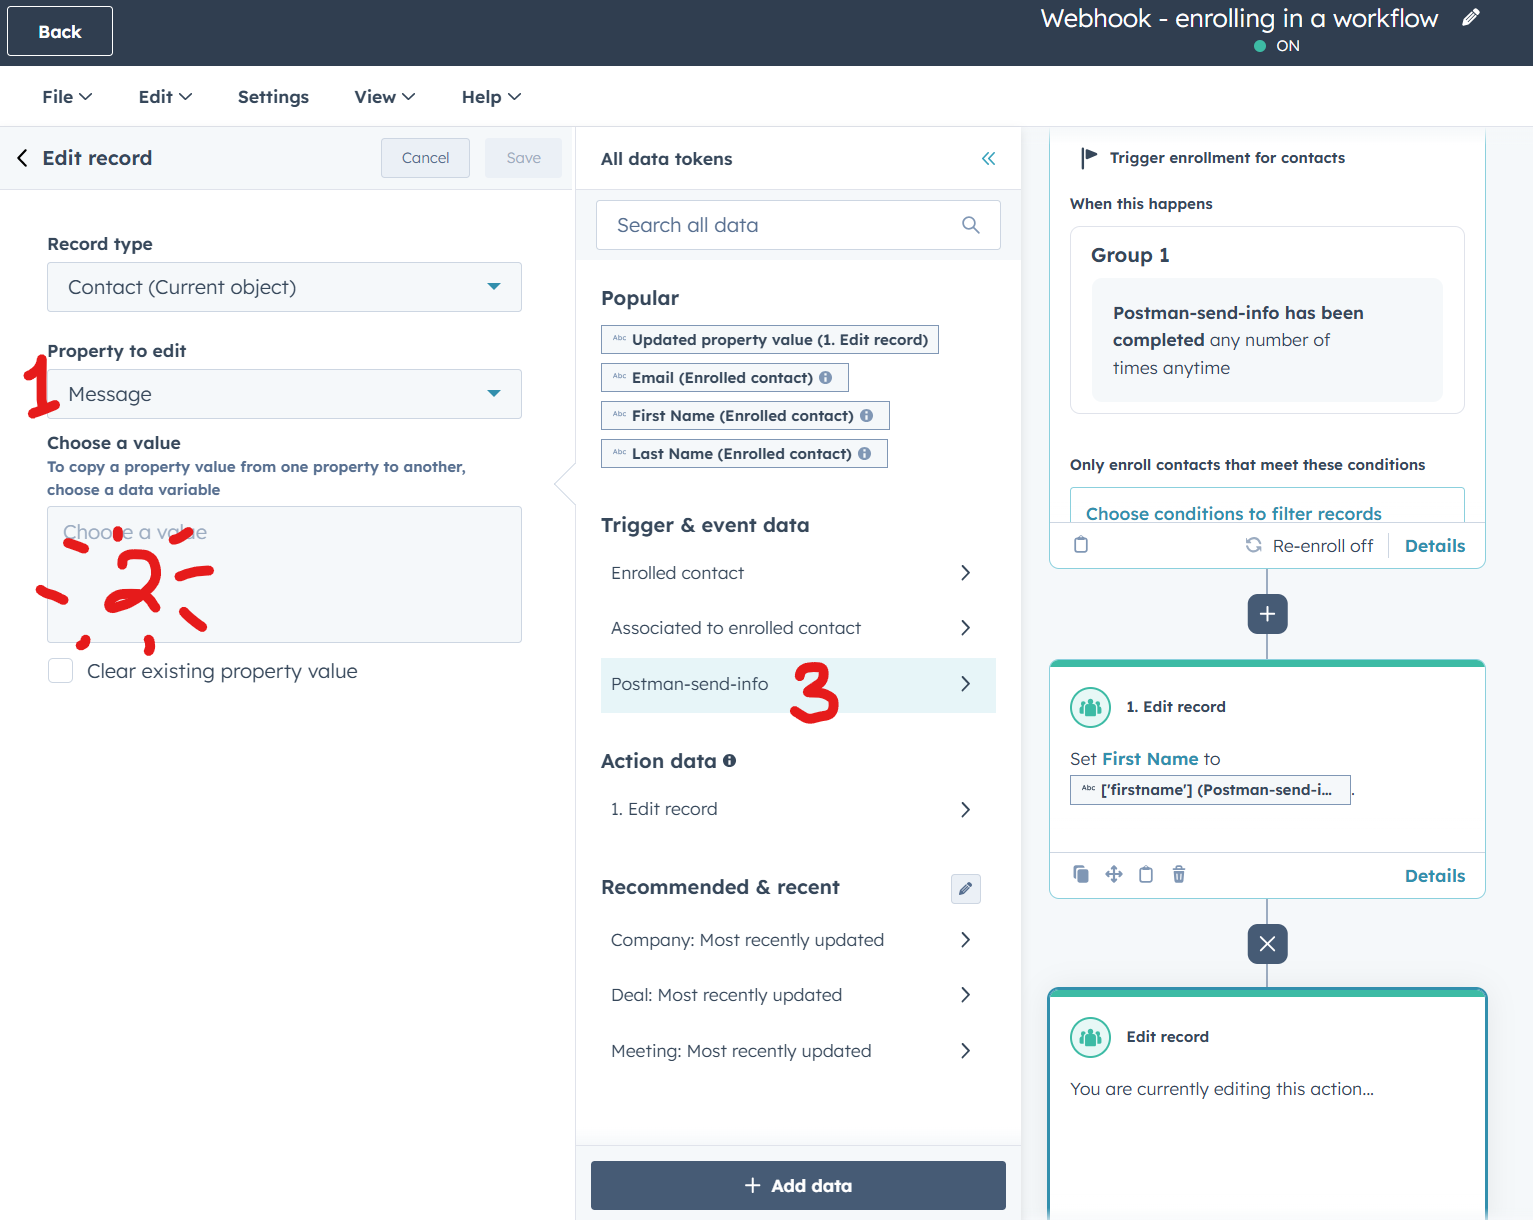
- If we want to use any of the properties send via the webhook, we’ll need to add steps. You can use the data in personalization tokens, to set up branching logic and to edit records. We’ll add an action to edit record
- As I’ve written about in this post on using data in webhooks, not all types can edit records. Stick with types that are text for now and map them against strings, like
firstnameormessage.
- As I’ve written about in this post on using data in webhooks, not all types can edit records. Stick with types that are text for now and map them against strings, like
- To see the full effect, turn the workflow on. You’ll the need to add a contact with the same email addres you are using in the test (the webhook trigger only executes actions for known records). Then hit send in Postman.
POST request body message
Copy paste below to test it:
{
  "email": "jennyC@pm.me",
  "firstname": "Jenny",
  "lastname": "Calendar",
  "hs_buying_role": "champion",
  "message":  "This is my long message about this contact, an important piece of information to send through. Remember to MAP a step with an EDIT CONTACT action to allow this information to be saved."
}
Images on where to click and what you’ll see
Authenticating incoming webhooks
There is no built-in way to authenticate webhooks in the enrollment step.
There are two options for authenticating incoming webhooks:
- Recommended, more secure approach: Send the webhook to a so called serverless function that runs code to authenticate, and sends through passed (authenticated) requests to the webhook. (You can use middleware like Pipedream, Zapier or n8n, but again not as secure as a completely self-owned solution.)
- Doable, but not as secure: Allow enrollment via the webhook, and sort authentication as a custom coded action as the very first step. Failed authentications get yeeted from the flow, while passed ones go through. (This is not secure because it already triggers the flow, potentially letting bad actors get access. The data for the authenticatio method also gets exposed internally and can leak secrets.)
Naurally, we should try both.
Authenticate with middleware (Pipedream)
I’ve picked Pipedream as I have access to this platform, but you can try Zapier, Make or n8n as well. I’d assume the general steps are similar.
Authorization with API keys
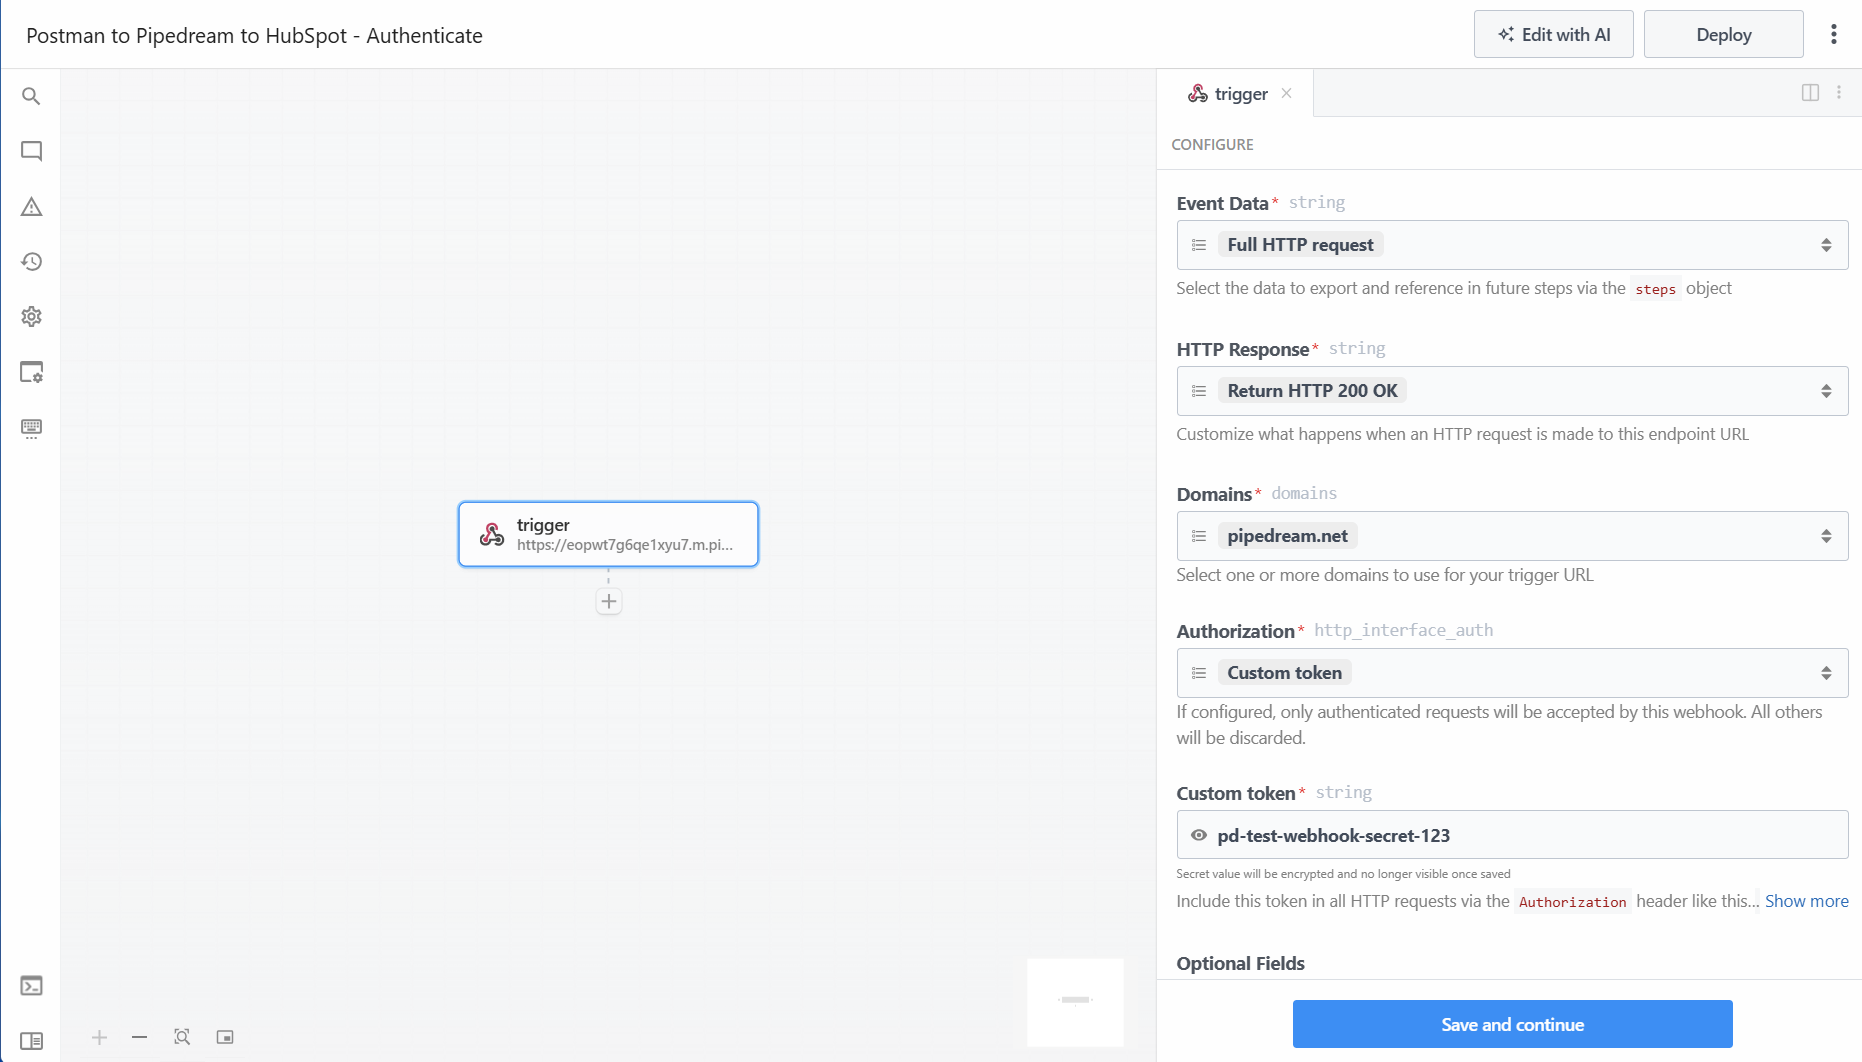
- Create a new project and automation. Add the trigger for webhook and keep most of the settings. Change Authorization to Custom token and set a secret password. For my tests I used:
pd-test-webhook-secret-123. Save and continue. You will now see a dialogue box with a URL to copy. (Sidenote: Pipedream manages encryping this.) - In Postman, you should be able to copy one of your earlier tests as a new POST-request. Change out the URL to use the one from Pipedream.
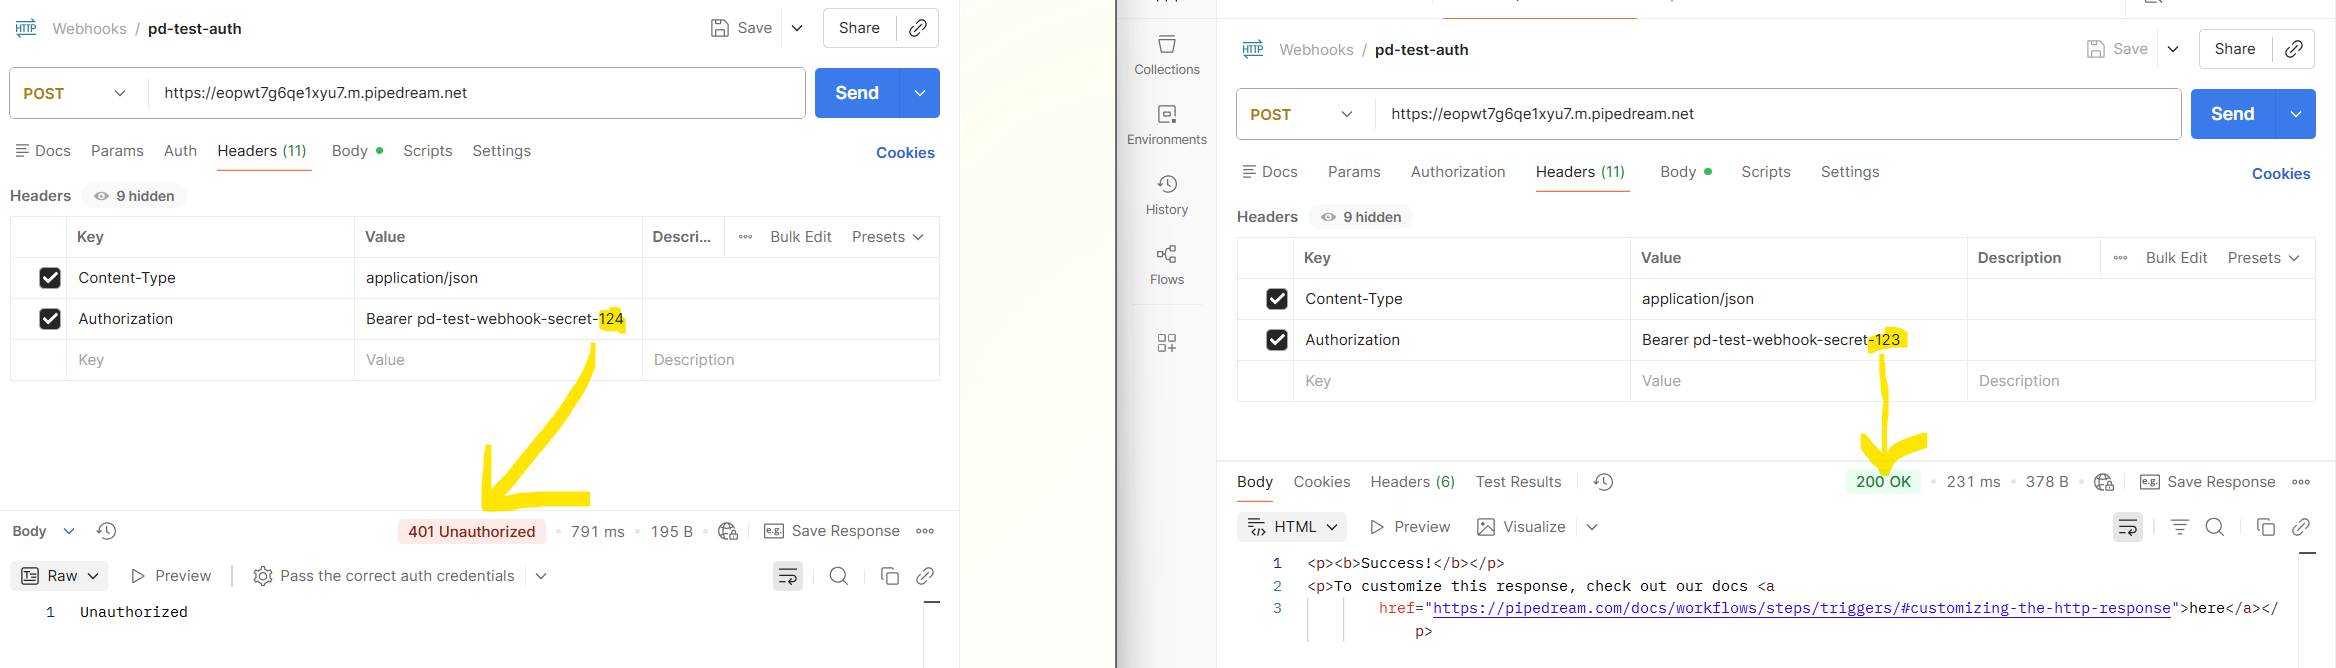
- In Headers add a new pair of Key and Value and set these to:
AuthorizationandBearer pd-test-webhook-secret-123(the bearer is expected by Pipedream as it receives the webhook). - Hit Send and you should have a new event in Pipedream to work with.
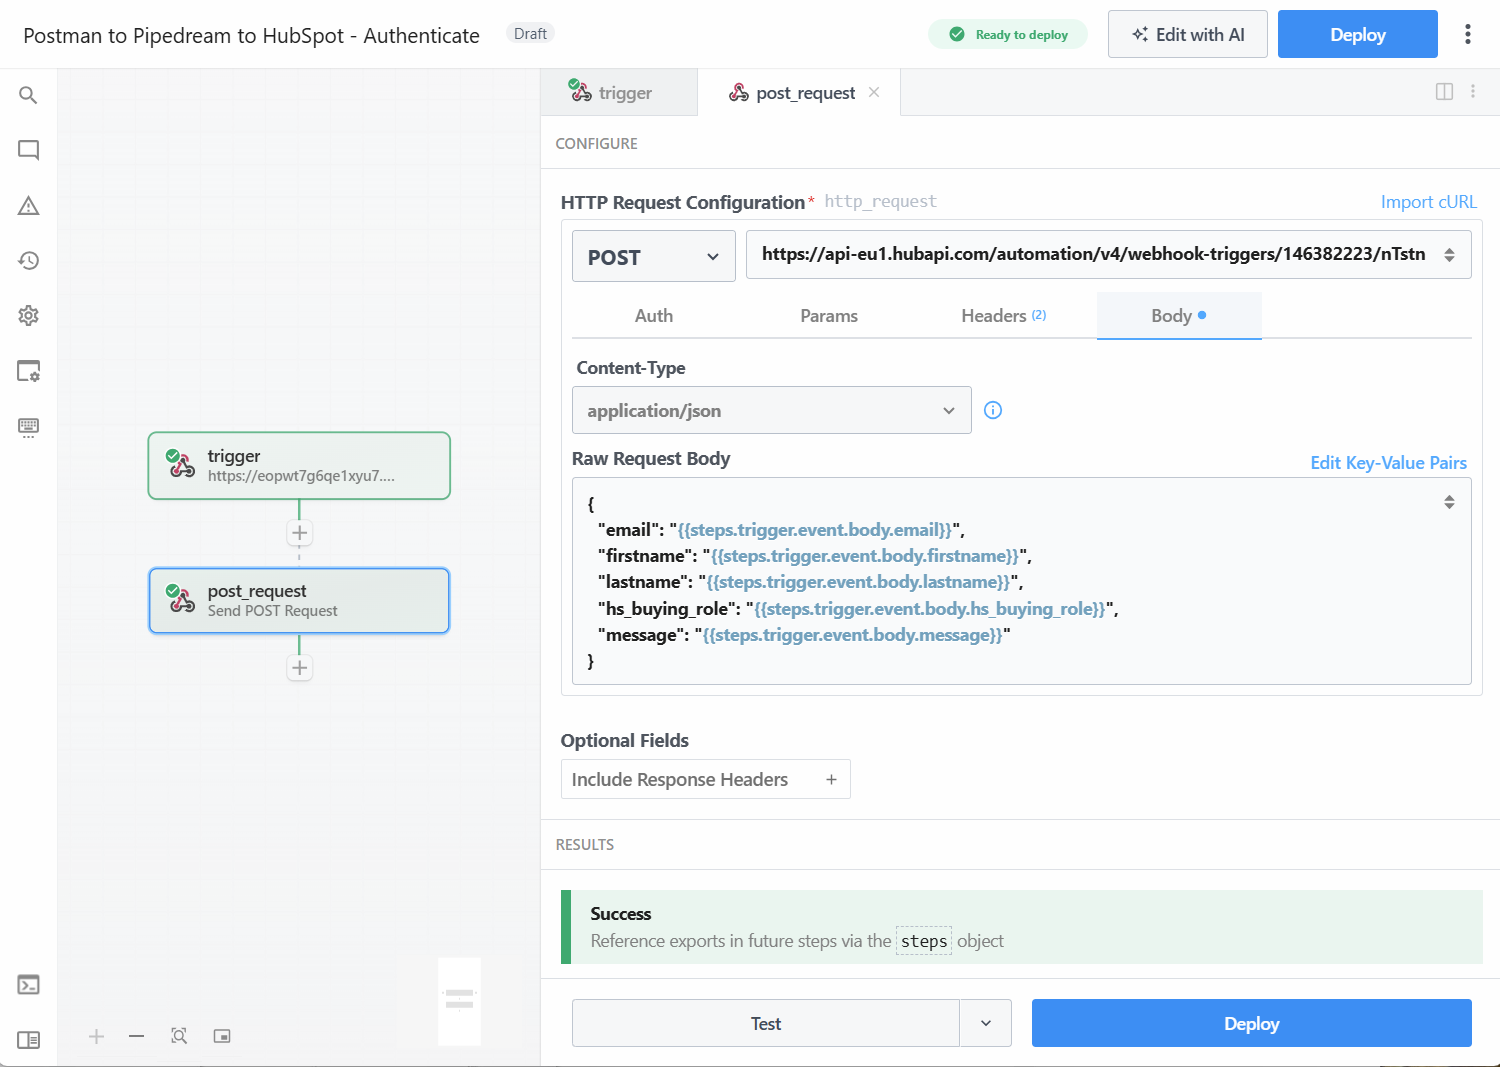
- In Pipedream, we add a new step. A webhook POST request. This will need to be configured like we’d do it in Postmad (key<>value pair and a body message in JSON for the data). We’ll build it out to send the information we get from the earlier step by using token variables.
- Go through the tabs.
- Set Authorization > Authorization type: None
- In Headers make sure that
Content-typeandapplication/jsonare visible in the list. - In Body click Edit raw JSON and add in the code block below. It’s the same message we’re using in Postman, but instead of values (eg. the name Jenny) we tell it to use the data from the enrollment step.
- In Hubspot, set up your workflow with a webhook event. Copy the URL and add it to Pipedream setup of the POST request. Click test and finalise the settings in HubSpot.
- The webhook should now be working! Mess around with the value for the authorization to test invalid token to see that your POST request is being rejected.
Raw requet body from Pipedream POST_request
{
  "email": "",
  "firstname": "",
  "lastname": "",
  "hs_buying_role": "",
  "message": ""
}
Encryption vs authentication
Let’s pause for a quick second and revisit encryption vs authentication.
All our webhook messages are encrypted since we’re sending via HTTPS.
Authentication here is a way to check “did this get sent from a trusted source?”. If the webhook leaks and someone tries sending through data, we need a method to validate it’s not a bad actor trying to POST to our webhook.
The setup we did in the previous step (using an API key) is just sending our password in a message. The recipient checks that the passwor matches, and lets the incoming message through. It’s encoded, but can be reversed, and anyone who has the password can then use it to send through data. There will be no notifications if the request is coming from another source, and access will continue until we switch out the API key.
In our method of request signature in header we work with a solution called HMAC (Hash-based Message Authentication Code).
Hashing is bascially transforming the message into a unique string of characters based on very speficic rules (math… these kind of things always involve algorithms and some kind of math).
The flow, as I’ve understood it, is basically:
- Sender sends a request containing a message (the JSON body we’ve tested earlier)…
- a timestamp value…
- and a hashed signtaure, which is created using the secret, the timestamp value and the message.
The recipient then uses the message, the timestamp value and their copy of the shared secret to hash the same information. If the two values match, it’s authenticated.
This means that the sender sends across:
x-signaturewhich is the hashed format of `(secret, timestamp + message), and then encoded in base64 (like for out API key) to make sure it’s sent across propely and no info is lost in transit (blank spaces etc.)x-timtestampvalue for the recipient to reject requests that are too old, and to allow it to construct a hashed version of the same information to compare output- Content of the message
- Other webhook config settings
An example of what could be sent is:
POST /webhook/hs-inbound HTTP/1.1
Host: example-middleware.com
Content-Type: application/json
X-Timestamp: 1700000000
X-Signature: 9b1f7c8a0e4c1b6f0d3a7a1c2e9f4b8d6c1a0e2f9a4b7d3c8e1f0a6b5c2d
User-Agent: webhook-sender/1.0

{
  "email": "jennyC@pm.me",
  "firstname": "Jenny",
  "lastname": "Calendar",
  "hs_buying_role": "CHAMPION",
  "event": "contact.updated"
}
Recipient gets it, uses their copy of the secret, the X-timestamp and the full body message (the stuff between the squiggly brackets) to hash it. It checks the result against the text string in the X-signature. A match means that the request is authentic. Not matching? Message is not accepted.
Webhook authentication with HMAC
With the same basis we already have in place in the middleware (Pipedream) we’ll add the authentication method for HMAC. This is the most similar to settings for our outbound webhooks on request signatures in header and will mean we need to:
- create a shared secret and add it in Postman + Pipedream (sender & receiver).
- include two new headers in the POST request - a signtaure and a timestamp header.
- setup inside Postman to make sure it generates the HMAC authentication
- add a code step in the Pipedream flow to run the authentication before letting through any data to HubSpot (if validated).
The outline of what to do:
- In Postman, we’ll reuse our post request and update it to work with this method.
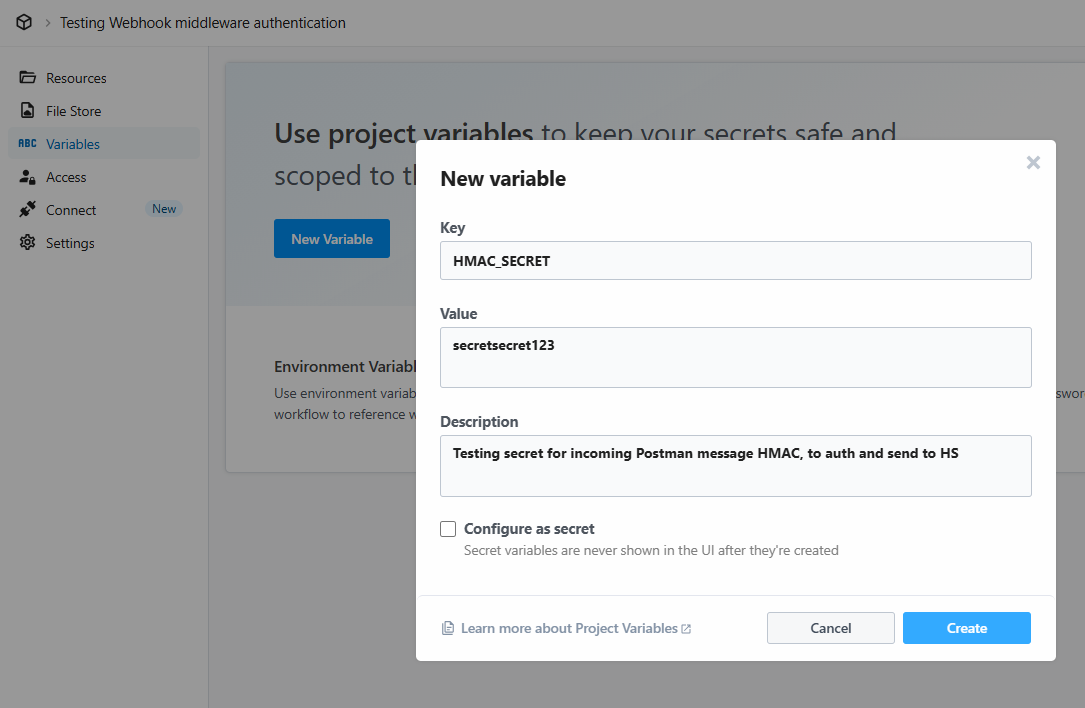
- We’ll need to set up a new Environment where we can store our secret to pull in and use. Add a variable name, eg.
HMAC_SECRETand a shared secret. I ran it withsecretsecret123just for testing. - In the settings, we’ll visit a new heading called Scripts (right next to Body). Here, we can add a script for pre-request and post-request, so code that will run (hashing our outgoing request) before completing the request. We’ll add a script to Pre-request.
- Click Send and check the console for a reply. You should be able to see a success status, and if you open the console you can see the
X-TimestampandX-Signaturewere included in the send. - The info is sent, but the data isn’t being checked. We need to add that as a step in Pipedream. We’ll build onto our earlier flow. In the project for our workflow in the menu we’ll add a Variable and save the same information we saved in a Postman environment.
- Next, go to the automation flow. Add a step between incoming webhook and sending webhook to Run Node code (this will allow us to add code to run Node.js)
- Add in the script (found below for testing, get help from a developer if a live situation).
- You’ll now need to Deploy the workflow (set it live) as the tiny delay between sending test from Postman to choosing the test event and testing it in the flow will mean it times out and fails authentication.
- Make sure to activate your workflow in HubSpot. Send from Postman. Success! Check Hubspot logs for updated data, see in Postman that you get a status 200 success message, and that the run has gone through Pipedream as planned.
- One final thing. Make sure the middleware actually rejects (doesn’t send through) requests when authentication fails. We’ll set up a new environment variable in Postman, but set the
HMAC_SECRETto another value likeWRONGpassword. - Switch environments to this new one (incorrect secret key) and Send.
- You’ll likely get a 200 success message since the request was received by the Pipedream automation. If you go into Pipedream and check the flow, you’ll see that the request fails the validation step and is not sent through to Hubspot. That is a successful authentication!

Pre-request script (Postman)
Generated by a LLM (ChatGPT), most of which I do not understand. Ask a developer to do a propert script for you if you need to use it, but this should be ok for running tests.
// Postman has CryptoJS built in
const secret = pm.environment.get("HMAC_SECRET");
if (!secret) throw new Error("Missing HMAC_SECRET in environment");

// 1) Timestamp (seconds)
const ts = Math.floor(Date.now() / 1000).toString();

// 2) Canonicalize body (so sender & verifier sign the same string)
const rawBody = pm.request.body?.raw || "{}";
let obj;
try { obj = JSON.parse(rawBody); }
catch { throw new Error("Body must be valid JSON"); }
const canonicalBody = JSON.stringify(obj);

// 3) Base string: timestamp + "." + body
const base = `${ts}.${canonicalBody}`;

// 4) Signature: HMAC-SHA256(secret, base) → hex
const sig = CryptoJS.HmacSHA256(base, secret).toString(CryptoJS.enc.Hex);

// 5) Attach headers
pm.request.headers.upsert({ key: "X-Timestamp", value: ts });
pm.request.headers.upsert({ key: "X-Signature", value: sig });
pm.request.headers.upsert({ key: "Content-Type", value: "application/json" });

// Optional debug
console.log({ ts, base, sig });
Node.js code (Pipedream)
This is added to the Pipedream step. Same warning as the code block before.
import crypto from "crypto";

export default defineComponent({
  async run({ steps }) {
    const secret = process.env.HMAC_SECRET;

    const headers = steps.trigger.event.headers || {};
    const ts = String(headers["x-timestamp"] || "").trim();
    const provided = String(headers["x-signature"] || "").trim();

    if (!ts || !provided) throw new Error("Missing X-Timestamp or X-Signature");

    // Replay protection: 5 minutes
    const now = Math.floor(Date.now() / 1000);
    if (Math.abs(now - Number(ts)) > 300) {
      throw new Error("Timestamp outside allowed window");
    }

    // Canonicalize body in the same way Postman does
    const canonicalBody = JSON.stringify(steps.trigger.event.body || {});
    const base = `${ts}.${canonicalBody}`;

    const computed = crypto
      .createHmac("sha256", secret)
      .update(base, "utf8")
      .digest("hex");

    const ok =
      provided.length === computed.length &&
      crypto.timingSafeEqual(Buffer.from(provided, "utf8"), Buffer.from(computed, "utf8"));

    if (!ok) throw new Error("Invalid signature");

    return { verified: true };
  },
});
Resources
This bit is tough to grasp, and some helpful resources are:
- HMAC Authentication: Secure Your APIs with Hash-Based Message Authentication Codes
- What Is Hashing, and How Does It Work?
- How HMAC Works, Step-by-Step Explanation with Examples
Authenticate inside HubSpot with CCA
Using this setup is against best-practice.
Why? When a webhook request is sent to this kind of workflow a few things to be aware of:
- The webhook is received, and the workflow starts. A record that matches the payload is enrolled before it can be checked and validated. This means that there are runs in the history, a possbility to trigger the workflow many times (repeat spam submissions can trigger limits to make the workflow stop working). If the code step is fauly, the request goes through and malicious requests can cause damage/errors.
- The
x-signatureandx-timestampinfo should be sent in the header. For HubSpot to recieve the data, it all needs to go in the body. This means the info can be seen in logs/history, test events and can be copied and passed around. Not the same as sharing the secret, but still sensetive info that is best kept away from prying eyes.
Let’s set it up anyway so we’ve seen it in action. To reduce some of the possible negative impact, we’ll have a code step running directly after the webhook is triggered. It will weed out any requests that fail validation and authentication.
As earlier, my skills at the point in time that I’m running these tests are not so great that I’ve written the code myself; fed straight from an LLM. So treat with caution and only use for testing purposes.
- In HubSpot, create a new contact based workflow and set the enrollment trigger to Recieved a webhook from an external app. Get the URL for the webhook, and navigate to Postman.
- In Postman, create a new POST request. As earlier, add in the Headers Key and Value to:
Content-typeandapplication/jsonand in the Body- settings, click raw and add the JSON info seen below. Hit Send. - Navigate back to HubSpot and complete the webhook setup with the test data. Map all the fields to type: text, and associate to contact based on the HubSpot property email. (Sidenote: I got this working, but you may want/need to format the
tsas a number) - Add the first action in the workflow, the Custom Code Action and paste the code further down below. In the settings, there is a drop-down for secrets where we’ll need to add a new one for
HMAC_SECRET(use passwordsecretsecret123) andEXPECTED_API_KEYwith the value ofsecretkey(these are all for testing, real-live ones need to be less obvious). - Between the code block adn the Secrets, make sure to add Property to include in code. You map the information sent in the JSON message by picking data token (click the select a property field > click the name of your incoming webhook > pick the property). It will automatically pull in the key (
email,firstname,lastname,hs_buying_role,message,api_key,ts,sig) used in the code. - Below the code block there is an area for Data outputs. Click the Add output and add a Boolean set to
auth_okand a String set toreason. Adding these are necessary to be able to build a branching logic using output from the code step. Save. - Navigate to Postman. In here, you need to make sure you have an environment set up with these two variables and values to apply when you send tests from your POST request. Navigate to Environments > Create new environemnt > Adding your variables and values. Hit save, go back to your Postman Collection with the POSt request and swith environment in the top right corner.
- Switch back to HubSpot. Add an action step, the Branch and pick Based on property value. In the picklist you should now be able to find Custom code under the headline of Action data, and to pick the data outputs you added earlier. (If these aren’t visible for some reason; set the workflow live and run the POST request once from Postman) I set my follow up actions to edit the record with the new data (if Pass), or to send me a notification if validation failed.
- All done.
Postman body message
JSON message should look familiar by now; we’ve added the final three rows for adding the API key (api_key), the signature (sig portion), and timestamp (ts).
{
  "email": "jennyC@pm.me",
  "firstname": "Jenny",
  "lastname": "Calendar",
  "hs_buying_role": "CHAMPION",
  "message": "This is my long message",

  "api_key": "",
  "ts": "",
  "sig": ""
}
HubSpot CCA code
The code checks the API key (to see if the value is known; known password allows you through) and then the HMAC (is the request valid?). It spits back if the checks have Passed or Failed; and from there you can build the logic of what happens next using workflow action steps.
const crypto = require("crypto");

exports.main = async (event, callback) => {
  const EXPECTED_API_KEY = process.env.EXPECTED_API_KEY;
  const HMAC_SECRET = process.env.HMAC_SECRET;

  const fail = (reason) => callback({ outputFields: { auth_ok: false, reason } });

  const apiKey = String(event.inputFields.api_key || "").trim();
  const ts = String(event.inputFields.ts || "").trim();
  const providedSig = String(event.inputFields.sig || "").trim().toLowerCase();

  // 1) API key check
  if (!apiKey) return fail("Missing api_key");
  if (apiKey !== EXPECTED_API_KEY) return fail("Invalid api_key");

  // 2) Timestamp check (5 min)
  if (!ts || !providedSig) return fail("Missing ts or sig");

  const now = Math.floor(Date.now() / 1000);
  const tsNum = Number(ts);
  if (!Number.isFinite(tsNum)) return fail("ts is not numeric");
  if (Math.abs(now - tsNum) > 300) return fail("Timestamp outside allowed window");

  // 3) Rebuild signed object in fixed key order
  const signedObj = {
    email: event.inputFields.email || "",
    firstname: event.inputFields.firstname || "",
    lastname: event.inputFields.lastname || "",
    hs_buying_role: event.inputFields.hs_buying_role || "",
    message: event.inputFields.message || "",
    api_key: apiKey,
    ts: ts
  };

  const canonical = JSON.stringify(signedObj);
  const base = `${ts}.${canonical}`;

  const computedSig = crypto
    .createHmac("sha256", HMAC_SECRET)
    .update(base, "utf8")
    .digest("hex")
    .toLowerCase();

  // Compare as hex bytes
  let ok = false;
  try {
    const a = Buffer.from(providedSig, "hex");
    const b = Buffer.from(computedSig, "hex");
    ok = a.length === b.length && crypto.timingSafeEqual(a, b);
  } catch (e) {
    return fail("sig is not valid hex");
  }

  if (!ok) return fail("Invalid signature");

  return callback({ outputFields: { auth_ok: true, reason: "OK" } });
};
Postman pre-requisite script
Javascript.
function toHex(arrayBuffer) {
  const bytes = new Uint8Array(arrayBuffer);
  return Array.from(bytes, b => b.toString(16).padStart(2, "0")).join("");
}

async function hmacSha256Hex(secret, message) {
  const enc = new TextEncoder();
  const cryptoKey = await crypto.subtle.importKey(
    "raw",
    enc.encode(secret),
    { name: "HMAC", hash: "SHA-256" },
    false,
    ["sign"]
  );
  const sigBuffer = await crypto.subtle.sign("HMAC", cryptoKey, enc.encode(message));
  return toHex(sigBuffer);
}

(async () => {
  const apiKey = pm.environment.get("EXPECTED_API_KEY");
  const hmacSecret = pm.environment.get("HMAC_SECRET");
  if (!apiKey) throw new Error("Missing Postman env var EXPECTED_API_KEY");
  if (!hmacSecret) throw new Error("Missing Postman env var HMAC_SECRET");

  const rawBody = pm.request.body?.raw || "{}";
  let obj;
  try { obj = JSON.parse(rawBody); }
  catch { throw new Error("Body must be valid JSON"); }

  // Fill api_key + timestamp
  const ts = Math.floor(Date.now() / 1000).toString();
  obj.api_key = apiKey;
  obj.ts = ts;

  // Build the signed object in the SAME key order as your HS CCA
  const signedObj = {
    email: obj.email || "",
    firstname: obj.firstname || "",
    lastname: obj.lastname || "",
    hs_buying_role: obj.hs_buying_role || "",
    message: obj.message || "",
    api_key: obj.api_key,
    ts: obj.ts
  };

  const canonical = JSON.stringify(signedObj);
  const base = `${ts}.${canonical}`;
  obj.sig = await hmacSha256Hex(hmacSecret, base);

  pm.request.body.update(JSON.stringify(obj));
})();
Debugging the custom code action and flow
To get this particular setup correct took a lot of trial and error (remember, I’m using LLM provided code here!). To check what’s going on when a webhook is recieved but it doesn’t go down the expected path (I sent, but the validation failed), you’ll need to check the Custom code event.
When the workflow is activated, send the POST request.
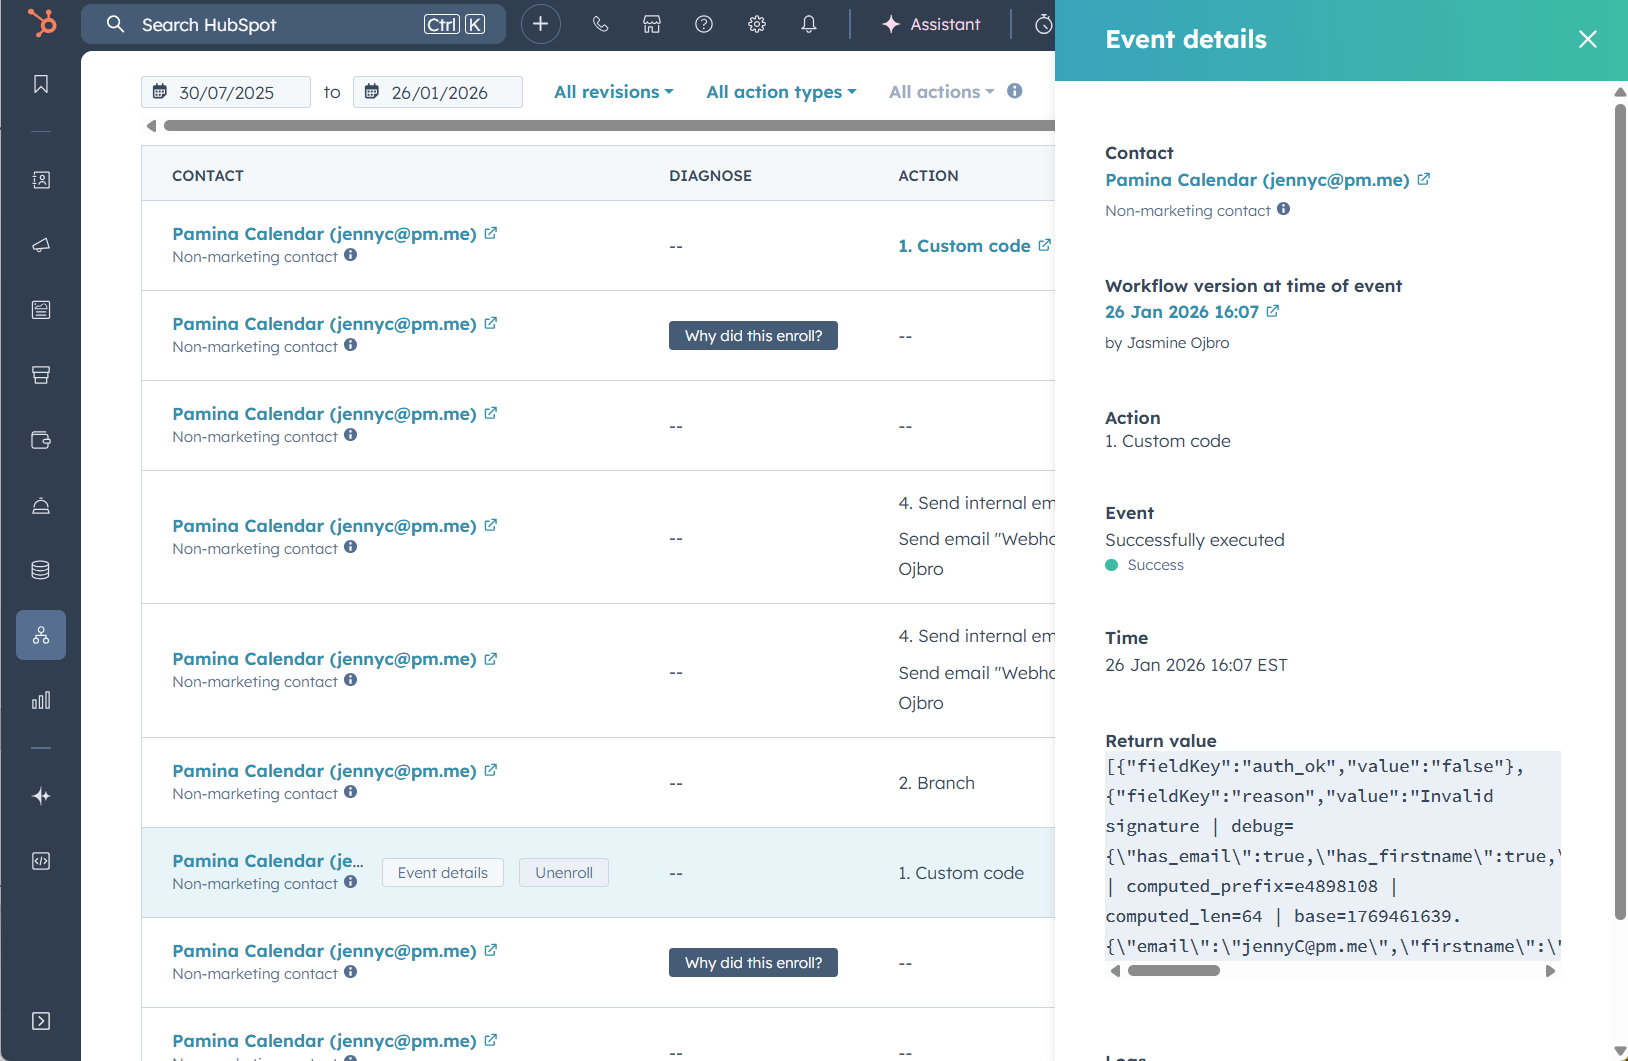
In the workflow editing window, go to Peformance history (tiny button, top right) and pick Action logs. Scroll to the action for custom code and click the button that appears on hover for Event details. A slideout window should give you Return value that can be used for figuring out the problem.
Send webhook via a custom coded action
One final area I want to visit before closing the book on learning about webhooks is sending a webhook via custom coded actions. In the earlier steps, we sent authenticated POST/GET requests with an action step. They are fairly limited in terms of how you can configure them.
The real pros (AKA keyboard angels AKA developers AKA programmers) do it in style using custom coded action. What we’ve been doing so far in Postman, but like code all the way.
With CCAs you can shape the way the values are presented, like put them inside a static message for example. You can build further logic or have more complex and robust rules around authorisation. This “level” is where the integrated apps available in the workflow automations are at (they’ve been built as Workflow Extensions).
With making the CCA send the webhook, you can do cool things like:
- Add a differen authentication method than the two built in presets
- Layer up! Bearer token + HMAC for example
- Rotate keys depending on the environment (sandbox or “prod” which means production)
- Create more branches based on output, use the data in a different way
Knuckle crack and fingers on keys. We’ll use Pipedream (again, you can likely switch this out for Zapier, Make, n8n or another equivalent) and HubSpot (this one you need for this tutorial. Yes, I’m hilarious). Steps are below, and further down the test code (LLM provided, don’t use for real projects!).
- Starting in Pipedream, set the trigger to HTTP/Webhook. Leave the standard settings intact, we’ll be adding HMAC authentication steps in the code. We can reuse the HMAC secret we used earlier, to set one up, follow the steps from earlier.
- Add a node.js code step right after the trigger. Add the code block further below. It will verify the HMAC and show us the verdict: OK or invalid.
- Deploy the Pipdream flow.
- We’ll set up a new workflow. We’ll trigger it on manual enrollment for contacts so we can control our test.
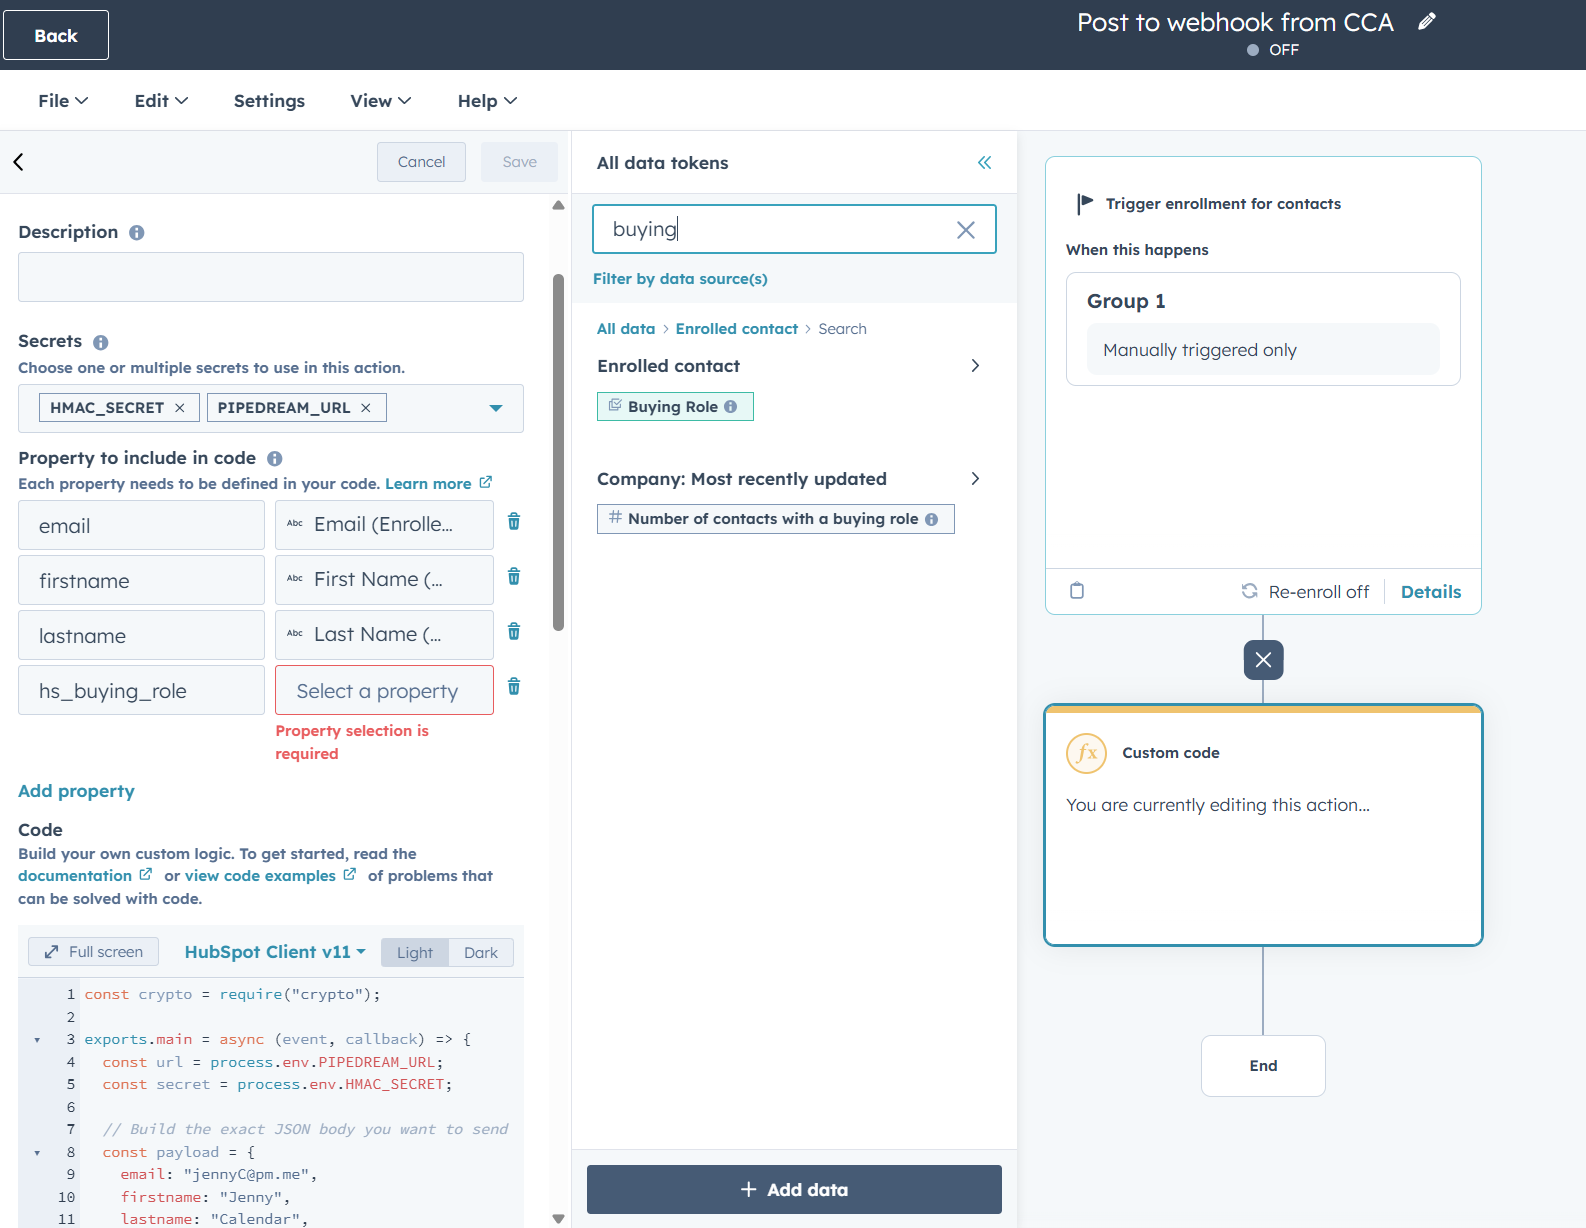
- Add a first step for Custom Code and add the code further below into the block area for code. In the settings, there is a drop-down for secrets where we’ll need to add a new one for the
HMAC_SECRET(set it to the same as in Pipdream, per earlier examplesecretsecret123) andPIPEDREAM_URLto pull in the information when the code runs. Sidenote the webhook url can be added directly into the code, but using secrets is a way to safeguard accidentally sharing the full url when debugging or sending screenshots (which can lead to data leaks). - Before we can run the code, we’ll need to map the fields we’ve added to the code. We’ll map
email,firstname,lastname, andhs_buying_roleto match out test. This will allow the request to pull throgh and send different data depending on the contact we enroll. - Inside the custom code step, you can scroll to the bottom of the window and under Test action choose a contact and initiate a test.
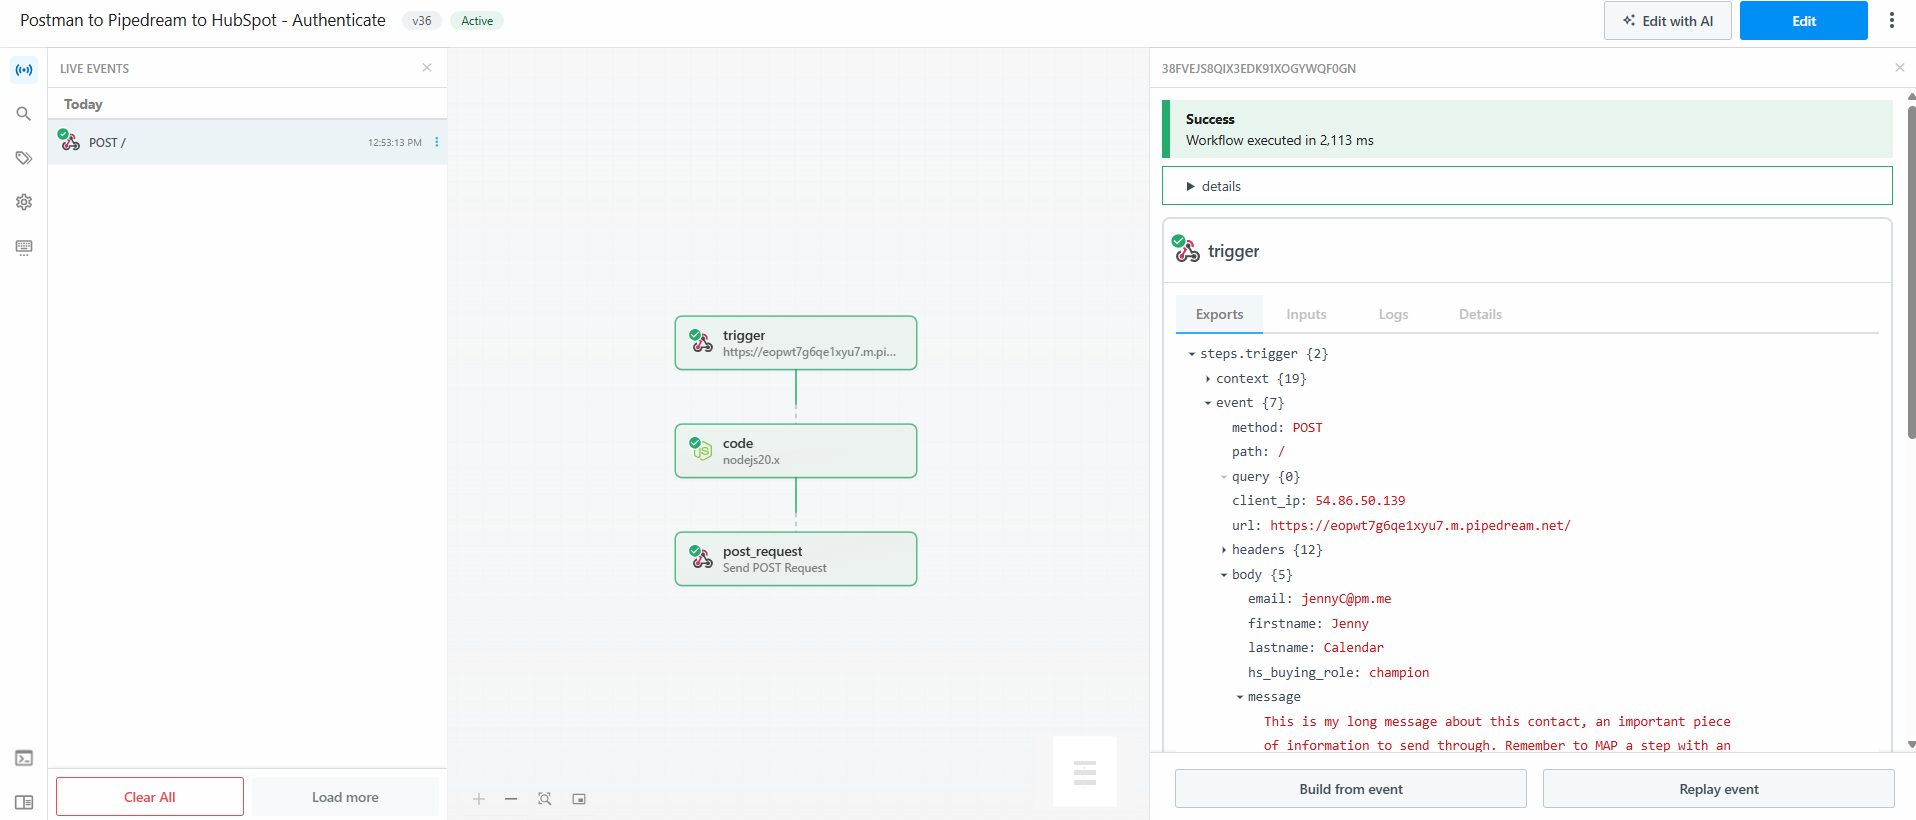
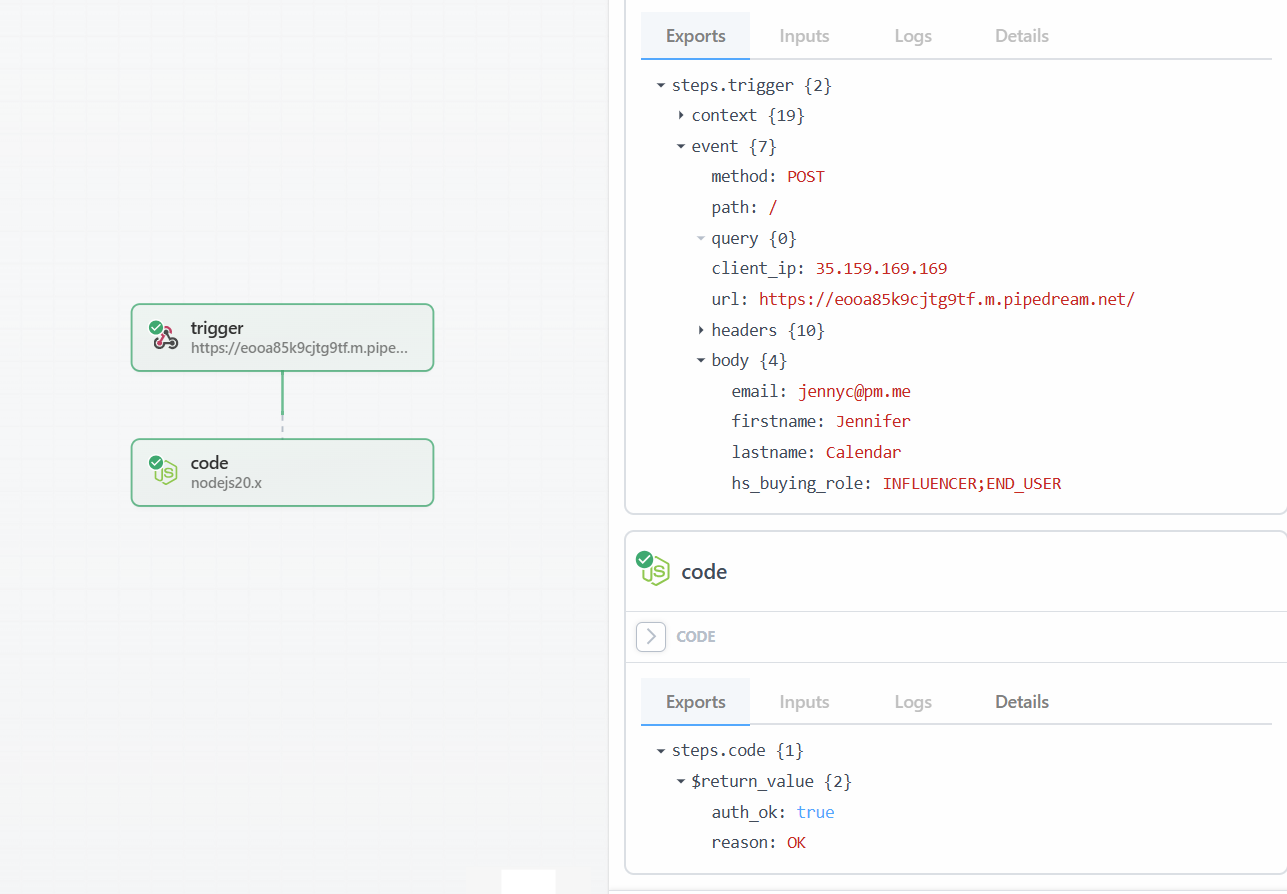
- Check Pipedream; it should show a new event and a the result of authentication set to
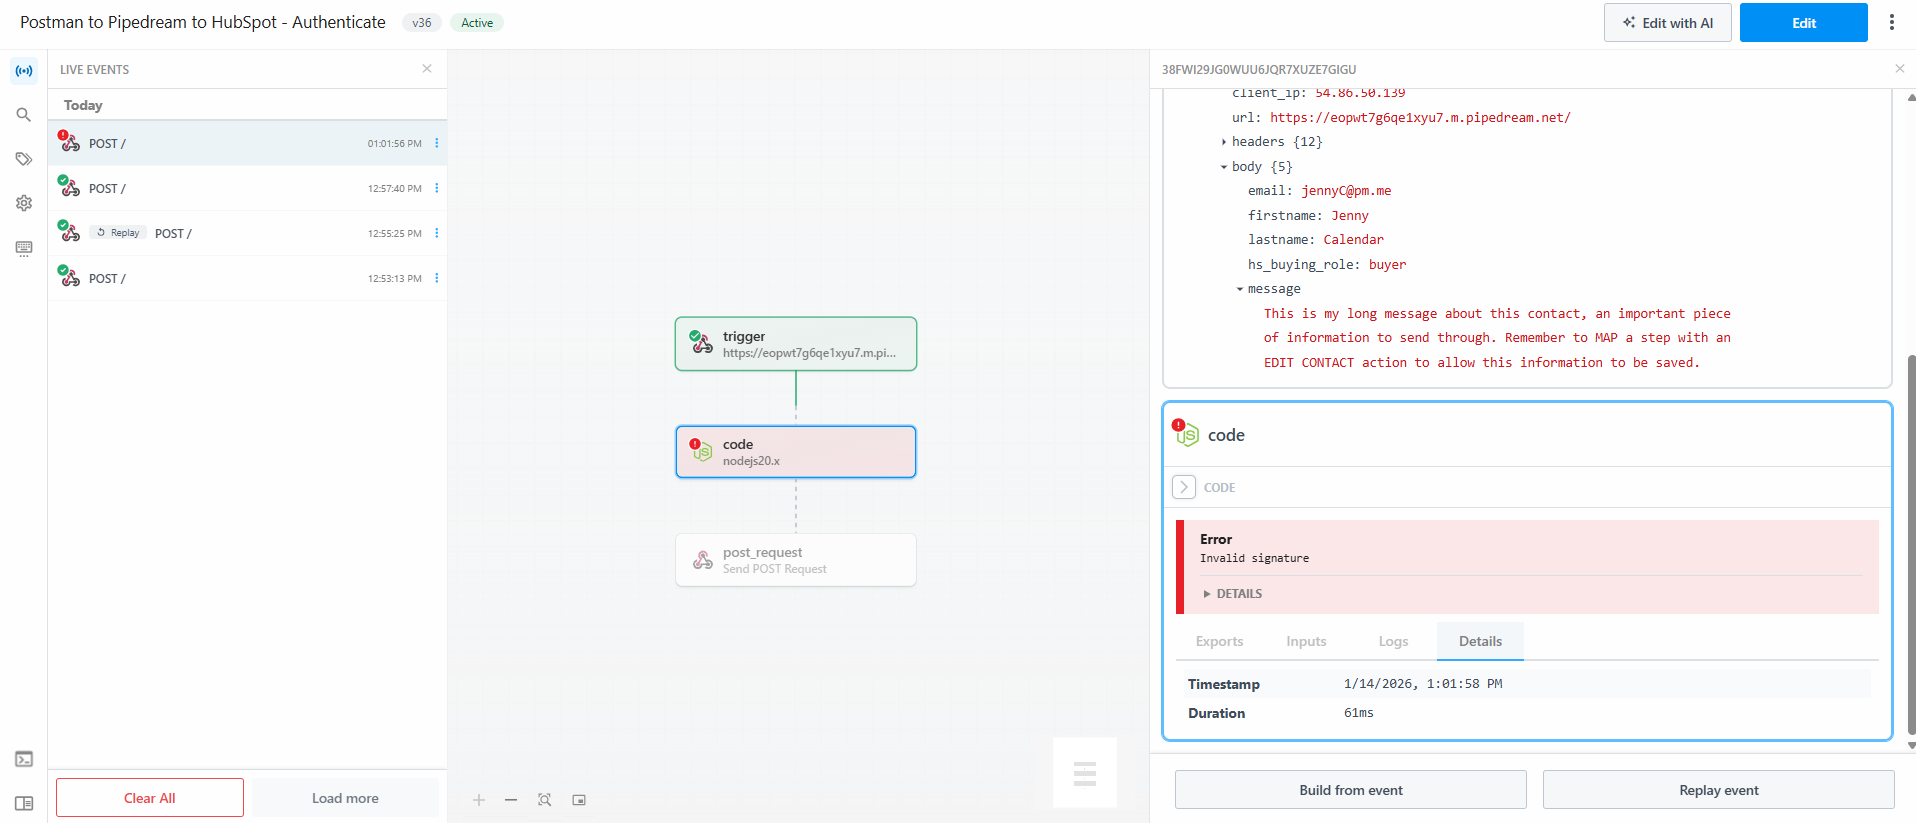
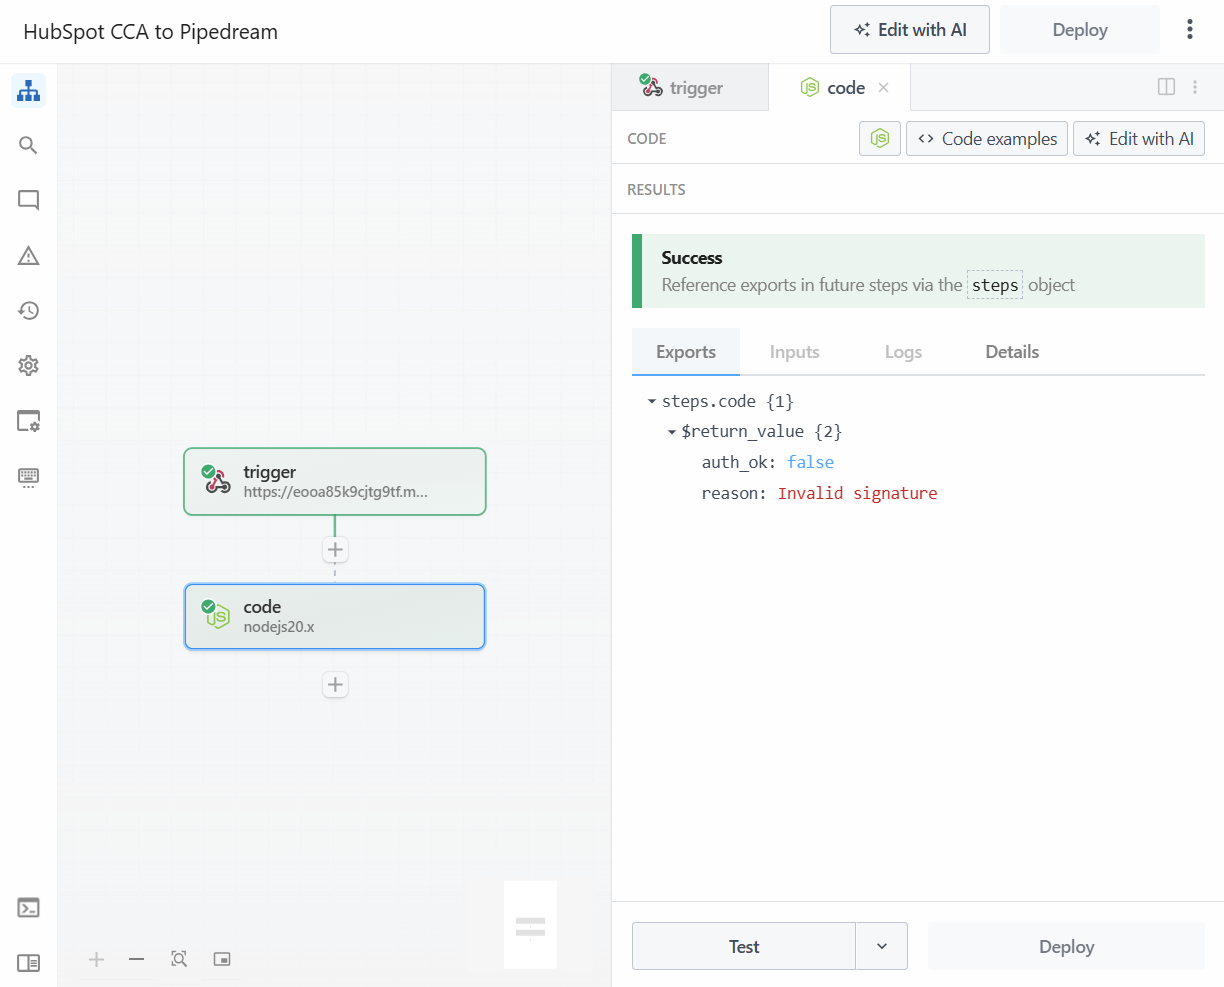
auth_ok: truewithreason: OK. - Click to Edit the flow. In the trigger step, you can now pick the same event that was just authenticated. Click Test workflow and pick the code step. The outcome will now have changed to
auth_ok: falsewithreason: invalid signature. The the code hashing the same info got a different signature because of the time delay.
Basics are done. This can be layered with fancier code for authentication, manipulation of data before sending or after receiving and all sorts of programming goodies, but does rely on better grasp of code.
Test code for the steps
Provided by our AI overlords, I don’t grasp what it does, so cannot vouch that it does what it’s supposed to.
Node.js code in Pipedream
import crypto from "crypto";

export default defineComponent({
  async run({ steps, $ }) {
    const secret = process.env.HMAC_SECRET;

    const headers = steps.trigger.event.headers || {};
    const ts = String(headers["x-timestamp"] || "").trim();
    const provided = String(headers["x-signature"] || "").trim();

    const fail = (reason) => ({ auth_ok: false, reason });

    if (!ts || !provided) return fail("Missing X-Timestamp or X-Signature");

    const now = Math.floor(Date.now() / 1000);
    if (Math.abs(now - Number(ts)) > 300) return fail("Timestamp outside allowed window");

    const canonicalBody = JSON.stringify(steps.trigger.event.body || {});
    const base = `${ts}.${canonicalBody}`;

    const computed = crypto
      .createHmac("sha256", secret)
      .update(base, "utf8")
      .digest("hex");

    const ok =
      provided.length === computed.length &&
      crypto.timingSafeEqual(Buffer.from(provided, "utf8"), Buffer.from(computed, "utf8"));

    if (!ok) return fail("Invalid signature");

    return { auth_ok: true, reason: "OK" };
  },
});
Node.js code in HubSpot
const crypto = require("crypto");

exports.main = async (event, callback) => {
  const url = process.env.PIPEDREAM_URL;
  const secret = process.env.HMAC_SECRET;

  // Pull from workflow input fields (configured in the action)
  const payload = {
    email: event.inputFields.email || "",
    firstname: event.inputFields.firstname || "",
    lastname: event.inputFields.lastname || "",
    hs_buying_role: event.inputFields.hs_buying_role || "",
  };

  const ts = Math.floor(Date.now() / 1000).toString();
  const canonicalBody = JSON.stringify(payload);
  const base = `${ts}.${canonicalBody}`;
  const sig = crypto.createHmac("sha256", secret).update(base, "utf8").digest("hex");

  try {
    const res = await fetch(url, {
      method: "POST",
      headers: {
        "Content-Type": "application/json",
        "X-Timestamp": ts,
        "X-Signature": sig,
      },
      body: canonicalBody,
    });

    const text = await res.text();

    callback({
      outputFields: {
        ok: res.ok,
        status: res.status,
        response_snippet: text.slice(0, 500),
        sent_timestamp: ts,
        sig_prefix: sig.slice(0, 12),
      },
    });
  } catch (e) {
    callback({
      outputFields: { ok: false, error: String(e) },
    });
  }
};
Closing remarks
Feels like this needs some kind of outro?
I think we can give ourselves a big round of applause for completing a ton of experimentation, learning a lot along the way, and hopefully feeling more empowered when talking to others about this topic.
Yay us!