First attempts at API requests to and from HubSpot with Python
When you’re surrounded by highly technical people you’ll run into the term API eventually.
I’m no different and have heard it in passing from my own colleagues and clients alike. Some recent examples include:
- Adding a list of job ads (with clickable links to the ad) from a recruitment tool (take your pick!) onto a HubSpot website page. The cool thing being that it’ll update the list based on actions in the recruitment tool. Neato.
- Using a webhook in a HubSpot workflow to send some kind of data ~ somewhere ~ (presumably a 3rd party software to tell it to action things… like checking bank details have been filled in).
- Building your own private app to do ~ something ~ (I’ve seen these in lots of client portals, but since it’s just an endpoint I don’t know specifics).
- Exporting and importing data between HubSpot and a 3rd party platform (homebuilt or another one on the market where no fancy app marketplace integration exists) for things like contact information or even sync up a full ERP product library.
A large part of what I do most days is HubSpot or website related. So I thought it was time to get a grip on what this is and how one goes about building and managing one. In case I need to chat to a developer about it, or am pushed into a scenario where I have to do it myself.
What is an API?
API = Application Programming Interface. It’s a set of rules to allow systems to interact and exchange information with each other.
An API integration works like a robot that follows instructions. To take this project as an example, it connects to a HubSpot portal (the endpoint, using an API token as passkey to gain access), grabs information (GET request), and then follows the next set of instructions to connect to another portal and add that information (POST request). The API itself is the rules that HubSpot has set up to allow the little robot to gain access when it can present the right verification (API token).
The API request is written in code to explain what the robot should do, and how to act in different scenarios (there was an error, or the request was successful).
Building vs Using an API
It took me forever to reflect on the difference here, and it’s an important distinction to understand.
To build an API means setting up the rules code within a system or software to allow others to call on it (make requests) and manipulate things. You software is an island, and the API a bridge.
What this project does is make API calls to HubSpot (who built an API) to use the API. You walk the bridge over to the island.
If I say build API later on (or similar variations), I’m referring doing API request/calls, and not creating the API itself. I only understood the distinction is terms very late into the project, and am frankly too lazy to rewrite it.
Let’s get technical - a summary of the process to set up an API integration
Starting with the idea of “I want to build an API integration for HubSpot”, a Youtube video (this one: APIs for Beginners - How to use an API (Full Course / Tutorial) and the realisation that I should start small with a scenario I actually grasp how to do in the user interface (import/export contact data between portals) for comparison, I set about information gathering.
The progress that followed was an absolutely chaotic mess of wrong turns and side quests (some of them abandoned), but overall a highly useful and rewarding experience.
Sidenote: Done with a little help from ChatGPT and a friend
Through work I have access to ChatGPT o4 (paid), and my darling husband has a background with code optimisation for Python. He helped me with terminal and GitHub, and acted as a sounding board to understand some of the Python logic.
ChatGPT was… invovled. Anyone having interacted with an AI at any point will know, you need good prompts to get solid answers. Contextual understanding is fundamental to prompting (in my opinion as you can ask the right kind of precise questions). And a high level of knowledge to know if the answer is correct or not. I had neither.
I got ChatGPT to read through documentation to identify “what’s next” for things like Postman settings, explain central concepts and help me with formulating code. I have not copy-pasted straight up without grasping exactly what something does, as the whole point of this exercise is to understand things well enough to be able to do it again.
The AI model was seriously unhelpful in things like laying out a learning path with progression from complete beginner to making a passable API request, and led me down several rabbit holes and completely missing out on simple steps before introducing harder ones.
Or as ChatGPT would put it: why yes Jasmine, as a complete beginner looking for next steps, it is easier for you to set up your own virtual server with Node.js so that you can export your Postman code and run it via an integration, rather than make the code in Python to run on your computer locally.
Back to the table of contents and process overview
As a reminder for myself, and for anyone looking to get from point A (no clue) to point B (working API request, yay!), the course corrected learning steps I should have followed to keep it on track is:
- Define what the API request will do
- Set up a HubSpot Developer Account
- Create a Postman account and set up the varables to test the API requests
- Create and test the GET request
- Create and test the POST request
- Setting up the local coding environment by downloading a code editor and set it up to be able to run Python files
- Create the Python script for the GET request
- Create the Python script for the POST request
- Increase security by moving token variables to another file
- Save and upload the code to GitHub
- Final thoughts and project summary
Bonus: Get a basic understanding of the terminal/command line)
Continue scrolling and reading for step-by-step instructions.
Step 1: Define what the API request will do and set the scope of the build
The basic flow of what I want to do is:
- In HubSpot Portal Source - take Contact data
- Go to HubSpot Portal Destination - add the taken Contact data to create new contacts
Knowing the basic flow of actions helps find the right documentation and learning materials.
Since this is my first go, the scope is limited to building it out with code and making it work by initiating it on a terminal.
There won’t be a webb app with a user interface with a lovely Send contact data button to initiate and run the code. So, it’ll have to be a code that I can run on my computer.
Step 2: Set up a HubSpot Developer Account
To work with an API, we will need and use two basic things:
- An API enpdoint: the URL to where a request to do something will be sent.
- An API token: a secret password to identify to the endpoint who is making the request, and verify that they are allowed to gain access to complete the request. [Sidenote: API key is another method of authentication and authorisation that’s less safe than the API token method, the terms are not interchangeable]
Since I want to build the API around HubSpot, I need API keys for the two portals I want to shuffle data between. Since I don’t have a portal (or two) to mess around with live data in, I set up a HubSpot Developer Account to create HubSpot portals where I can play around and trial things.
The steps
- Create a HubSpot Developer Account.
- Go to Test accounts and create a new portal within it called Contact Sync Testing - Source
- Within the account go to Settings > Integrations > Private Apps > Create a private app.
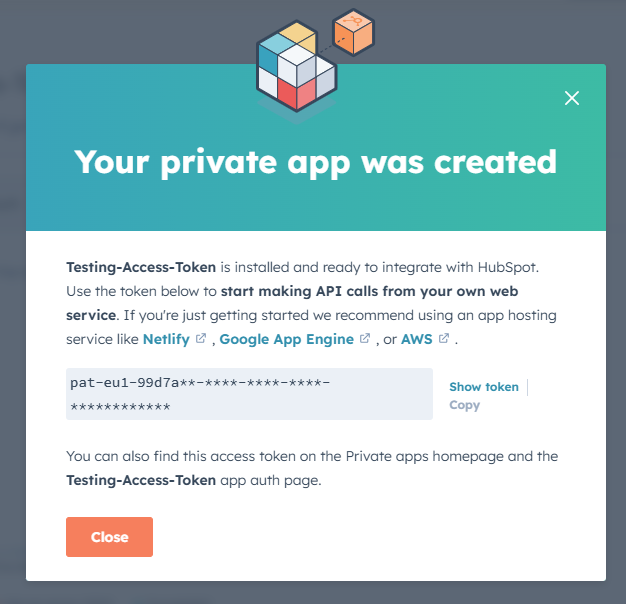
- In Basic info, give it a descriptive name and description as a reminder of its purpose. In the tab Scopes you define what the API token will allow you to do when you access this endpoint. Set the scope to
crm.objects.contacts.readandcrm.objects.contacts.write(having both will be useful later). Click Create app. - A popup will now appear with the API token. Copy and save for later, or keep the tab open the related steps with Postman are completed.
- Create a new portal within the Developer Account called Contact Sync Testing - Destination and repeat steps 3 through to 5.
Top learnings
- Be restrictive in the scopes (access to what the API key will allow you to do). Too much access and a wrong line of code can cause irreperable damage to the portal data.
- API keys are like secret identification. Sharing it can allow others to use it, and gain access to your endpoint as you. It’s not recommended to add it into code that others can read.
Step 3: Create a Postman account and set up the varables to test the API requests
Based on my first introduction to the workings of APIs (YouTube explainer and tutorial on APIs), I came across Postman.
Explained as a tool for creating and testing APIs requests, it felt like the natural next step of building ~ something ~ without fully throwing myself into the deep end and having to learn how to write code.
Concepts
Things are already turning technical. To better understand the whys of the steps that follow, here are key concepts:
Request URL
To send an API request, we use a request URL that points to an API endpoint (a designated opening in the system we’re trying to access).
It’ll consist of the:
- Base URL - the start of the API endpoint. Here we’ll use:
https://api.hubapi.com/ - Resource path - specifies what you’re trying to access. Here it’s a type of object called contacts. HubSpot’s API documentation shows this path as:
crm/v3/objects/contacts - Query parameters - optional. Adds additional information to the request. We’ll test this by adding a limit on the number of contacts we’ll request:
?limit=10
Put it all together and we’ll be using: https://api.hubapi.com/crm/v3/objects/contacts?limit=10.
Requests
The API work by making a request to the endpoint. The two types used in this project are GET and POST.
A GET request will ask to read data (and extract to show it somewhere else). A POST request will ask to write data (add data). This lines up with the read/write settings we added to the private apps in the two HubSpot portals.
API access token
What we set up in making a new private app in the HubSpot Dev account. The access token is our secret passkey to authenticate which HubSpot portal we want to make a request to, tells the system what we’re allowed to do, and who we are that’s making the request.
Variables, labels and values
In code you often work with variables. They are like containers you can fill with information. The container has a name (the label of the variable) and will hold different types of data (the value).
For this project, we’ll use variables to allow us to add our secret access token in code by storing the information elsewhere, and using code to basically say “look over there and use that value”. Super handy to not store the super secret token information inside the rest of the API request code/instructions (in case we want to share it).
Variables are also used when you code to create containers you can fill with information and use for later. For example, store the values of the GET request to send with the POST request.
Collections (in Postman)
In Postman, you set up requests as part of a collection where you create shared rules and settings.
If you’re creating and testing multiple API flows, separating them by collections means that you can more easily spot which ones belong to which project. It allows allows to team collaboration and creating documentation.
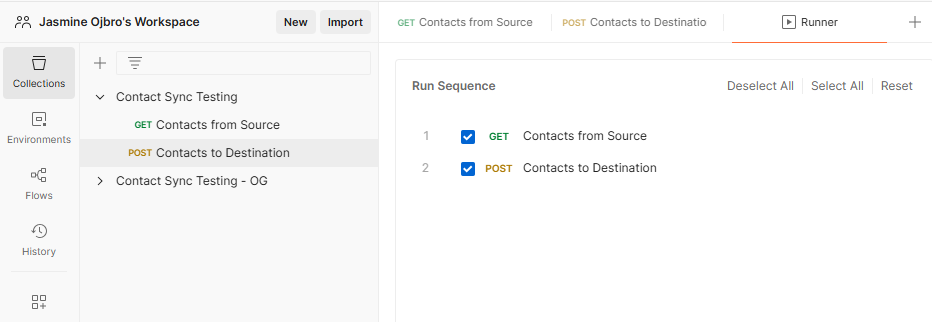
A neat aspect is that you can get the collection to run the requests in sequence, thereby testing the flow of different requests.
Environments (in Postman)
A collection of variables. Our super secret API access token can be stored in here, and the collection can point to it to suck in the values when the requests run, but keep them separate from the collection in case we share it.
The steps
- Create an account in Postman.
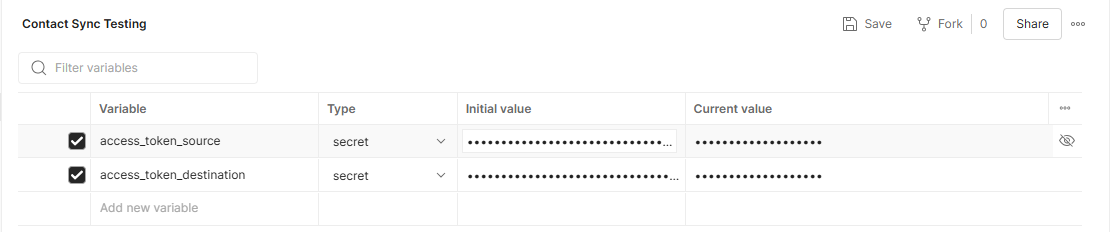
- Set up an Environment. Name it Contact Sync Testing. Set the type to secret. Add variables for
access_token_sourceandaccess_token_destinationand paste your copied API token from HubSpot to the initial value field. Save your changes ctrl/cmd+s. - Create a new collection by clicking the Collections icon in the workspace > + > New collection. Name it Contact Sync Testing.
Step 4: Creating and testing the GET request
Time to set up and test our first request! This would also be the first step of this AI automation we’re building, to get information from the source portal.
The steps
- Within the the collection, add a new request. Name it Contacts from source and set it to GET. Add in the request URL:
https://api.hubapi.com/crm/v3/objects/contacts?limit=10 - In the top right of the workspace, there is a button to choose the environment for the collection to be able to pull in variables. Choose the environment Contact Sync Testing we set up earlier.
- Next, we’ll pull in the varable
access_token_sourceto handle our authentication. Go to the tab Authorization. For the Auth Type choose Bearer token and in the field to the right, add in the variable from the environment: `` (Sidenote: I’m not 100% sure on the how/whys here in this choice. ChatGPT sent me down this path, and I’ve not been able to make the request work testing any of the other options). - Hit the Send button next to the URL, and the bottom half of the screen in the window Body should now show a reply from the HubSpot Portal with the Source data. It should spit out contact information for up to ten contacts.

Concepts
Now that we have some concrete output to look at, it’s important to note and understand the following concepts.
Coding language
What we don’t directly see in this view is the code used to make this request work. Postman transforms our input into workable code to run it.
The API requests can be exported into various code formats for us to work with in another format (eg. add to a file to create and run a script on our computer locally). However, this export is very basic and still require actual code writing to make it work.
JSON - the data format
For the HubSpot API, responses (what HubSpot sends back when a GET request comes through) are sent back in a data format called JSON. This is what we see in the response window.
Step 5: Creating and testing the POST request
With success in our GET request, let’s move on to POST.
The steps
In the same collection:
- Add a new request. Set it to POST. Add in the request URL from earlier (I removed the limit):
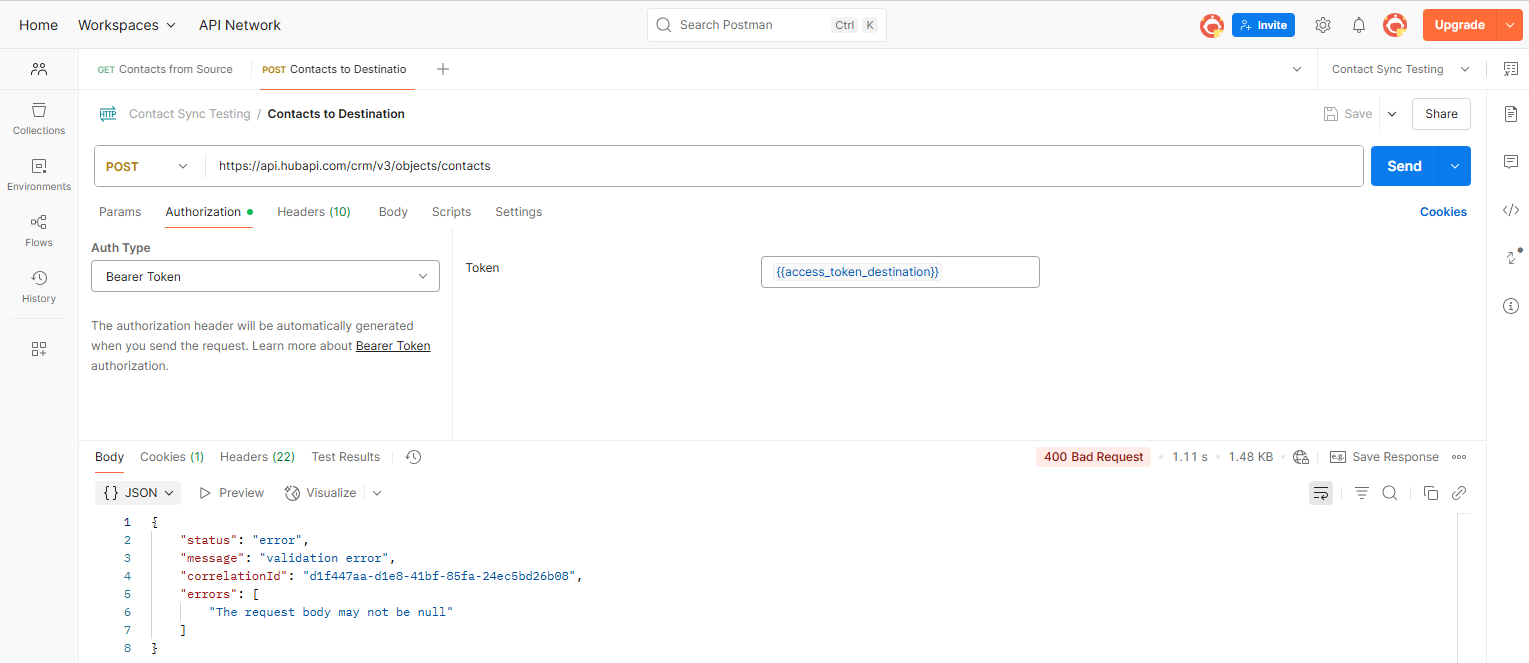
https://api.hubapi.com/crm/v3/objects/contacts - Go to the settings for authentication so it’ll pick up our variable
access_token_destination. Go through the same steps as previously, but use the destination variable instead. - Hit the Send button next to the URL…. and you’ll see a 400 Bad Request error.
Error - no data, no success
Currently, the POST request is asking the API to add (write/post) data into the destination portal. However, we don’t have any data within our request for it to post.
As we hit Send, we tested this request in isolation, so it’s not adding any data from the GET request we did.
To solve this, we have two options:
- Fake data - Add some data to the
POSTrequest so it will have something to write onto the destination portal. Makes it work if we run the request on it’s own. Will not pull through any data from theGETrequest if we run the collection sequence. - Coding - For this to work if we want to run the collection (make requests execute in sequence), we require code. It will save the data from the
GETrequest, and then used for thePOSTrequest. To accomplish this, we’ll need to add code to both requests.
For this simple getting to know API integrations in general phase, option one is the easiest.
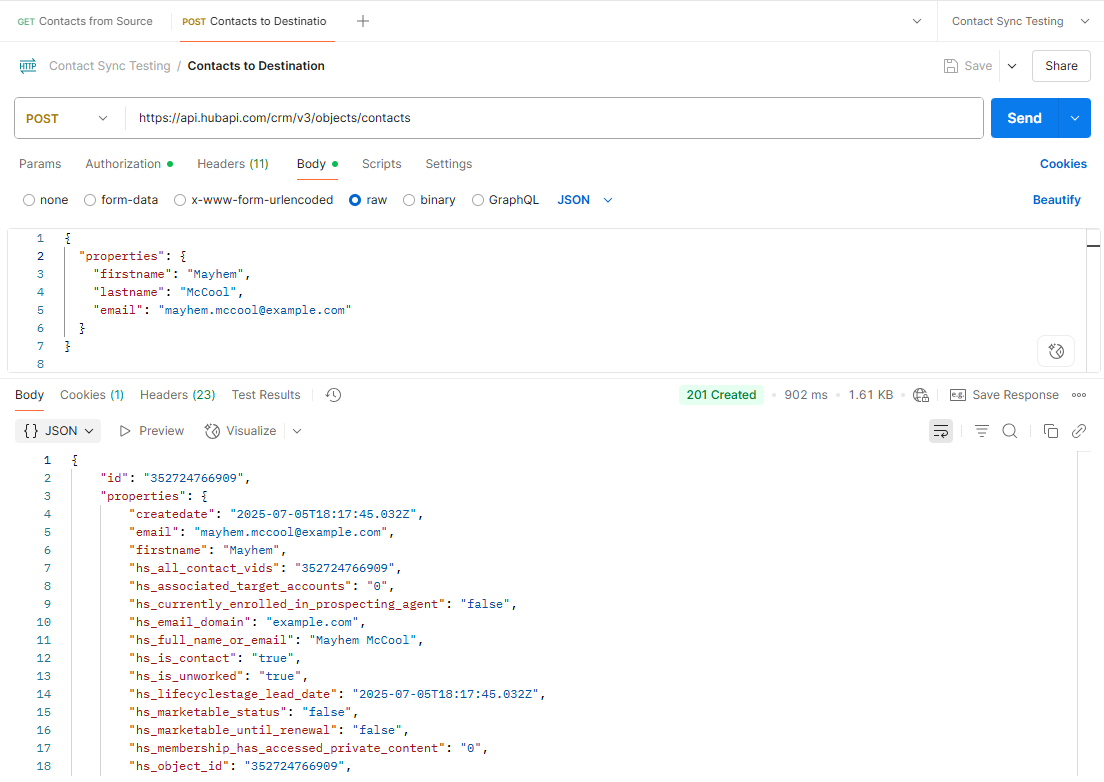
POSTing fake data
In the same tab row as you found Authorization, go to Body > Click Raw > Change the dropdown to JSON > and add in the code block seen below.
{
  "properties": {
    "firstname": "Test",
    "lastname": "User",
    "email": "test.user@example.com"
  }
}
You can add multiple contacts this way (change details > hit Send > change details > hit Send > repeat process), and in preparing for the next steps I recommend changing the POST request authorisation to pull in the access_token_source information and load it up with some contacts this way. Remember to change it back to the destination token in case you want to run more tests in Postman later.
Sidenote: POST single vs. batch
If you try to add several contacts at once (by adding more fake contacts onto the codeblock), you’ll get an error.
Why? Because the API endpoint only allows for posting a single contact. To be able to add multiple, the request URL needs to include information that it will be a batch update, and you furthermore need to specify that it will create new contacts.
Things are tricky enough to try to keep track of, so I’ve opted to continue down the single post route.
The revised steps for POST request
In summary, to circumvent the error, in the same collection:
- Add a new request. Set it to POST. Add in the request URL from earlier (I removed the limit, as it only works for one contact):
https://api.hubapi.com/crm/v3/objects/contacts - Go to the settings for authentication so it’ll pick up our variable
access_token_destination. Go through the same steps as previously, but use the destination variable instead. - In the same tab row as you found Authorization, go to Body > Click Raw > Change the dropdown to JSON > and add in the code block in the previous section. Hit Send. Success!
Resources
Useful information and resources for this section:
- YouTube tutorial: APIs for Beginners - How to use an API (Full Course / Tutorial)
- HubSpot documentation on their API endpoints
- Postman documentation
Step 6: Setting up the local coding environment
With the steps so far, it’a already partially mission accomplished. We have created a set of API request and managed to get them working.
The missing piece though, is getting the data from the source portal to go into the POST request and add information to the destination portal.
Doing this project before this writeup, I still hadn’t found the run sequence functionality. So I was blissfully unaware that one could add code functionality in Postman to make this work.
I did grasp that code would be necessary to grab a hold of the source data to add to the post request, so I decided to next explore how to build the flow using Python.
Why Python? Partially a suggestion from ChatGPT when I mentioned writing code, and partially because it’s a coding language I have heard about before and recognise.
Concepts
Alright, as we dip into another set of tools, let’s pause and define some key concepts and background info.
Writing and running code
Writing code is the act of putting code into a file. The code output will do something once you run it. It’s basically the instruction manual or the rules, telling a robot what to do. The aim here is to recreate the API requests as a sequential set of actions (do A, then B) .
Running code is allowing the robot to read the instructions and for it to follow them. It’s the doing something bit. Completing the API request. Code can be run locally or on a server/online platform.
For code running locally, your computer is the robot. It only works when you tell the code to run.
For code running on a server the server is the robot. It can be scheduled to run at specific times, continously or when triggered.
Python
Is a coding language for writing instructions for the robot to follow. For a robot to be able to read and execute the instructions, it needs to have the Python program installed.
Python dependencies
The code language we’ll use is Python. To make the code work, we are using functionalities that aren’t part of the standard “package”.
Dependencies are packaged up pieces of code other clever people have written that we can install and pull into our code. Instead of writing out the full code to make this functonality, well, function, in our code we import this code and use variables within our own code.
To be able to use dependencies, these also need to be installed on our computer.
Terminal
The terminal is a text-based interface you can use to navigate and interact with your computer. It’s reminicent of what you’ll see on the monitor of a personal computer in old 80s movies (think: Ghost, Wargames, Jumpin’ Jack Flash).
The terminal strips away the UI (user interface) and you use terminal commands to make it do and show what you’re after. At this stage, we’ll use it to install Python dependencies and make our code run.
The steps
Rough outline of the todos:
- Download and install a code editor. Suggested: VS Code.
- In VS Code: Go to Extensions and download Python.
- Install Python and Python dependencies.
More details on this in the sections below.
Step 6.1: Downloading a code editor
To write code, we need a tool. To spare you the details I opted for the code editor Visual Studio Code (VS Code) and installed it. It has built-in access to the terminal (which we’ll need to run the code).
By installing the extension for Python, we’ll get some help in the formatting of the Python file itself.
Step 6.2: Being able to run Python files
You can write Python code just fine in the editor without any further downloads, but to run the code is another matter. You need to install Python, the actual program that reads/executes Python code, so that the computer (the robot) can actually understand and follow the code (instructions).
Thusly we need to install Python and dependencies:
- Go to the official Python website https://www.python.org/downloads/ and download and install the latest version for your computer. Alternatively for PC - install from the Microsoft Store.
- In VS Code, open a new terminal and type in
python --versionand hit Enter. The terminal should spit back a value telling you which version you have installed. - If Python is installed, it’s now time to install the dependencies we’ll use for this project. Type in
pip install requestsand hit Enter. - In the terminal type in
pip install python-dotenvand hit Enter.
Step 7: Create the Python script for the GET request
Figuring out this part was a mixture of exporting the request from Postman, reading through online guides, interrogating ChatGPT on formatting, and trial and error.
The steps are essentially:
- Open VS Code and create a new project folder. Name it HubSpotContactSyncTesting (or similar) and add a Python file for the code: name it
hubspot_contact_sync_testing.py(it becomes a python file thanks to the file extension.py). - Add/write the code. You can copy-paste from the code block below. Save the file.
- Open a new terminal and run the code. You’ll need to navigate to the project folder (if you’re unfamiliar with the terminal, jump to the sidequest section for understanding the terminal), type
pythonfollowed by the file name (typepythonand then hit tab until the file name is shown) hit Enter. You ought to have output in the terminal that shows contact data from theGETrequest.
Copy and paste this code
To spare you an additional six or seven steps of having a super simple script in place and then slowly adding and improving the code, I’ll skip a few steps ahead to make this process overview easier to follow.
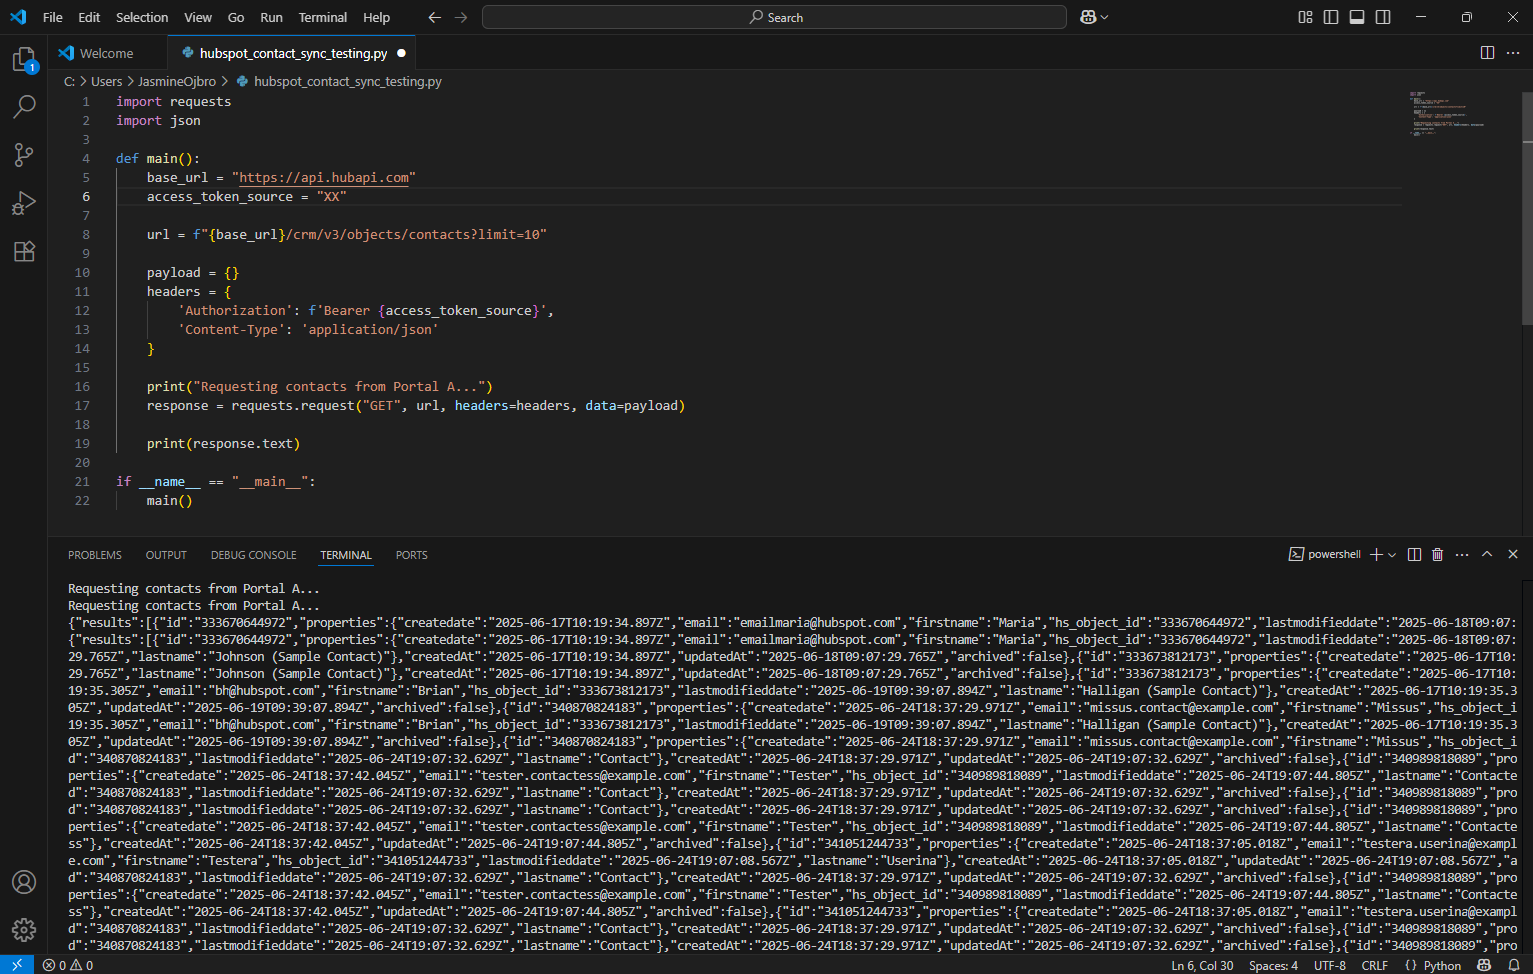
I’m not a developer. The code seen in the screenshot and in the code block below certainly works, but I doubt it’s the best or most elegant solution.
I highly recommend having a go at rewriting this yourself, or creating it from scratch following guidelines from Python resources to better understand what the code does.
I’ve added my comments to the lines below to illustrate my understanding of what each line does. Remove anything following the hashtag sign # to remove the comment from your code file.
Sidenote: This code has had a slight cleanup compared to the screenshot of my very first attempt. Note that you’ll need to replace the XX with your API token.
import requests #this imports requests library for python so we can do the request
import json #this imports JSON library so we can use it for the data format

def main(): #Acts as the starting point of execution for the code
    access_token_source = "XX" #Remove XX and add the API token here

     #Where the request is sent
    get_url = f"https://api.hubapi.com/crm/v3/objects/contacts?limit=10"

    #info used by the script to access the API
    get_headers = {
        'Authorization': f'Bearer {access_token_source}',
        'Content-Type': 'application/json'
    }

    #Adds an action to print text to the terminal
    print("Requesting contacts from Portal A...")
    #Defines what the type of request is (GET)
    response = requests.get(get_url, headers=get_headers)

    #Adds an action to print the response from HubSpot from the request
    print(response.text)
if __name__ == "__main__": #Acts as a control to make sure you can open/read the file without running the code automatically
    main() #Acts as the end point of execution of the code
Resources
- From Postman to Python: Your First GET Request
- Getting Started with Python HTTP Requests for REST APIs
- Python and REST APIs: Interacting With Web Services
Step 8: Create the Python script for the POST request
Time to build upon this code.
As I failed to do in Postman, we must now create code to store the reply we get from the request, and use that information in the POST request.
Since we’re using a single object request (rather than the batch type), we need code to execute a series of posts of the data we get. We’ll achive this with conditional logic (if A > then do B, if not A > then C) and loops (repeating a set of actions until the reason to repeat is no longer true). More specifially, the loop will be an enumeration loop to looping through information in a list.
Some additions to our code will therefore be:
- The access token for the destination portal (for us to make the
POSTrequest). - Introduce if/else logic. If the
GETrequest is successful, we want the code associated with thePOSTrequest to happen. Else we’ll print an error message. - For the replies fron the
GETrequest, loop through the responses and clearly split them apart into groupings of information for each contact. - A neat function called pretty print to make the output more legible in our terminal.
- The information for the
POSTrequest itself.
The todos of this process steps are:
- Add the code elements outlined above to the file.
- Use the terminal to run the code. Success!
Sidenote: If you are missing contacts in the source portal at this point you can either add them quickly through your Postman POST request (temporarily change it to use the source portal access token), or add them in manually via the UI, to make sure that there is contacts to post.
Copy and paste this code
Our amended code should therefore be:
import requests #this imports requests library for python so we can do the request
import json #this imports JSON library so we can use it for the data format

def main(): #Acts as the starting point of execution for the code
    access_token_source = "XX" #Remove XX and add the API token here
    access_token_destination = "XX" #Remove XX and add the API token here

    # Step 1: GET contacts from Source portal
    #Where the request is sent
    get_url = f"https://api.hubapi.com/crm/v3/objects/contacts?limit=10"

    #info used by the script to access the API
    get_headers = {
        'Authorization': f'Bearer {access_token_source}',
        'Content-Type': 'application/json'
    }

    #Adds an action to print text to the terminal
    print("Requesting contacts from Portal A...")
    #Defines what the type of request is (GET)
    response = requests.get(get_url, headers=get_headers)

    #Start of logic IF successful retrieval, start these steps:
    if response.status_code == 200:
        print("I've got it! Contact retrieval success! Here's the list of contacts:")
        print(json.dumps(response.json(), indent=2))  # pretty-print the response.text in the JSON format in terminal. Replaces our earlier line of code for print(response.text)

        # Step 2: POST contacts to Destination portal
        # Where the request is sent
        post_url = f"https://api.hubapi.com/crm/v3/objects/contacts"
        # info used by the script to access the API
        post_headers = {
        'Authorization': f'Bearer {access_token_destination}',
        'Content-Type': 'application/json'
        }

        #Define 'Contacts' that the loop will assign the results in
        contacts = response.json().get("results", [])

        # starts a loop to check contact info from the GET request
        for i, contact in enumerate(contacts, 1):
            props = contact.get("properties", {})
            firstname = props.get("firstname", "Unknown")
            lastname = props.get("lastname", "Unknown")
            email = props.get("email")

            if not email:
                print(f"Skipping contact #{i} (missing email)")
                continue

            #POSTs the contact info to the Destination portal
            post_payload = {
                "properties": {
                    "firstname": firstname,
                    "lastname": lastname,
                    "email": email
                }
            }

            #Print info in terminal about status
            print(f"Syncing contact #{i}: {firstname} {lastname} ({email})")
            post_response = requests.post(post_url, headers=post_headers, json=post_payload)
            print(f"Status: {post_response.status_code}, Response: {post_response.text}")

    #Other half of logic IF NOT successful, write this
    else:
        print("Failed to retrieve contacts:")
        print(f"Status: {response.status_code}")
        print(response.text)
if __name__ == "__main__": #Acts as a control to make sure you can open/read the file without running the code automatically
    main() #Acts as the end point of execution of the code
Resources
Step 9: Increase security by moving token variables to another file
So far, we’ve stored the API token directly in the code file. If we wish to share this lovely code, and to get into the habit of not accidentally leaving sensitive info, we need to move our definition of the variables where we’ve added our API tokens, the access_token_source and access_token_destination.
The logic here is the same as when we used Environments in Postman. We’ll set up a separate file in our project folder, add the variables there, and then call on those variables (suck it into our Python code for it to be used).
The todos are:
- Create a new file and name it
.envin the same folder as the.pyfile. - Copy-paste the API access token variables from the python file into the
.envfile. - In the python file, import the
.envandoslibraries. - Make sure to test the code again by running the script
Copy and paste this code
Adding our imports to the python file, right before the def main():
from dotenv import load_dotenv # This reads the .env file and imports the libraries to use later in this file
import os
For the .env file, add the following info:
access_token_source = "XX" #Remove XX and add the API token here
access_token_destination = "XX" #Remove XX and add the API token here
In our .py file (the python code), replace the section with the lines below to load the variables form this external file:
load_dotenv()  # Load environment variables

    access_token_source = os.getenv("access_token_source")
    access_token_destination = os.getenv("access_token_destination")
Resources
- Managing API Keys and Secrets in Python Using the Dotenv Library: A Beginner’s Guide
- Read Environment Variables with Python dotenv
- Using os to call on variables in other files
- Documentation on the dotenv (Environmental variables)
Step 10: Save and upload the code to GitHub
For me, closing off the project meant completing one, final, step. I wanted to upload my code to GitHub.
Instead of having it sit on (and eventually be deleted from) my work computer, I thought I’d wrap things up with a neat little bow by learning how devs work with GitHub to do version control of saved project files (the Git part of GitHub)… and to be able to share and brag a bit about my achievement.
Concepts
Some new concepts to grasp are listed below.
Git version control
When you work in a Word document and hit save, you have the latest version of the file. The next time you open it, that’s what you’ll see. Generally speaking, you won’t be able to access the file as it looked 10 saves ago.
Git (sort of) allows you to do that. It’s more like save points in a game, where you add a save point (called a commit) to an empty save slot. It means that you can go back to a saved file and see how it looked at a previous point in time.
When you work on your file, you can save it like normally. As we saw with the Word document example, it saves locally and overwrites what information was previously in the file. Once you’ve reached a point where you want it to occupy a save slot - you upload your latest saved file(s) to the project repository.
Git version control has many more features, and GitHub even more so. But I won’t go into them here.
Project repository
Often referred to as a repo, the project repository is essentially a folder in the cloud where all project files go. This can be synced to your computer using terminal commands, GitHub interface in VS Code, or by working with download/importing files directly in the GitHub website UI.
I opted for terminal as much as possible as it seemed the route where you get a deeper understanding for the git management process.
.gitignore to keep sensitive files away from the cloud
We spent time moving our super secret sensitive API access token passwords into a separate file to keep it away from files other’s could access and read. To keep it from ending up in a GitHub repo (and ending up sharing it anyway) we can create instructions for GitHub to not upload certain files. The instrucions are put into a so called .gitignore file.
The steps to prepare the project to upload to the GitHub repo
- Create a new file in the project and name it
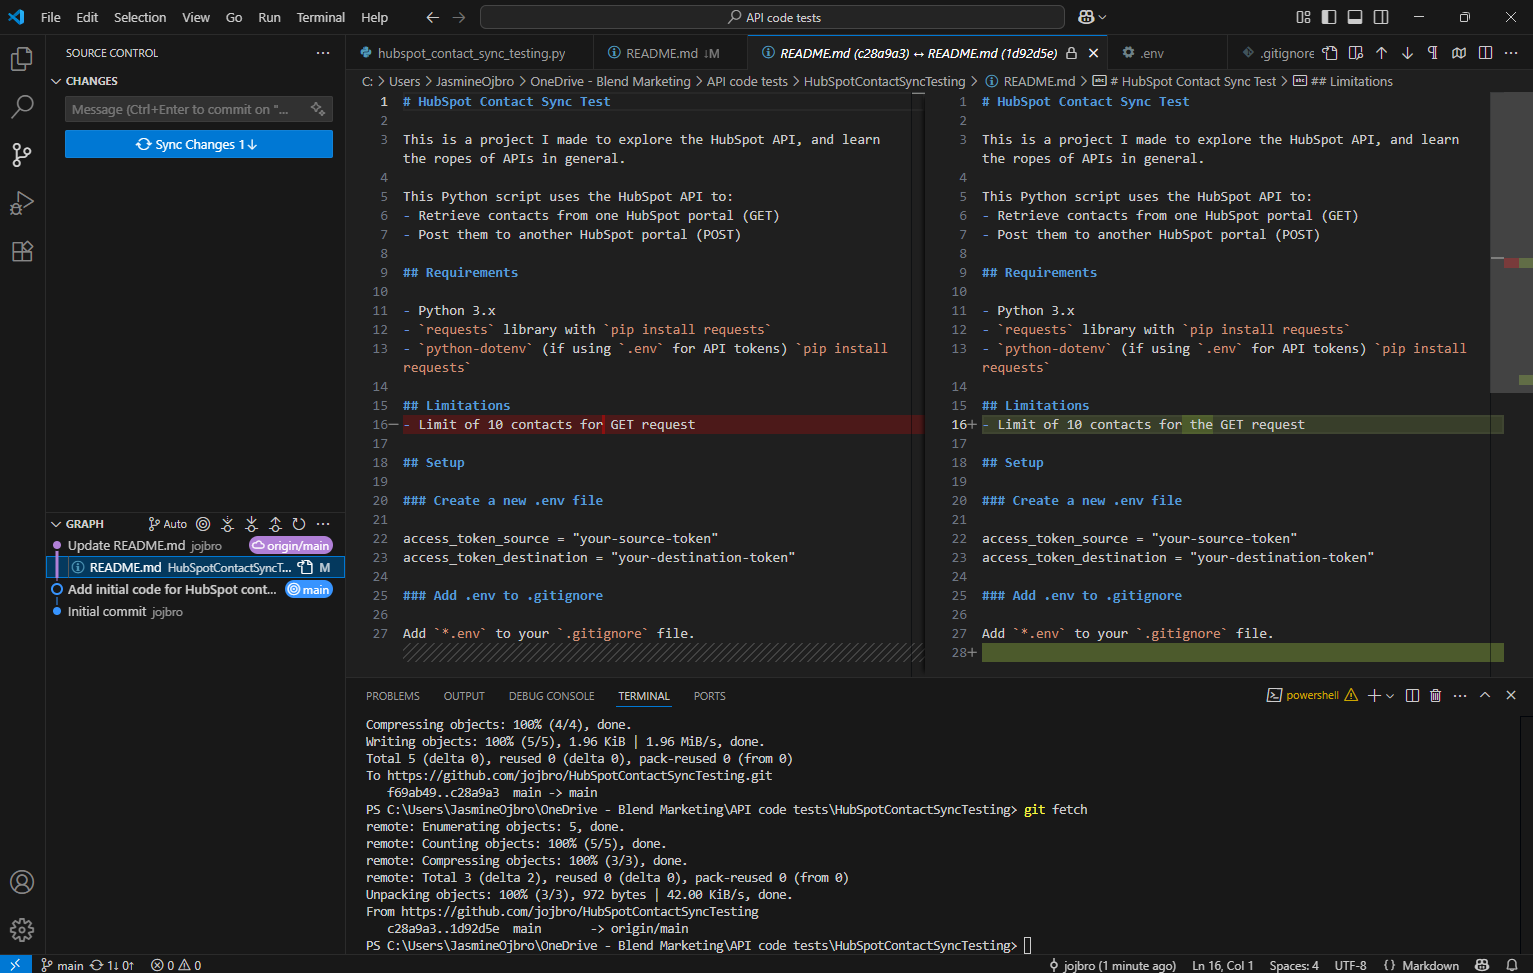
.gitignore. Add the exculsion rule for the dotenv file (copy from the code block below). - Create a new file and name it
README.md. This acts as the project documentation. It usually outlines what is required to run the files (the python dependencies) and an explanation of what the code does. See the readme that I created for this project as an example.
Copy and paste the .gitignore instructions
Cope paste this code into the .gitignore file to exclude the .env file from being uploaded:
# Ignore all files with a given extension
*.env
The steps for setting up GitHub and adding the project to a repo
- Create a new account in GitHub.
- Create a new repository. I found this easiest to do on the website. Set it to private if you don’t want to share it with anyone else. Copy the URL address to your repo. To find the URL, open your repo project in GitHub and click the green button Code and the slideout will show the URL for the repo.
- In VS Code, clone the repo (this essentially sets up the folder on your computer locally to allow you to add the save file when you want). Open a new terminal and type in
git cloneand add the URL, hit Enter. Choose where to save the folder locally on your computer. You may be prompted to log in via VS Code onto your GitHub account. - Pull all of your files into the folder that was created, including the
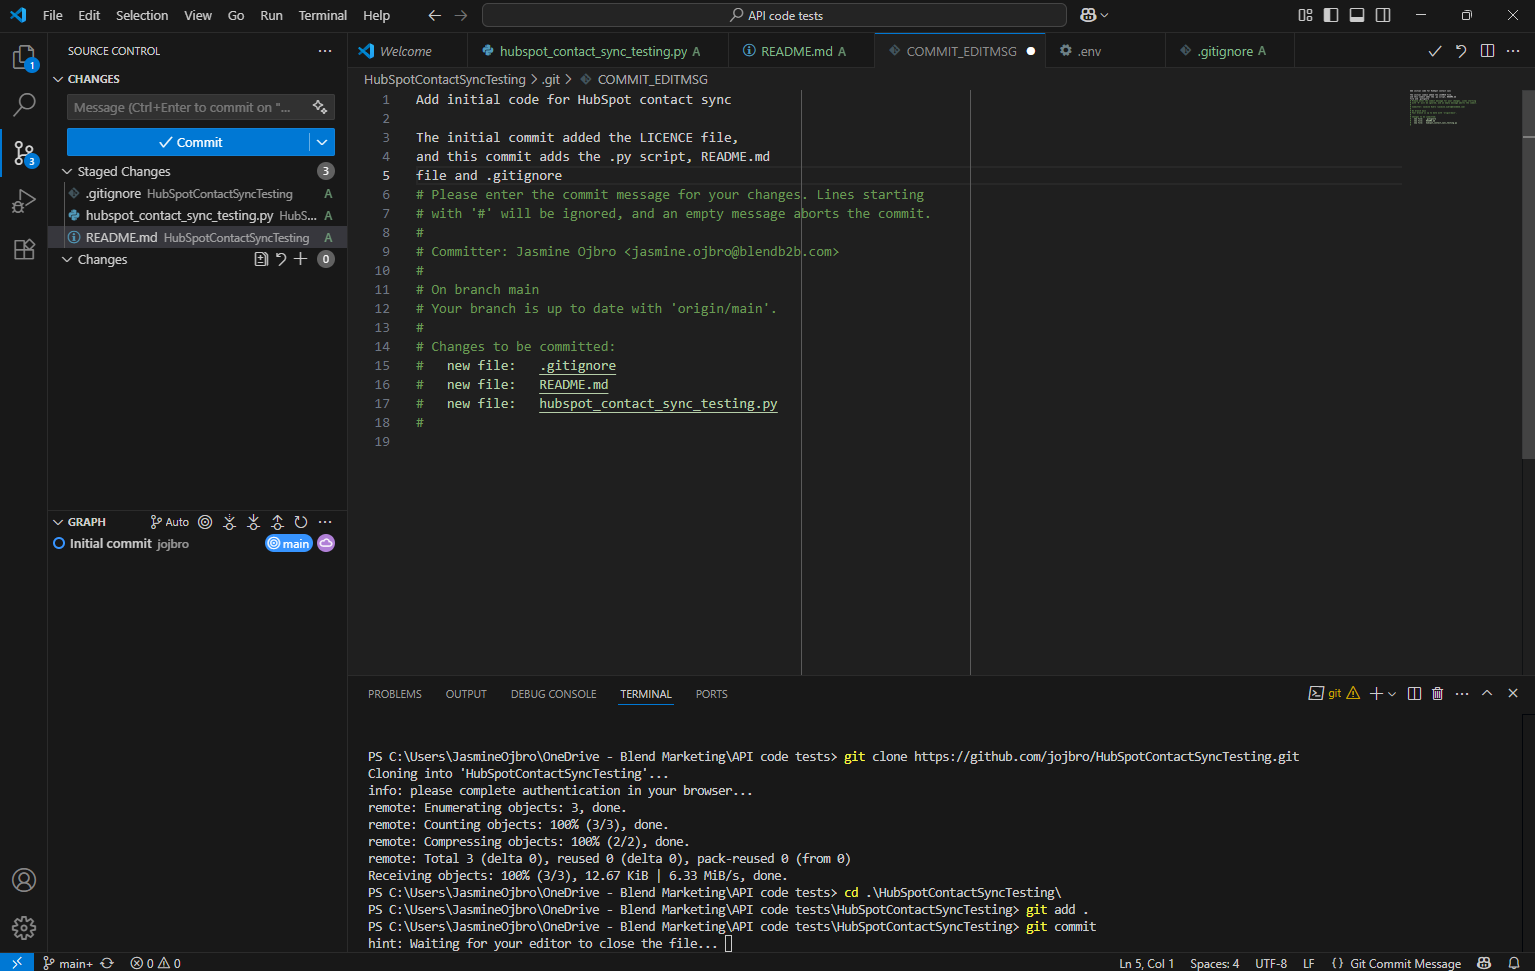
.envand.gitignore. You can do this through your computers usual interface. - Time to add your files to the GitHub repo by doing a so called commit. Check that the terminal is currently “in” the newly created folder in the terminal and type
git add .and hit Enter. This instruction preps the all files in the folder and adds them to the queue to be uploaded. - Next, type
git commit. Once you’re hit enter, a new tab will appear. In here, you write a message about this commit for others to read. Save and close the tab. - Complete the final step by typing
git pushand hit Enter to upload all files (the.gitignorewill be ignored, and it also specifies that the.envshould be excluded). You can now refresh the repo in GitHub to see your files listed. All done!
Resources
Final thoughts
This project took way longer to write this process overview for than it took to complete in full.
Postman bits I’d reckon I spent shy of 2 hours on, and getting the Python bit working roughly 5 hours (yes, a little help from ChatGPT there likely saved me 20h+ to have to learn stuff from scratch).
All in all, a fun foray into the world of API integrations.
My next steps will be to scale up this specific request (as in: be able to do this on a full scale portal) and to grasp more of the ins and outs of the HubSpot API to build other, related requests.