Building a Deal Logger interface for HubSpot with Claude Code
With a few smaller projects under my wings where I’ve been testing Gemini CLI for creating UI cards in HubSpot, this project I got to explore using Claude Code and moving slightly off platform.
I did this as part of HubSpot’s Building with AI mini-cohort and mentorship program, which meant I’ve been able to spitball with my mentor Erik Hooijer (of Hubspot Admin Arena & Pack of Nodes fame) for input on how to build better.
The plan
- Outline functionality and plan the build
- Mockup the visuals and basic functionality with HTML, CSS and Javascript
- Add API functionality to pull through and interact with data in HubSpot
- Rebuild code in Next.js + NextAuth to prepare for login functionality
- Add functionality for login through Google Workspace
- Move from local hosting to Vercel
1. Outline functionality and plan the build
Before I get building, it’s a good idea to plan what to create. To summarise a very lengthy prompt:
- The goal is to build a simple interface to see, make slight updates, and to create deals
- Easy to add a new open or closed deal
- Needs to be able to set closed won/lost status
- Mandatory to connect to a company, so needs search functionality to find and add an existing company or create a new one
- When adding a new company, the name, country and company registration number are mandatory for deduplication and later searchability
- Ability to specify currency
- Background settings handled behind the scenes: moving deal across pipeline stages, setting deal owner, updating the close date.
- Interface should link to HubSpot for the complex tasks that may detract from the simplified UX (eg. changing associated company, adding further details, adding a contact)
- Must have login feature to only allow access to verified users in both the copmany’s Google Workspace and HubSpot portal
2. Mockup the visuals and basic functionality with HTML, CSS and Javascript
Time to get building. I did two major version, where smaller tweaks (eg. correcting mistranslated words or odd grammar) was saved as part of a major version.
For this, I opened up Claude Code in a terminal and fed it an outline of what I was building alongside specifications of just the mockup itself. I asked it to pull styling from an existing website (I had to use an eyedrop tool to confirm some colours to get the correct shades). It handled this kind of simplistic style quite well, though I gave it lots of specifics around UX to make sure it didn’t put too much on the screen at once. It had free reign on example data.
This process was speedy. Maybe 2 hours in total? I did two major version of it in three sittings. One to get a nice-looking first version in place, and the second was following a discussion and some feedback from my mentor on ways to bring more into it without cluttering the interface or introducing too many extras.
3. Add API functionality to pull through and interact with data
Once I was happy with my second version, it was time to move to getting real data flowing. Still, it would be without the final functionality of having a login screen to display different data for different users, so I set out to get the API of fetching and pushing back information working.
This bit took more time. I worked on it for around two days (office hours, between other work).
The basic process was to:
- Start with v2 as a basis and ask Claude Code to spin up a v3 with additional files and code for handling the backend: API calls to fetch data to display, adding data for new deals, updating deals for closed won/lost
- Set up a service key in a sandbox portal to use for API access
- Create a vercel environment (more details on that below) and add the environment variables as specified in the code from step 1
- Start testing (and re-testing!) and providing feedback and instructions to tighten the look, feel and functionality
Some (in my humble opinion) improvements between v2 and v3 that I didn’t notice were needed (and failed to plan for) were:
- Making sure updates to closed won sequentially moved deals to stop at each preceeding deal stage (necessary for reports)
- Add a way to change the close date for closed won deals with a date picker - Claude added button choices for common picks (today, yesterday, one week ago, one month ago) for even speedier selection
- Specified behaviour for the dashboard and reports for past years
- Switched out a little icon-looking thing that was initials for the mock user, and replaced it with the fetched name of the user that is logged in (seen at the very top in subtle colour and font size) to easier signal that you’ve accessed the right information
- Added a mockup for “what if”-scenario of someone logging in (confirmed Google Workspace user), but not having a HubSpot user attached to it. In v3 it shows as a different button during login screen, and is supposed to then show a screen that specifies that they need to contact an administrator to first get assigned a user account in HubSpot before being able to access any data
- Added a tooltip that shows when hovering the cogwheel icon to edit the deal that explain that clicking there will take them through to HubSpot
Vercel environment
To make the page interactive, in the sense where it can get and send data from and to HubSpot, it requires code to run. This cannot be run in a website browser and needs a dedicated server. Enter Vercel.
It allows me to set up a server to host the interface (essentially a website page) and to run the code.
For the part of the build where I’m still running locally on my machine (as much as possible) during build, I need to connect to Vercel to runt he code through (instead of through my laptop) and handle the environment variables (service key secrets to access the testing portal, specify pipeline stages etc.).
In short, the steps are:
- Sign up for a Vercel account - I set mine to hobby as it is free but does come with several limitations.
- Set up all login authentications (be diligent!)
- Frustratingly enough, you now need to add your variables from the
.envto Vercel so it pulls from the project online to serve functionality. Go to Vercel and log in, locate your project and enter. In the menu find Environment variables and then Add Environment Variable. I was able to drag and drop my file. - In a terminal, run
npm install -g vercel. Sidenote! I can’t recall if it is here or in a later step where you’ll have to connect the installed vercel to your account. When the time comes by interacting with Vercel in the terminal, go with the flow and it’ll be set up and connected. - Go to the directory of the build you want to spin up the vercel environment for and run
vercel devin the terminal. Sidenote You may be able to swap this step for step 7 - test it. - There will now be an interactive ask-answer to configure the project, like creating a vercel project (adding a directory and dependent files to your local machine)
- Close the vercel session by using Ctrl+C or close the terminal and open again, going back to your project folder
- Run
vercel env run -- vercel devin a terminal on your computer, and you should now be able to access the full functioning webpage, but all code running from Vercel
Technically speaking, the code is still local on the computer at this point, but the code exeuction is happening through Vercel. Later, once it is time to bring the full thing live, the files are all moved to a GitHub repo that is connected to Vercel and served from there. No need to start/stop anything as it’ll run continously.
Explaining: vercel env – run vercel dev
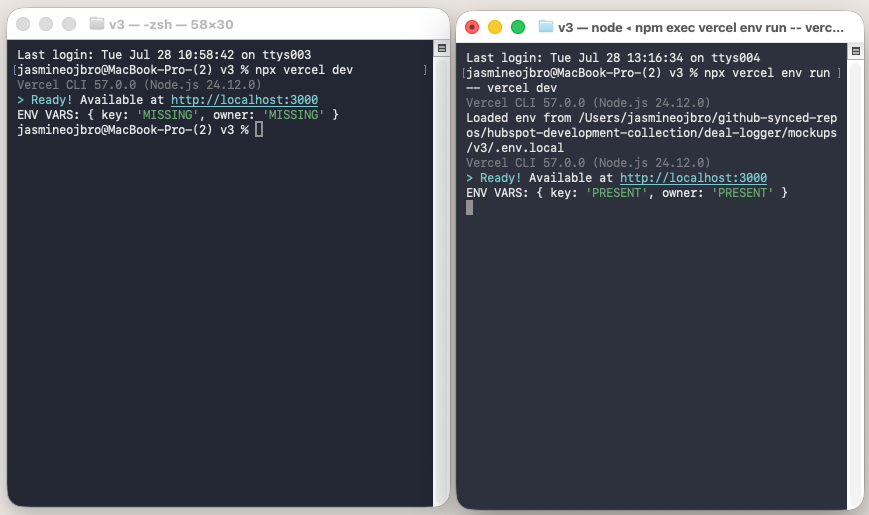
I kept on running into an issue with getting Vercel working on my laptop actual data. It would not “find” the environment labels (the service key to HubSpot and the user I picked for testing alongside the rest). This was despite my many attempts at adding the info to the Vercel website or in a .env or .env.local file.
Vercel on the hobby plan blocks you from adding environment labels to use in development mode, only making them available during preview or production (no, I don’t fully grasp the difference in flow to explain what is what). When you run the standard command of vercel dev it tries to grab the environment variables from Vercel settings, but ignores anything not labelled as development (as that’s the mode we’re in).
Where Claude could finally guide me to was a solution where vercel env run fetched variables directly from Vercel, ignoring flags or tags and restrictions, and then in the second half -- vercel dev injects that to the locally run dev session.
4. Rebuild code in Next.js + NextAuth to prepare for login functionality
Stepping in to v4, I needed to have Claude Code rewrite the project. Central to the interface is having working login. This is to ensure that each view and action is connected to a real user and account, and further boost security. Simply sharing a URL and pick-and-choose the user or password protecting a URL doesn’t help with that.
The business uses Google Workspaces, so adding this as login or way to authenticate the account holder helps secure the data and make sure the person on the other side of the screen is served the right information.
In a chat and plan session with Claude it seems like this can be taped on top of the existing code base with HTML/CSS/Javascript, but is trickier to get right, doesn’t scale well and can be harder to get right. The recommendation was to redo the same API connected MVP (minimum viable product) in Next.js, with React compontents for the website bits and NextAuth to manage the login details.
A note on security
I have full understanding for the need to run a tight ship and keep the application secure. So at this point I interrogated Claude on possible ways to tighten the flow of data to make sure info couldn’t be intercepted and credentials stolen for later malicious use.
Thankfully, with a simple application like this and a login flow handled by a 3rd party, it seemed to be handled to a good enough degree to survive being out in the world. Of course, keeping the exact URL a secret, managing token rotation of API keys and NextAuth secrets are important.
Further details on NextAuth
The login process is handled by Google, and NextAuth is a way to tell the app that the user is authorised to access the information. In the NextAuth flow and the code, a session token is in use to limit how long that login is valid for. The token lives in their browser cookie. No valid token? No way to access the data. The session is marked as not being valid.
This session cookie can be limited in time, so login is reset after 7 days for example. This token in based on the NextAuth secret which is set in the project’s environment variables in Vercel. That should be updated occasionally.
The layers of the app are thusly:
- GitHub stores the code.
- Vercel acts instead of my computer to run the code. It is online and accessible via a URL. When you visits the address, Vercel acts on the code from GitHub to know what to display or do.
- Google handles the login and the checks of identity. It shows the Google login screen, handles password authentication and let’s the app know that the user is who they say they are. No passwords are exchanged.
- NextAuth handles the conversation between the Vercel-hosted application and Google login.
- HubSpot is the data we interact with and pull through into the interface.
5. Add functionality for login through Google Workspace
For this project I had to:
- Get access to Google Cloud Plaform for this particular Google Workspace set up by the organisation
- Creating a new project for the deal logger
- In the navigation meny, find my way to API & Services and then Credentials
- Pick Create credentials and set up a OAuth Client ID
- The settings for this app were:
- Aplication type: Web application
- Authorized JavaScript origins:
http://localhost:3000(for local testing before moving online, though this can differ when you are developing locally on your computer) - Authorized redirect URIs: URI1:
http://localhost:3000/api/auth/callback/google - Authorized redirect URIs:
https://<your-vercel-domain>/api/auth/callback/google/api/auth/callback/google
- A pop-up window will now give you Client ID and Client Secret values. Copy these.
- Add the values as Environment variables in Vercel that the code reference to use for the login method.
At one point in the setup process I could also pick if the credentials were limited to users within the organization or open for all. For this use case, I limited it to restricted to users within your organization.
Now, when I run vercel env run -- vercel dev and go to the index page, I’m prompted to log in via Google.
It will then run the login process through Google, and finally (when successful) serve the logged in page version complete with data that my speciic user can access.
Testing scenarios
We need to try to break things to find use cases and plug some holes before they appear. I therefore:
- Had this connected to a sandbox
- Logged in via my regular super admin user to confirm access
- Logged in via a shared account on the Workspace with no account access to verify the look/experience of error message that no matching HubSpot user could be found, and where to direct questions
- Logged in via my personal Google-account that is not connected to the Google Workspace account to verify not getting any access at all
6. Move from local hosting to Vercel
Move from local and sandbox to live production
Next on the list is to move from local deployment to serving the project on Vercel, and connect it to the correct portal.
For this I needed to:
- Create a new OAuth Credential with settings for the Vercel domain instead of localhost
- Replace environment credentials in Vercel with these updated IDs (alternatively set up a fresh project so you keep the local setup for testing)
- Connect my project folder to a GithHub repo (private). As I was saving versions along the way, I copied the files to a fresh folder and initiated and pushed from there
Moving from local development to the Vercel environemnt didn’t go off without a hitch. There were somes issues with the first couple of builds where Claude Code had to help debug and find the issues in program files and various settings in Vercel I had to update.
Voilá - live app
Finally, I had a live, working version accessible to others. Code in GitHub, login via Google and data to/from HubSpot.
Final cleanup before releasing internally is to replace the environment labels with service key and portal-specifics for the live account.
Project learnings
So, what have I learned?
Debugging with Claude or AI
As a non-programmer (I’d love to hold the title someday, but lack enough coding experience and understanding at this point!) at time I need to heavily use LLM support to debug and figure out blockers and how to move past them. Some tricks I’ve picked up from earlier projects that have been useful here, alongside some new ones are:
- In the planning phase and as early as visual mockup, add in error handling. Don’t assume the build will be perfect once live. Make sure it doesn’t fail silently, and that end users can see a meaningful message to feedback to you once it inevitably runs into an issue. These can also be used during build phase to identiy issues.
- Consider instructing the LLM to add information to the console log as you are building. This should print errors or insights in the terminal to help hone in on solutions.
- Team up with multiple LLMs or chats to accomplish different things. At a minimum I’m running Claude Code for creating and editing files alongside a Claude chat (lightweight model unless specific question) to share screenshots or errors to help debug outputs and refine promps for the Claude Code chat. On occasion I’ll also open Gemini or ChatGPT to vet code snippets or other architectural suggestions.
- Taking pauses? Get progress summary printed to a project file (markdown format) with project context to bring the LLM (and yourself) up to speed when you restart later. It can be immensely helpful to remember specific errors you’ve already solved to avoid going around in circles. Especially if you accidentally close a terminal or restart your computer which will usually loose a lot of context.
- Get it explained!. No, I don’t have a 100% understanding of all the code lines in all the project files. But I did push to under what files exist and why, their dependencies on each other and pushing back to check if things can be built in another way. During planning phase and for certain sections I often had Claude explain in broad strokes what sections do and why things are structured that way. A few times I caught areas of improvement my pick of model/instructions didn’t sort naturally.
- Avoid hard coding and use environment variables where possible. I’ve had to flit between different portals and settings, and updating references to test users, portals or stages is prone to cause errors if you have to do it in multiple places.
- Don’t assume each phase will move smoothly to the next one. Shifting the environment means you’ll encounter or catch new errors.

Proper planning saves time!
The more diligently you outline the project early on and decide on what the core functionality will be, the easier the build is later on. I still ran into instances where I wanted to add on functionality once I got the API up and running, but it helped that I had laid out what data needed to go where so I could add smaller tweaks rather than try to introduce something completely new.
- Be clear on what objects are in play: eg. here I limited to deals, companies and user data. Think through what needs to happen and the flow of information to make that is clear from the outline.
- List what properties need to be fetched, filled or interacted with. Provide the LLM with input on what the internal naming is in HubSpot, what type it is and other details (eg. if a dropdown function, what values are possible). It should help it pair things in the UI with actual data.
- Make a running log/note of things added for testing purposes that need to be removed later, for example hard-coded emails to access during early phases before login functionality is in place need to be cleaned up and removed later.
Sandbox or separate test environment
Move fast and break things. Plan metiocously and still destroy stuff you didn’t intend to. While I didn’t experience anything quite this dramatic, it really pays off to set up a sandbox or separate development environment for testing.
This is also where environment variables come in handy! You can easily switch out which portal your’re connected to and what pipeline stages are affected.
Creating properties that mirror the exact name and setup as the production portal (the “live”, actual one where this will later be connected) is essential to not have to iron out bugs later because internal names don’t match and referencing is broken.
Test ALL functions
As I was iterating the functionality and design it became apparent that it is vital to keep on testing functions. Not just that data fetches and looks correct, but that the code actually executes in a way that you expect. A few examples:
- Once I connected the API, I added the functionality that a deal that is marked as closed won needs to be moved through all preceeding pipeline stages for reporting purposes. So I fired off a few tests where I had test deals in each stage, marked as won through my interface and checked the property history of the pipeline stage to confirm it did as intended.
- Unintentionally, as I was battling getting Vercel working for me, I got to test the error messages for non-connection to the API etc.
- Between sessions some context was lost, and moving between mockup to Next.js version some earlier changes were left out. By testing again I found them easily and had them corrected before proceeding further.
UX is important
As a UX Designer I can’t stress this enough. UX is important and needs to be taken into account from the start.
A core reason to work on this project at all was to help with user adoption of HubSpot, and needed to weigh getting enough information into the portal to make it worthwhile against making it simple enough for someone to use with no prior instructions or recollection of what to do. This meant that though I, as an admin of the portal, desperately wanted deal details like project start and end dates or deal source, I settled on getting what I needed. Deals with associated companies, current status, and their sums.
A flaw in this project from a UX perspective what that I built and launched first, and am not looking for feedback until after the introducton of it to make further iterative improvements. In a usual project this should have started with research as to current usage patterns and tests of the mockups before proceeding to far ahead with the build. Due to the nature of the project (not requested internally but rather me using it as a project to learn more about building with AI) it’s the wrong way around, but find it ok under the circumstances. Had it been in the service for a paying client or come in a explicit internal request, UX research comes first.
Project reflections
This was a great project to work on! It was rooted in a real business need, I’ve had a chance to explore development with AI and work with data that bridges familiar territory (HubSpot). I think it was an alright scope to dedicate a few learning hours to without over-committing to anything.
Had this been done in service for a client or formally requested, I’d have done at least one round of observations and user feedback during v2 of the mockup and UAT (user acceptance testing) after getting the login set up. As circumstances stood with holiday period and lack of direct access to the end users, I think I fared alright. And now I have a better undestanding for the plan-mockup-test-build iterative process.